Snowmobile Yamaha FX10X, FX10RTX, FX10RTRX, FX10RTRAX, FX10MTX, FX10MTRX, FX10MTRAX. Manual - part 76


  Index      Snowmobiles / ATV     Snowmobile Yamaha FX10X, FX10RTX, FX10RTRX, FX10RTRAX, FX10MTX, FX10MTRX, FX10MTRAX - service manual 2008 year


Search            


Content   ..  74  75  76  77   ..


Snowmobile Yamaha FX10X, FX10RTX, FX10RTRX, FX10RTRAX, FX10MTX, FX10MTRX, FX10MTRAX. Manual - part 76


7-34

FI

THROTTLE BODY

INSPECTION AND ADJUSTMENT
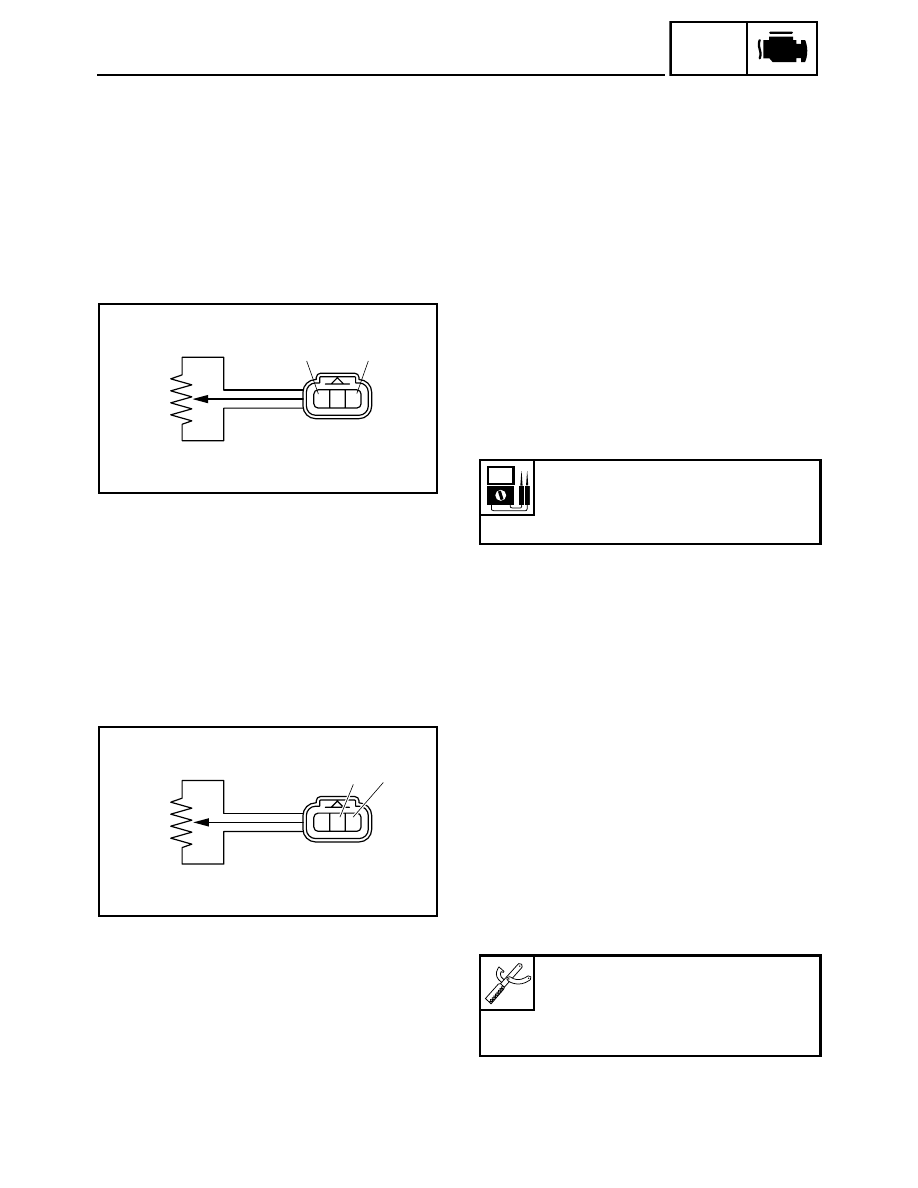
1. Inspect:

• Throttle position sensor

Inspect steps:

• Disconnect the throttle position sensor coupler.
• Remove the throttle position sensor from the

throttle body.

• Connect the pocket tester (

Ω × 1k) to the throt-

tle position sensor.

• Measure the maximum throttle position sensor

resistance.
Out of specification 

→ Replace the throttle posi-

tion sensor.

Positive tester probe 

 Blue terminal 1 

Negative tester probe 


Black/Blue terminal 2

Maximum throttle position sensor 
resistance:

2.64 ~ 6.16 k

 at 20 °C (68 °F)

(Blue – Black/Blue)

L

B/L

Y

1

2

2. Adjust:

• Throttle position sensor angle

Adjustment steps:

• Connect the fuel injection system sub-wire har-

ness coupler to the wire harness.

• Connect the digital circuit tester to the throttle

position sensor.

Positive tester probe 

 Yellow terminal 1 

Negative tester probe 

 Black/Blue terminal 2 

Digital circuit tester:

90890-03174

Model 88 Multimeter with tachome-
ter:

YU-A1927

L

B/L

Y

1

2

7-35

FI

THROTTLE BODY

• Measure the throttle position sensor voltage.
• Adjust the throttle position sensor angle so the

measured voltage is within the specified range.

• After adjusting the throttle position sensor

angle, tighten the throttle position sensor
screws.

Throttle position sensor voltage:

0.63 ~ 0.73 V
(Yellow – Black/Blue)

7-36

FI

8-1

+

ELEC

ELECTRICAL

SWITCH INSPECTION

SWITCH INSPECTION

Use a pocket tester to check the terminals for conti-
nuity. If the continuity is faulty at any point, replace
the switch.

NOTE:

• Set the pocket tester to “0” before starting a test. 
• When testing the switch for continuity the pocket

tester should be set to the “

Ω × 1” range.

• When checking the switch turn it on and off a few

times.

Pocket tester:

90890-03112

Analog pocket tester:

YU-03112-C

INSPECTING A SWITCH SHOWN IN THE 
MANUAL

The terminal connections for switches (main switch,
handlebar switch, engine stop switch, light switch,
etc.) are shown in a chart similar to the one on the
left. This chart shows the switch positions 

a in the

column and the switch lead colors 

b in the top row.

For each switch position, “

” indicates the

terminals with continuity.

The example chart shows that:
There is continuity between the brown and red
leads when the switch is set to “ON”.
There is continuity between the brown and red and
between the brown/white and red/white leads when
the switch is set to “START”.

OFF

ON

START

Br R Br/W R/W

b

a

R/W

Br/W

Br

R

SWITCH INSPECTION

8


Content   ..  74  75  76  77   ..