Snowmobile Polaris Turbo IQ LXT (2014 year). Manual - part 29


  Index      Snowmobiles / ATV     Snowmobile Polaris Turbo IQ LXT - service manual 2014 year


Search            


Content   ..  27  28  29  30   ..


Snowmobile Polaris Turbo IQ LXT (2014 year). Manual - part 29


119

MAINTENANCE

Brakes

Hydraulic Brake Inspection

Inspect the brake lever reserve before each use of the snowmobile. See 
page 69.

Brake pads must be replaced when the brake pad material becomes thin-
ner than the backing plate, approximately 1/16” (1.5 mm). A kit is avail-
able for replacing brake pads. See your dealer.

WARNING! Brake failure during operation can result in serious injury or death. 
Properly functioning brakes are vital to your safety. Be sure the brake pads do 
not drag on the disc and that brake lever travel is not excessive. Always replace 
brake pads when the brake pad material becomes thinner than the backing 
plate, approximately 1/16” (1.5mm).
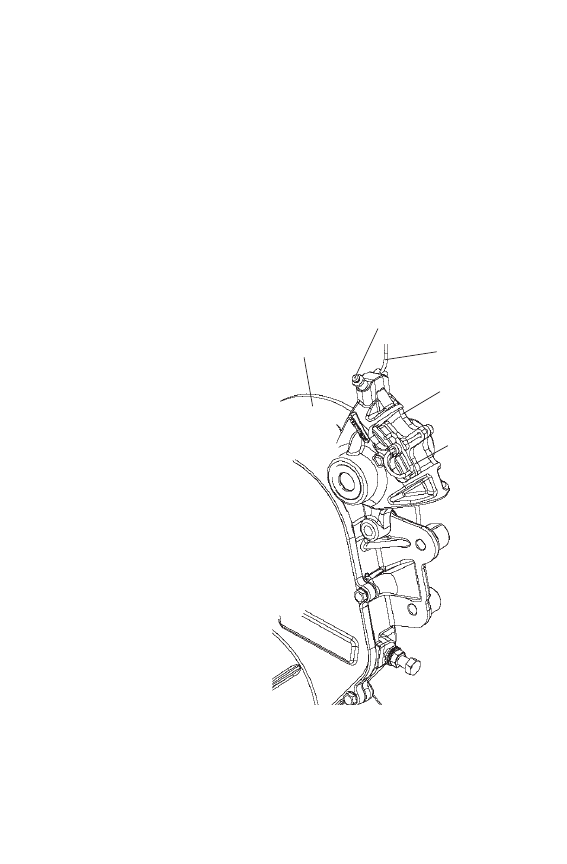
Brake Components

• Brake  Disc

• Bleed Screw

• Brake Line

• Brake Caliper

• Brake Pad Material - 

Replace when thickness is 
less than 1/16” (1.5 mm).

Excessive Lever Travel

Hydraulic brakes are self-
adjusting, but if excessive 
brake pad clearance develops 
bring the snowmobile to an 
authorized POLARIS dealer for 
inspection and adjustment.

Brake Disc

Bleed Screw

Brake Pad 

Material

Brake Line

Brake 

Caliper

120

MAINTENANCE

Brakes

Brake Fluid

After opening a bottle of brake fluid, always discard any unused portion. Never 
store or use a partial bottle. Brake fluid is hygroscopic, meaning it rapidly 
absorbs moisture from the air. The moisture causes the boiling temperature of 
the brake fluid to drop, which can lead to early brake fade and the possibility of 
accident or serious injury.

Keep the master cylinder cover free of dirt and debris. The vent slits allow for 
diaphragm movement, and if they become plugged, movement of brake fluid 
below the diaphragm may be restricted, altering brake function.

NOTICE: Brake fluid will damage decals, paint and some plastics. Always wipe 

up spills immediately.

Replace brake fluid at least every two 
years with POLARIS DOT 4 high 
temperature brake fluid. See page 141 
for the part numbers of POLARIS 
products.

The brake fluid level can be seen 
through the fluid level indicator (a 
plastic sight glass) in the master cyl-
inder reservoir. If the fluid is suffi-
cient, the sight glass will be black. If 
the sight glass is any color other than 
black, add brake fluid.

WARNING

Sight Glass

121

MAINTENANCE

Brakes

Bleeding the Hydraulic Brake System

Air in the hydraulic brake system will cause spongy brake lever action. 
Bleed the system before operating the snowmobile.

WARNING! Operating the vehicle with a spongy brake lever can result in loss of 
brakes, which could cause an accident and lead to serious injury or death. 
Never operate the vehicle with a spongy-feeling brake lever.

During the bleeding procedure, keep the brake handle as level as possi-
ble. The reservoir must be in this position to minimize the possibility of 
air entering the system through the reservoir vent.

1. Remove brake master cylinder reservoir cover and gasket.

2. Fill the master cylinder reservoir to between the MIN and MAX 

marks or 1/4”-5/16” (.6-.8 cm) below the lip of the reservoir open-
ing. Reinstall the gasket and cover.

3. Slip a rubber tube over the ball of the bleeder valve and direct the 

flow of fluid into an approved container.

4. Squeeze the brake lever a full stroke. Then unscrew the bleeder 

valve 3/4 of a turn to release air.

5. Close the bleeder valve and release the brake lever.

6. Repeat steps 4 and 5 until fluid flows from the bleeder valve in a 

solid stream free of air bubbles.

WARNING! Overfilling the master cylinder leaves no room for fluid expansion 
and may cause the brakes to lock, resulting in serious injury or death. Always 
add brake fluid to the fill line as recommended.

7. After bleeding is complete, refill the reservoir to the proper level. 

See page 120. 

8. Reinstall the gasket and cover.

122

MAINTENANCE

Lights

Removing Halogen Bulbs

Tip: Do not touch a halogen bulb with bare fingers. Oil from skin leaves a resi-

due, causing a hot spot that will shorten the life of the lamp. If fingers do 
touch the bulb, clean it with an alcohol-moistened towel.

1. Remove the plenum cov-

ering from the headlight 
assembly.

2. Lift the rubber boot to 

expose the bulb.

3. Push down on the spring 

to release it from the 
housing.

4. With the wire harness 

attached to the bulb, 
withdraw the bulb from 
the housing.

5. Grasp the bulb by its metal base and carefully separate the bulb 

from the harness.

Installing Halogen Bulbs

1. Hold the bulb by its metal base and install it into the wire harness.

2. Insert the bulb into the housing.

3. Connect the spring to the housing.

4. Carefully flip the spring back into the housing, placing it around the 

wire harness.

5. Reinstall the plenum covering on the headlight assembly.

6. Adjust headlight aim. See page 31.

Replacing Taillight Bulbs

1. Remove the screws securing the taillight lens.

2. Push the bulb in and twist counterclockwise and replace the bulb.

3. Replace the taillight lens.

Spring

Harness

Bulb


Content   ..  27  28  29  30   ..