TRAKTOR PRO 2.9. Manual Englisch (2015) - part 5
 

  Index      Tractors     TRAKTOR PRO 2.9. Manual Englisch (2015)


Search            copyright infringement  


Content   ..  3  4  5  6   ..


TRAKTOR PRO 2.9. Manual Englisch (2015) - part 5


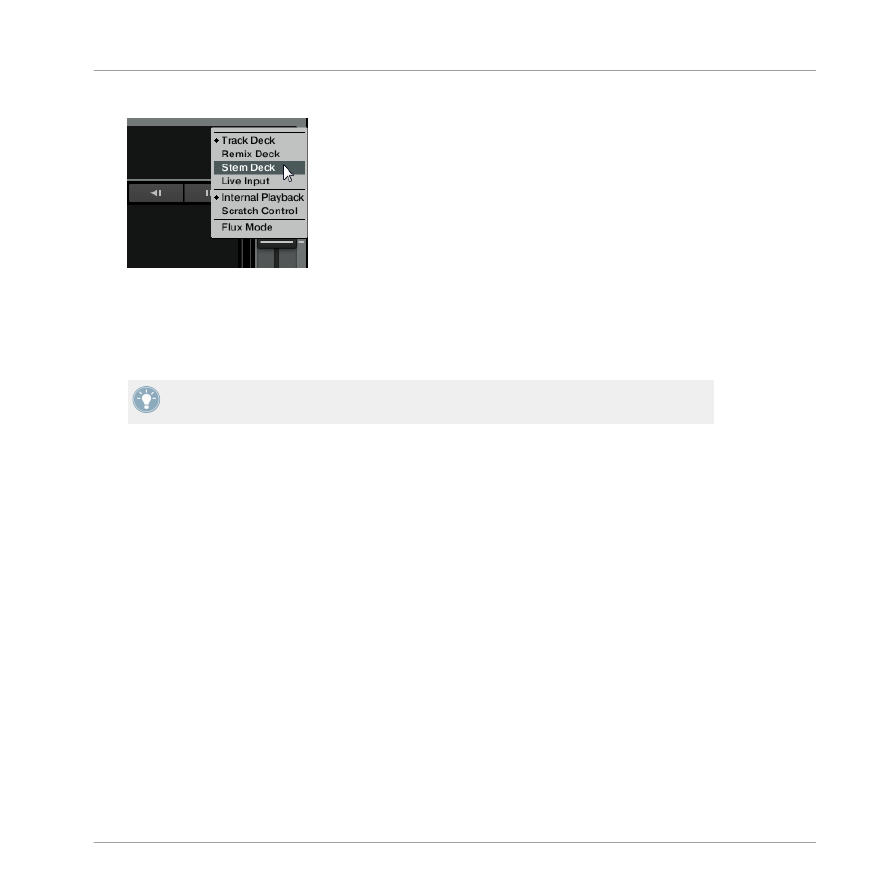
2.

Select the desired Deck Flavor from the menu.


As a TRAKTOR SCRATCH PRO 2 user, you can also choose the Playback mode (

Internal

Playback

  or 

Scratch  Control

),  and,  if  you  own  a  TRAKTOR  AUDIO  6  or  TRAKTOR  AU-

DIO 10 audio interface, a hardware Direct Thru mode for a complete audio bypass via this
drop-down menu. (For more information on this, please refer to the Setup Guide of your
audio interface.)

For more information on Deck preferences, please read 

14.9, Decks Layout

 and 

14.10,

Track Decks

.

Automatic Deck Flavor Switching

TRAKTOR features full Automatic Deck Flavor Switching. Loading or dragging a Track or Remix
Set onto a Deck will cause the Deck to automatically switch to the appropriate flavor to play
the content.

7.1.1

Track Deck and Stem Deck


In the TRAKTOR software the Track Deck and Stem Deck look identical. The following section
provides you with an overview.

The Decks

Deck Flavor Descriptions


TRAKTOR - Manual - 81

Track Deck overview

(1Deck Cover Artwork: Displays artwork related to the loaded track on a Track Deck or a Stem
File on a Stem Deck.
(2Deck Heading: The Deck Heading displays information about the loaded track or Stem File
such as the artist name and title, tempo. It also has some unique drag and drop features that
are explained in detail in 6.3.
(3Phase Meter: Visualizes the offset of the beats playing in the Deck to the beats playing in
the Master Deck, or the Master Clock tick.
(4Deck Focus: Holds a menu for selecting the Deck Flavor and the playback method for the
Deck. Click the Deck letter and use the drop-down menu to change the Deck Flavor and play-
back method. The Deck letter is highlighted orange for the Deck currently in focus. (If no Deck
letter is highlighted, the function is propably disabled in the Preferences. You can activate fo-
cus highlighting from the Preferences window via Global Settings > Deck Focus > Software.)
(5Bend: Temporarily slows down or speeds up the Deck.
(6Tempo Fader: Decreases or increases the tempo of the track playing by moving the slider up
or down.
(7Key: Activates or deactivates the Keylock feature.

The Decks

Deck Flavor Descriptions


TRAKTOR - Manual - 82

(8SYNC button: Synchronizes the current track to the tempo master. MASTER button: Defines
the Deck as tempo master for syncing.
(9Waveform Display: Visually represents a localized view of the loaded track. The brighter col-
or shade represents higher frequencies, while the darker color shade represents lower frequen-

cies.
(10Stripe: The Stripe displays the whole waveform of the loaded track including Cue Points

and Loops.
(11Transport: Includes the Play/Pause, 

CUE

 (Cue/Play) and 

CUP

 (Cue/Pause) buttons.

(12)  Advanced  Panels:  Contains  advanced  control  options  for 

MOVE

  (Loop  move  and  beat

jump), 

CUE 

(Cue Point and Loop Management) and 

GRID

 (Beatgrid) panels.

(13Hotcues: Provides direct access to 8 user-definable Cue/Loop In Points per track.
(14Flux button: Indicates if the Deck's Flux mode is activated by highlighting the button or-
ange.
(15Loop Controls: Set Auto Loops and control their size.

For a tutorial on using Track Decks, please refer to 

16.3, Playing Your First Track

.

The Decks

Deck Flavor Descriptions


TRAKTOR - Manual - 83

7.1.2

Remix Deck


A Remix Deck.

(1Deck Heading: The Deck Heading displays information about the currently loaded Remix Set
such as the title and the tempo. On the left hand side, it also displays artwork for the Set if
artwork is available. On the right hand side, there are two interactive elements: the Quantize
Value (3) and the Deck Tempo display. Click and drag the Deck Tempo display to change the
tempo of the Deck.
To save a Remix Deck's content as a Remix Set, double-click the Deck Heading, type in a new
name for the Deck, and then drag-and-drop the name to your Track Collection; the Deck con-
tent will be saved as a Remix Set, and appears as an entry in your Track Collection. To load a
Remix Set, simply drag-and-drop its entry from the Collection onto a Remix Deck's Heading.
The file format for importing/exporting Remix Sets is a Traktor Pak (.trak). See 

16.8, Using

the Remix Decks in Your Mix

 for a tutorial on importing/exporting Remix Sets.

The Decks

Deck Flavor Descriptions


TRAKTOR - Manual - 84

(2Phase Meter: Visualizes the offset of the Remix Deck's internal beat count to the beat count
playing in the Master Deck, or the Master Clock tick. See 

7.7.2, Phase Meter

 for more infor-

mation on the Phase Meter.
(3Quantize Value: When Quantize is activated, a triggered Sample will become active at a cer-

tain point of the Remix Deck's internal timeline; e.g., setting the Quantize Value to "1" will ac-

tivate the triggered Sample at the next beat of the Remix Deck's internal timeline. Setting it to
"4," a Sample you hit will start playing with the next 4/4 bar of the Remix Deck's internal time-

line. You can see the internal timeline displayed below the Quantize Value display.
Note that the Quantize Value does not represent the amount of beats it will take before a Sam-

ple starts playing, therefore, it is not a "delay" value; the Quantize Value represents a mark in
the Remix Deck's internal timeline (such as a bar line on a sheet of music).
To activate/deactivate the Quantize feature for the Deck, click the dot on the right hand side of
the value. Click the arrow on the left hand side of the value to open the drop-down menu to
select a Quantize Value.
(4Deck Focus: Holds a menu for selecting the Deck Flavor and the playback method for the
Deck. Click the Deck letter and use the drop-down menu to change the Deck Flavor and play-
back method. The Deck letter is highlighted orange for the Deck currently in focus. (If no Deck
letter is highlighted, the function is propably disabled in the Preferences. You can activate fo-
cus highlighting from the Preferences via 

Global Settings

 > 

Deck Focus

 > Software.)

(5Bend: Temporarily slows down or speeds up the Deck.
(6Sample Slot: This is where the main action takes place. A Sample Slot consists of a Slot
Player  on  top  and  16  Sample  Cells  below.  Click  the  Page  Selector  buttons  (10)  to  navigate
through the pages of Sample Cells, the so-called Sample Grid. Load single Samples to a Sam-
ple Cell, capture Loops from the Loop Recorder or the Track Decks to a Cell, or load whole Re-
mix  Sets—the  TRAKTOR  term  for  a  saved  set  of  Samples  in  a  Remix  Deck—to  the  Sample
Grid  (for  a  tutorial  on  using  Remix  Decks,  please  refer  to 

16.8,  Using  the  Remix  Decks  in

Your Mix

). While a Sample is being played, the Slot Player will show the Sample’s waveform

and include a moving red playhead, indicating the current playback position.
For a detailed description of the Sample Slot's features, see the subsection "Inside the Sample
Slot" below.
(7Loop Controls: Set Auto Loops and control their size from here.

The Decks

Deck Flavor Descriptions


TRAKTOR - Manual - 85

(8Advanced Panel: The Advanced Panel gives you access to the parameter settings of the indi-
vidual Sample Cells. Key and gain settings per Sample Cell can be set from here, and also the
Type properties, i.e., Gate vs. Latch mode, Loop vs. One-shot mode, and Synced vs. Unsynced

mode. For further information on these, please see subsection "The Advanced Panel" below.

The Advanced Panel of the Remix Deck is only visible in the Advanced Deck Layout. Dou-

ble-click the Deck's upper border to cycle through the various Deck Layouts.

(9Transport: Includes the Play/Pause, 

CUE

 (Cue/Play) and 

CUP

 (Cue/Pause) buttons.

(10Page Selector buttons: Use the four Page Selector buttons to navigate through the pages of
the Sample Grid.
(11SYNC button: Synchronizes the Deck's internal timeline to the tempo master. MASTER but-
ton
: Defines the Deck as tempo master for syncing. Other Decks will sync to this Deck if acti-
vated.

Inside the Sample Slot

One of the four Sample Slots inside a Remix Deck.

(1Sample Title: Displays the title of the Sample currently loaded in the Slot Player.
(2Slot Player: Displays the waveform of the Sample currently loaded. A moving red playhead
indicates the current playback position within the Sample. Hovering over the Slot Player, you'll
see a Mute button, which mutes/unmutes the Sample currently loaded.
(3)  Filter:  Apply  a  quick  low-pass  or  high-pass  filter  to  the  Sample  Slot  by  moving  the  bar
downwards or upwards, respectively.

The Decks

Deck Flavor Descriptions


TRAKTOR - Manual - 86

(4)  Volume:  Controls  the  Sample  Slot's  volume.  This  control  is  applied  after  the  individual

GAIN

 control of a Sample Cell, which is accessible from the Advanced Panel.

(5Sample Cell: A Sample Cell is the container element for Samples. Drag-and-drop Samples
from your Collection onto a Sample Cell, or capture Samples and Loops from the Loop Record-

er or a Track Deck (see 

16.8, Using the Remix Decks in Your Mix

 for a tutorial on using the

Remix Decks). On the left hand side of the Sample Cell, you can see a symbol (the Play Type

indicator), indicating whether the Sample Cell is set to Loop or One-shot mode. Clicking this
symbol also triggers the Sample. [Shift] + click stops the Sample and resets its play marker to
the Sample start position.
You can change a Sample Cell's settings from the Advanced Panel at the bottom of the Remix
Deck. If at any time the Advanced Panel should not be visible, double-click the upper border
of the Deck until the Advanced Panel becomes visible. See section "The Advanced Panel" be-
low for a description of the Sample Cells' parameters.
(6)  Slot  Parameters:  Each  Sample  Slot  in  the  Remix  Deck  has  a  set  of  parameters.  Hovering
over the Heading of the Sample Slot, the relevant buttons become visible.

The Slot Parameter buttons when hovering over the Slot Player.

• Keylock (note symbol): Separates playback pitch from playback speed. This control needs

to be active in order for the 

PITCH

 knob in the Advanced Panel to affect the Sample Cell.

Otherwise a Sample Cell's pitch will be directly related to the Remix Deck's tempo.

• FX: Routes the Sample Slot through the FX Unit(s) currently assigned to the Remix Deck’s

channel in the Mixer.

• Monitor  (headphones  symbol):  Routes  the  Sample  Slot  to  the  Mixer’s  Monitor  Output

(which can be monitored on headphones).

• Punch mode (arrow symbol): When a Sample, either in One-shot or Loop mode, is triggered

in a Sample Slot, the position of that Sample is fixed to the Remix Deck's internal time-
line. This is most noticeable when using One-shot Samples since you can trigger the Sam-

The Decks

Deck Flavor Descriptions


TRAKTOR - Manual - 87

ple, let it play, then wind the Deck backwards to the original location of the Sample and
play it again. Since only one Sample can be played in a Slot at a time, triggering a new
One-shot Sample will remove the previous Sample from the Deck's internal timeline and

will fix the new Sample to the current location.
This behavior is changed, however, when Punch mode is enabled. With Punch enabled, ev-

ery Sample you trigger will be placed in the same location as the previous Sample in the
Deck's internal timeline. What this means is that you can trigger a One-shot Sample, let it

play, trigger a different One-shot Sample in the Sample Slot, then wind the Deck back-

wards to the location of the first Sample and you will hear the new Sample instead.
Punch mode is also beneficial when using Loops because it allows musical phrasing to be
maintained when switching Loops. Just as with One-shots, triggering a Loop while Punch
mode is enabled will place the Loop back at the location of the previous Loop. Because
Loops repeat themselves infinitely into the future and past of the Deck's internal timeline,
you'll hear the new Sample playing at your current playback location, but the Loop will be
playing in the correct position as if it had been triggered back at the position of the first
Loop.

The Advanced Panel

Each  Sample  Cell  has  a  set  of  individual  parameters,  which  are  accessible  from  the  Remix
Deck's Advanced Panel. If at any time the Advanced Panel of a Remix Deck is not visible, dou-
ble-click the upper border of the Deck until the Advanced Panel becomes visible.

The Advanced Panel at the bottom of a Remix Deck.

(1Move Grid Left: Moves the Samle Cell's Beatgrid to the left.
(2Move Grid Right: Moves the Samle Cell's Beatrgid to the right.

The Decks

Deck Flavor Descriptions


TRAKTOR - Manual - 88

(3Trigger Type: When activated (Latch mode), a Sample will continue to play after you release
the mouse button, either until the end of the Sample is reached (for One-shot Samples) or un-
til it is stopped by some other method (like triggering a new Sample in the same Slot).
The alternative Type is Gate mode, where a Sample will play only while you’re holding down on

the mouse button. Upon releasing the mouse button, the Sample will stop playing.
Note that both modes are also subject to the settings of the Quantize system; e.g., with Quan-

tize active, a Sample in Gate mode must be held until the Quantize interval is reached before
it starts playing. Similarly, after releasing the mouse button, the Sample will continue to play
until the next Quantize interval is reached at which point it will stop.
(4Reverse Playback: Activate reverse playback for the Sample Cell currently being played in
the Slot Player.
(5Play Type: This property determines whether a Sample stops after reaching its end or if it
continuously loops. When set to One-Shot (arrow symbol), a Sample will stop playing when it
gets to its end. When set to Loop (ellipse symbol), the Sample will automatically return to its
start and continue playing indefinitely.
(6)  Sync  Type:  This  property  determines  if  the  Sample  should  be  synchronized  to  the  Remix
Deck’s Tempo or not. When 

SYNC

 is on, the Sample’s BPM will match the Remix Deck’s BPM.

When 

SYNC

 is off, the Sample will play at its original speed.

(7BPM Decrease: This button changes the BPM of a Sample. As a result, the Beatgrid gets
expanded.
(8)  BPM  Increase:  This  button  changes  the  BPM  of  a  Sample.  As  a  result,  the  Beatgrid  gets
compressed.
(9

x2

: Doubles the tempo of the Sample.

(10

/2

: Halves the tempo of the Sample.

(11

GAIN

: Each Cell in the Sample Grid has its own gain value. Click the name of the Sample

you want to edit in order to select it, and adjust the 

GAIN

 knob.

(12

PITCH

: Each Cell in the Sample Grid has its own pitch value. Click the name of the Sam-

ple Cell you want to edit in order to select it, and adjust the 

PITCH

 knob. A Sample’s pitch can

only be altered if Keylock is enabled for the Slot. If Keylock is disabled, the Sample’s pitch
will  be  directly  related  to  the  playback  speed  of  the  Deck  (changing  speed  will  change  the
pitch), and the 

KEY

 control will have no effect.

The Decks

Deck Flavor Descriptions


TRAKTOR - Manual - 89

For a tutorial on using Remix Decks, please refer to 

16.8, Using the Remix Decks in Your

Mix

.

7.1.3

Live Input


A Live Input Deck.

A Deck switched to Live Input enables you to use an external analog source such as a turntable
or  microphone.  You  can  then  apply  TRAKTOR's  FX  to  the  signal  coming  from  the  external
source.

7.2

Loading Tracks, Stem Files, and Remix Sets


To load a track, Stem File, or Remix Set into a Deck, use one of the following methods:

Drag and Drop

Use the mouse to drag-and-drop a track, Stem File, or Remix Set from the Browser List
into the desired Deck.

The Decks

Deck Flavor Descriptions


TRAKTOR - Manual - 90

Right-click

Use the mouse to right-/[Ctrl]-click on the selected track, Stem File, or Remix Set, and

choose Load into Track Deck A/B/C/D, Load into Stem Deck A/B/C/D , or Load into Remix
Deck A/B/C/D from the menu.

Default Keyboard

Select a track, Stem File, or Remix Set from the Browser List with the up/down arrow
keys. Then use the [Ctrl] + [Arrow Left] to load a track, Stem File, or Remix Set into
Deck A or [Ctrl] + [Arrow Right] to load a track into Deck B.

MIDI Command

Use MIDI commands to load tracks, Stem Files or Remix Sets into the Decks. These must
first be mapped to your keyboard or MIDI controller. See 

12.2, MIDI Hotkeys

 for more

details on how to do this.

7.3

The Deck Heading


The Deck Heading displays information about the loaded track / Remix Set, and can be used to
alter the Deck Flavor, Playback Mode, and Deck Layout, and you may also drag-and-drop audio
from one Deck heading to another Deck.

The Heading of Track Deck B.

The Decks

The Deck Heading


TRAKTOR - Manual - 91

7.3.1

Deck Focus


Each Deck is named with a letter A, B, C and D. TRAKTOR highlights the letter of the Deck

that is currently selected and, therefore, in focus.

7.3.2

Deck Flavor


Click the Deck letter to change the Deck Flavor (Track Deck, Stem Deck, Remix Deck, Live In-
put). Alternatively, you may use Preferences > Decks Layout > Deck Flavor.

7.3.3

Playback Mode


Click the Deck letter to reveal the Playback Mode drop-down menu. This will allow you to
change to: Internal Playback or Scratch Control. In Internal Playback mode the Track
Deck displays the 

Play

CUE

 and 

CUP

 buttons on the Transport section of the Deck. In

Scratch Control mode, the 

CUE

 and 

CUP

 buttons are changed to Relative Mode and Ab-

solute Mode time tracking icons for use with Scratch Control. When in Scratch Control
mode, TRAKTOR will use a timecode signal to control the Decks.

For more information on Scratch Control please read 

13, Setting Up TRAKTOR SCRATCH

.

Specific information on Playback Tracking Modes (Absolute, Relative and Internal) can be
found in 

13.6, Tracking Modes

.

You can find more options regarding Scratch Control in Preferences > Timecode Setup.

7.3.4

Flux Mode


Flux mode lets you jump to cue points and loops without loosing the phrasing of your tracks. It
is a timeline-based transport technique that lets you interact with TRAKTOR's transport con-
trols  and  then  immediately  jump  back  to  the  position  of  the  timeline  where  the  track  would
have been if the transport action had not been used in the first place. In other words, it is as if
a second, virtual playhead continues forward in your song while TRAKTOR loops or jumps to a
cue  point.  When  you  release  the  loop  (or  cue  point)—by  releasing  the  relevant  Cue/Sample
Trigger button (1 - 4)—playback resumes at this playhead position. The longer you loop, the

The Decks

The Deck Heading


TRAKTOR - Manual - 92

farther  ahead  the  playhead  position  will  move  and  therefore  the  farther  ahead  playback  will
jump to when you release the Cue/Sample trigger button. The virtual Flux mode timeline is rep-
resented  by  a  green  playhead  in  the  waveform  view.  Additionally,  a 

Flux  Mode

  indicator  will

flash in the Deck Header.

While playing the track from a stored cue point, the virtual timeline is indicated with the extra green playhead, and the Flux
Mode indicator flashes in the Deck Header.

To activate Flux mode:

Click the Deck letter and select the Flux Mode entry from the bottom of that list.

7.3.5

Deck Layout


When using Full or Advanced Decks, you will see information regarding the loaded track / Stem
File / Remix Set, the Phase Meter, Tempo and Cover Art in the Deck's Header. You can cus-
tomize information displayed in the Deck Heading using Preferences > Decks > Deck Heading.

The Decks

The Deck Heading


TRAKTOR - Manual - 93

You  can  double-click  Deck's  upper  border  to  change  the  Deck  Layout.  Each  double-click
will cycle through the different Deck Layouts: MicroSmallEssentialFull or Advanced.

The Deck Heading info is not available in ME 2.

7.3.6

TRAKTOR Informer: Deck Header Warning Messages


TRAKTOR informs you of important deck related warning messages directly through the Deck
Headers. Warning messages will flash in the Deck Header drawing your attention to them. They
come in two forms, regular warnings (shown in orange), and critical warnings (shown in red).
These messages will not only display TRAKTOR's immediate warning, but also a suggested ac-
tion. See the below examples:

• Regular Warning Messages: 

Deck Locked

>

Stop deck to load new track

• Critical Warning Messages: 

Right channel missing

>

Check cable connections

In the scenario where TRAKTOR might need to draw your attention to two such warning mes-
sages simultaneously, the most important (critical) message will be prioritized to flash in the
Deck  Header.  For  more  information  on  disabling  these  warning  messages,  refer  to

14.13,

Global Settings

.

7.3.7

Deck Audio Drag and Drop


• If a track / Remix Set is currently loaded into a Deck, you can copy it to another Deck via

drag-and-drop from one Deck Heading to another. This action can be performed while a
track / Remix Set is playing.

The Decks

The Deck Heading


TRAKTOR - Manual - 94

• You can also drag and drop a track from a Track Deck into the Sample Slot of a Remix

Deck:

If the current playback position is within an active Loop, the Sample is a copy of the
Loop  and  the  playback  position  in  the  Sample  Slot  mirrors  the  playback  position  in

the Loop.

If the current playback position is outside any active Loop, the Sample starts at the

current  playback  position  and  its  size  is  defined  by  the  selected  loop  size  (as  dis-

played by the Loop Size Display).

When importing a Sample from the loaded track, as soon as the Sample is played live three
times in the main mix, the Sample is automatically saved to the Collection for later use!
Samples can be accessed for reuse via the ‘All Samples’ folder in the Browser.

Dragging audio to Sample Slots can help you to quickly build a complex mix on the fly. Add
effects such as Filter LFO and Gater to these short Samples, and they become interesting
tempo locked sweeping synth effects over your mixes. Remember to activate Snap (

S

) and

Quantize (

Q

) in the Master panel for a tempo locked mix!

For a tutorial on using the Remix Decks, refer to 

16.8, Using the Remix Decks in Your Mix

.

7.4

The Waveform Display and the Stripe View


Track Deck—Waveform Display and Stripe View.

The Decks

The Waveform Display and the Stripe View


TRAKTOR - Manual - 95

The Waveform Display (1) and the Stripe View (2) are visual representations of a loaded track.
The Waveform is instantly visible, however the Stripe is only displayed once the track has been
analyzed. Once a track has been analyzed, the Stripe will be displayed instantly upon loading.

Read more about the analyzing tracks in 

6.10.2, Analysis

.

(1Waveform Display: The Waveform Display gives a detailed overview of the loaded track and

its transient information.

• The Waveform Display is only visible in EssentialFull, and Advanced Deck Layout modes.

It is not available when using Micro or Small Deck Layout modes. To change the Deck Lay-
out, double-click the Deck Heading or go to Preferences > Decks Layout > Deck Layout.

• The Waveform Display has color-coded transients; Lighter colors represent high frequency

content while darker colors represent low frequency content.

• You can zoom in and out on a waveform by clicking the 

+

 and 

-

 buttons. Click the 

=

 sym-

bol to reset the zoom view.

• The Waveform Display provides a visual reference for BeatJumps, Cue Points, Loops and

Beatmarkers. Zoom in the Waveform Display to precisely place markers.

• The Waveform Display and Stripe View share the same Color Mode (color scheme). There

are  four  Color  Modes  available:  Ultraviolet,  Infrared,  X-Ray  and  Spectrum.  Select  a  Color
Mode in Preferences > Decks > Miscellaneous > Color Mode.

• The  behavior  of  dragging  the  waveform  with  the  mouse  depends  on  the  Mouse  Control

mode. There are two Mouse Control modes available: Vinyl and Snap. These can be chosen
in  Preferences  >  Transport  >  Mouse  Control.  Read  more  about  these  Transport  Mouse
modes  in 

14.8,  Transport

.  For  a  general  overview  of  Mouse  modes  please  read 

11,

Mouse Control for Faders and Knobs

.

(2Stripe View: The Stripe View gives an overview of the whole track. It also displays the cur-
rent playback position as well as all of the Cue Points and Loops.

• Strip View is visible in all Deck Layout modes.
• The  Stripe  View  provides  a  visual  overview  of  BeatJumps,  Cue  Points,  Loops  and  Beat-

markers.

• The Stripe View flashes red when the configured Track End Warning Time is reached. You

may change the warning time in Preferences > Decks > Miscellaneous.

The Decks

The Waveform Display and the Stripe View


TRAKTOR - Manual - 96


Content   ..  3  4  5  6   ..