Yamaha YFM45FAR, YFM450FAR. Service Manual - part 10
 

  Index      Manuals     Yamaha YFM45FAR, YFM450FAR. Service Manual


Search            copyright infringement  


Content      ..     8      9      10      11     ..


Yamaha YFM45FAR, YFM450FAR. Service Manual - part 10


4 - 18

ENG

CAMSHAFT, ROCKER ARMS AND VALVES

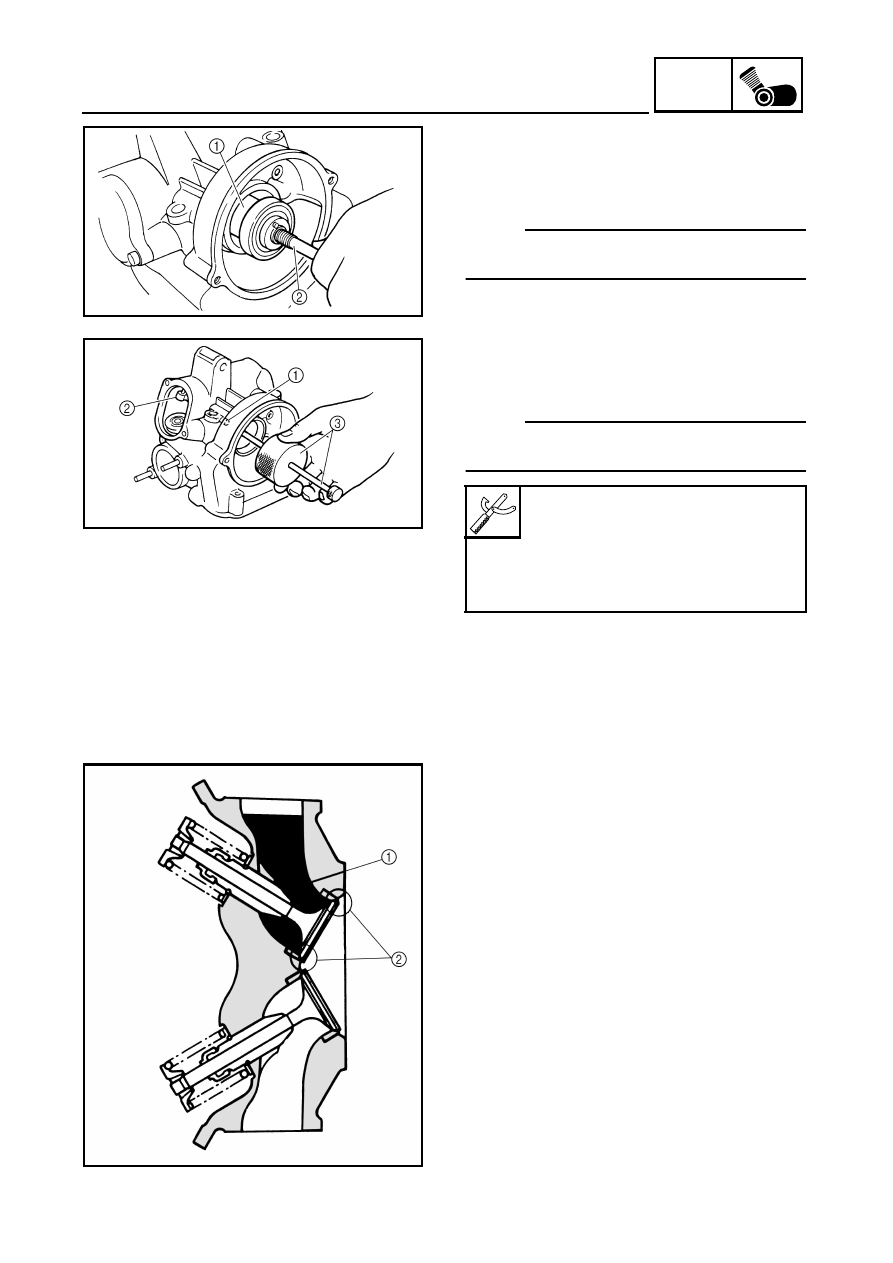
REMOVING THE CAMSHAFT AND ROCKER 
ARM

1.Remove:

Camshaft 

1


NOTE:

Screw in a M10 bolt 

2

 into the thread hole on

the camshaft, and pull out the camshaft.

2.Remove:

Rocker arm shafts (intake and exhaust) 

1


Rocker arms 

2


NOTE:

Use a slide hammer 

3

 to remove the rocker

arm shafts.

Slide hammer set:

P/N. YU-01083-A

Slide hammer bolt (M6):

P/N. 90890-01083

Weight:

P/N. 90890-01084

REMOVING THE VALVE AND VALVE 
SPRING

1.Check:

Valve sealing
Leakage at the valve seat 

→ 

Check the valve

face, valve seat and valve seat width.
Refer to “CHECKING THE VALVE AND
VALVE SPRING”.

*****************************************************

Checking steps:

Pour a clean solvent 

1

 into the intake and

exhaust ports.

Check that the valve seals properly.
There should be no leakage at the valve seat

2

.

*****************************************************

4 - 19

ENG

CAMSHAFT, ROCKER ARMS AND VALVES

2.Remove:

Valve cotters

NOTE:

Attach a valve spring compressor 

1

 between

the valve spring retainer and the cylinder head
to remove the valve cotters.

CHECKING THE CAMSHAFT 

1.Check:

Cam lobes
Pitting/scratches/blue discoloration 


Replace.

2.Measure:

Cam lobes length 

a

 and 

b

.

Out of specification 

 Replace.

Valve spring compressor:

P/N. YM-04019, 90890-04019

Camshaft lobe limit:

Intake:

a

 40.52 mm (1.595 in)

b

 32.08 mm (1.263 in)

Exhaust:

a

 40.52 mm (1.595 in)

b

 32.08 mm (1.263 in)

CHECKING THE ROCKER ARM AND 
CAMSHAFT

1.Check:

Camshaft lobe contact surface 

1


Valve adjusters 

2


Blue discoloration/pitting/scratches 


Replace.

4 - 20

ENG

CAMSHAFT, ROCKER ARMS AND VALVES

2.Check:

Rocker arms

Rocker arm shafts
Damage/wear 

 Replace.

*****************************************************

Checking steps:

Check the two contact areas on the rocker
arms for signs of abnormal wear.

1) Rocker arm shaft hole
2) Camshaft lobe contact surface

Excessive wear 

 Replace.

Check the surface of the rocker arm shafts.
Blue discoloration/pitting/scratches 


Replace/check lubrication.

Measure the inside diameter 

a

 of the rocker

arm holes.
Out of specification 

 Replace.

Measure the outside diameter 

b

 of the

rocker arm shafts.
Out of specification 

 Replace.

Calculate the clearance by subtracting the
rocker arm shaft outside diameter from the
rocker arm inside diameter.
Clearance greater than 0.08 mm (0.003 in)

 Replace the defective part(s).

*****************************************************

Rocker arm inside diameter:

12.000 ~ 12.018 mm 
(0.4724 ~ 0.4731 in)

Rocker arm outside diameter:

11.981 ~ 11.991 mm
(0.4717 ~ 0.4721 in)

Rocker arm to shaft standard 
clearance:

0.009 ~ 0.037 mm
(0.0004 ~ 0.0015 in)

4 - 21

ENG

CAMSHAFT, ROCKER ARMS AND VALVES

CHECKING THE VALVE AND VALVE 
SPRING 

1.Measure:

Stem-to-guide clearance

Out of specification 

 Replace the valve

guide.

Stem-to-guide clearance =

valve guide inside diameter 

a

 –

valve stem diameter 

b


Clearance (stem to guide):

Intake:

0.010 ~ 0.037 mm
(0.0004 ~ 0.0015 in)
<Limit>: 0.080 mm (0.0031 in)

Exhaust:

0.030 ~ 0.057 mm
(0.0012 ~ 0.0022 in)
<Limit>: 0.100 mm (0.0039 in)

2.Replace:

Valve guide

*****************************************************

Replacement steps:

NOTE:

To ease guide removal, installation and to
maintain correct fit, heat the cylinder head to
100 °C (212 °F) in an oven.

Remove the valve guide using a valve guide
remover 

1

.

Install the new valve guide using a valve
guide remover 

1

 and valve guide installer

2

.

After installing the valve guide, bore the
valve guide using a valve guide reamer 

3

 to

obtain proper stem-to-guide clearance.

NOTE:

After replacing the valve guide reface the valve
seat.

*****************************************************

Valve guide remover (7.0 mm):

P/N. YM-01225-A, 90890-01225

Valve guide installer (7.0 mm):

P/N. YM-04017, 90890-04017

Valve guide reamer (7.0 mm):

P/N. YM-01227, 90890-01227

4 - 22

ENG

CAMSHAFT, ROCKER ARMS AND VALVES

3.Check:

Valve face
Pitting/wear 

 Grind the face.

Valve stem end
Mushroom shape or diameter larger than the
body of the stem 

 Replace.

4.Measure:

Margin thickness 

a


Out of specification 

 Replace.

Margin thickness:

Intake:

1.0 ~ 1.4 mm (0.0394 ~ 0.0551 in)

Exhaust:

0.8 ~ 1.2 mm (0.0315 ~ 0.0472 in)

5.Measure:

Runout (valve stem)
Out of specification 

 Replace.

NOTE:

When installing a new valve always replace
the guide.

If the valve is removed or replaced always
replace the oil seal.

6.Eliminate:

Carbon deposits
(from the valve face and valve seat)

7.Check:

Valve seats
Pitting/wear 

 Reface the valve seat.

8.Measure:

Valve seat width 

a


Out of specification 

 Reface the valve seat.

Runout limit:

0.01 mm (0.0004 in)

Valve seat width:

Intake:

1.2 ~ 1.4 mm (0.0472 ~ 0.0551 in)
<Limit>: 1.6 mm (0.0630 in)

Exhaust:

1.2 ~ 1.4 mm (0.0472 ~ 0.0551 in)
<Limit>: 1.6 mm (0.0630 in)

4 - 23

ENG

CAMSHAFT, ROCKER ARMS AND VALVES

*****************************************************

Measurement steps:

Apply Mechanic’s blueing dye (Dykem) 

b

 to

the valve face.

Install the valve into the cylinder head.

Press the valve through the valve guide and
onto the valve seat to make a clear pattern.

Measure the valve seat width. Where the
valve seat and valve face made contact,
blueing will have been removed.

If the valve seat is too wide, too narrow, or
the seat is not centered, the valve seat must
be refaced.

*****************************************************

9.Lap:

Valve face

Valve seat

NOTE:

After refacing the valve seat or replacing the
valve and valve guide, the valve seat and
valve face should be lapped.

*****************************************************

Lapping steps:

Apply a coarse lapping compound to the
valve face.

CAUTION:

Do not let the compound enter the gap
between the valve stem and the guide.

Apply molybdenum disulfide oil to the valve
stem.

Install the valve into the cylinder head.

Turn the valve until the valve face and valve
seat are evenly polished, then clean off all of
the compound.

NOTE:

For best lapping results, lightly tap the valve
seat while rotating the valve back and forth
between your hands.

4 - 24

ENG

CAMSHAFT, ROCKER ARMS AND VALVES

Apply a fine lapping compound to the valve
face and repeat the above steps.

NOTE:

After every lapping operation be sure to clean
off all of the compound from the valve face and
valve seat.

Apply Mechanic’s blueing dye (Dykem) to the
valve face.

Install the valve into the cylinder head.

Press the valve through the valve guide and
onto the valve seat to make a clear pattern.

Measure the valve seat width again. If the
valve seat width is out of specification, reface
and relap the valve seat.

*****************************************************

10.Measure:

Valve spring free length 

a


Out of specification 

 Replace.

11.Measure:

Compressed spring force 

a


Out of specification 

 Replace.

b

Installed length

Free length (valve spring):

Inner:

39.9 mm (1.57 in)
<Limit>: 37.9 mm (1.49 in)

Outer:

43.27 mm (1.70 in)
<Limit>: 41.27 mm (1.62 in)

Compressed spring force:

Inner:

104.9 ~ 120.6 N at 33.6 mm
(10.70 ~ 12.30 kg, 
23.58 ~ 27.11 lb at 1.32 in)

Outer:

235.4 ~ 251.1 N at 36.6 mm
(24.00 ~ 25.60 kg, 
52.91 ~ 56.45 lb at 1.44 in)

4 - 25

ENG

CAMSHAFT, ROCKER ARMS AND VALVES

12.Measure:

Spring tilt 

a


Out of specification 

 Replace.

Spring tilt limit:

Inner:

2.5°/1.6 mm (0.06 in)

Outer:

2.5°/1.6 mm (0.06 in)

INSTALLING THE VALVE AND VALVE 
SPRING 

1.Apply:

Molybdenum disulfide oil
(onto the valve stem and valve stem seal)

2.Install:

Valve spring seats

Valve stem seals 

Valves

Valve springs (inner and outer)

Valve spring retainers

NOTE:

Install the valve springs with the larger pitch 

a

facing upwards.

b

Smaller pitch

New

3.Install:

Valve cotters

NOTE:

Install the valve cotters while compressing the
valve spring with the valve spring compressor

1

.

4.To secure the valve cotters onto the valve

stem, lightly tap the valve tip with a piece of
wood.

CAUTION:

Hitting the valve tip with excessive force
could damage the valve.

Valve spring compressor:

P/N. YM-04019, 90890-04019

4 - 26

ENG

CAMSHAFT, ROCKER ARMS AND VALVES

INSTALLING THE CAMSHAFT AND 
ROCKER ARM 

1.Apply:

Engine oil
(onto the rocker arm shafts)

2.Install:

Rocker arms 

1


Rocker arm shafts (intake and exhaust) 

2


NOTE:

Use a slide hammer bolt 

3

 to install the rocker

arm shaft.

3.Install:

Camshaft 

1


NOTE:

Install the camshaft pin hole 

a

 facing up.

4 - 27

ENG

CYLINDER AND PISTON

CYLINDER AND PISTON

Order

Job name/Part name

Q’ty

Remarks

Removing the cylinder and piston 

Remove the parts in the order below.

Cylinder head

Refer to “CYLINDER HEAD”.

Water pump outlet hose/pipe

Refer to “WATER PUMP” in CHAPTER 5.

1

Coolant inlet joint

1

2

Timing chain guide (exhaust)

1

3

Cylinder/O-ring

1/1

Refer to “INSTALLING THE CYLINDER”.

4

Cylinder gasket

1

5

Dowel pin

2

6

O-ring

1

7

Piston pin clip

2

Refer to “REMOVING/INSTALLING THE 
PISTON”.

8

Piston pin

1

9

Piston

1

10

Piston ring set

1

For installation, reverse the removal 
procedure.

4 - 28

ENG

CYLINDER AND PISTON

REMOVING THE PISTON 

1.Remove:

Piston pin clips 

1


Piston pin 

2


Piston 

3


NOTE:

Before removing piston pin, deburr the clip
groove and pin hole area. If the piston pin
groove is deburred and the piston pin is still
difficult to remove, use the piston pin puller 

4

.

CAUTION:

Do not use a hammer to drive the piston
pin out.

Piston pin puller:

P/N. YU-01304, 90890-01304

2.Remove:

Piston rings 

NOTE:

Spread the end gaps apart while at the same
time lifting the piston ring over the top of the
piston crown.

CHECKING THE TIMING CHAIN GUIDE 

1.Check:

Exhaust side timing chain guide 
Wear/damage 

 Replace.

CHECKING THE CYLINDER AND PISTON 

1.Check:

Cylinder and piston walls
Vertical scratches 

 Rebore or replace the

cylinder and the piston.

Cylinder water jacket
Mineral deposits/rust 

 Eliminate.

4 - 29

ENG

CYLINDER AND PISTON

2.Measure:

Piston-to-cylinder clearance

*****************************************************

Measurement steps:
1st step:

Measure the cylinder bore “C” with the
cylinder bore gauge.

NOTE:

Measure cylinder bore “C” by taking side-to-
side and front-to-back measurements of the
cylinder. Then, find the average of the
measurements.

If out of specification, replace the cylinder,
and the piston and piston rings as a set.

Cylinder bore “C”

 84.500 ~ 84.510 mm

(3.3268 ~ 3.3272 in)

Max. taper “T”

 0.05 mm

(0.0016 in)

Out of round “R”

 0.01 mm

(0.0004 in)

“C”= maximum of D

1

 ~ D

6


“T”= maximum of D

1

, or D

2

 – 

maximum of D

5

 or D

6


“R”= maximum of D

1

, D

3

 or D

5

 – 

minimum of D

2

, D

4

 or D

6


2nd step:

Measure piston skirt diameter “P” with a
micrometer.

a

5.0 mm (0.20 in) from the piston bottom edge

If out of specification, replace the piston and
piston rings as a set.

Piston skirt diameter “P”

Standard

84.445 ~ 84.460 mm

(3.3246 ~ 3.3252) 

4 - 30

ENG

CYLINDER AND PISTON

3rd step:

Find the piston-to-cylinder clearance with the
following formula.

If out of specification, rebore or replace the
cylinder, and replace the piston and piston
rings as a set.

*****************************************************

Piston-to-cylinder clearance = 

Cylinder bore “C” – 
Piston skirt diameter “P”

Piston-to-cylinder clearance:

0.040 ~ 0.065 mm
(0.0016 ~ 0.0026 in)
<Limit>: 0.150 mm (0.0059 in)

CHECKING THE PISTON RING 

1.Measure:

Ring side clearance
Use a feeler gauge. 
Out of specification 

 Replace the piston

and rings as a set.

NOTE:

Clean carbon from the piston ring grooves and
rings before measuring the side clearance.

2.Position:

Piston ring 
(in cylinder)

NOTE:

Insert a ring into the cylinder and push it
approximately 40 mm (1.6 in) into the cylinder.
Push the ring with the piston crown so that the
ring will be at a right angle to the cylinder bore.

a

40 mm (1.6 in)

Side clearance

Standard

Limit

Top 

ring

0.03 ~ 0.07 mm

(0.0012 ~ 0.0028 in)

0.12 mm

(0.0047 in)

2nd 

ring

0.02 ~ 0.06 mm

(0.0008 ~ 0.0024 in)

0.12 mm

(0.0047 in)

4 - 31

ENG

CYLINDER AND PISTON

3.Measure:

Ring end gap 
Out of specification 

 Replace.

NOTE:

You cannot measure the end gap on the
expander spacer of the oil control ring. If the oil
control ring rails show excessive gap, replace
all three rings.

End gap

Standard

Limit

Top 

ring

0.20 ~ 0.40 mm

(0.0079 ~ 0.0157 in)

0.65 mm

(0.0256 in)

2nd 

ring

0.40 ~ 0.60 mm

(0.0157 ~ 0.0236 in)

0.95 mm

(0.0374 in)

Oil

ring

0.2 ~ 0.7 mm

(0.0079 ~ 0.0276 in)

CHECKING THE PISTON PIN

1.Check:

Piston pin
Blue discoloration/grooves 

 Replace, then

check the lubrication system.

2.Measure:

Piston pin-to-piston clearance

*****************************************************

Measurement steps:

Measure the piston pin outside diameter 

a

.

If out of specification, replace the piston pin.

Measure the piston inside diameter 

b

.

Calculate the piston pin-to-piston clearance
with the following formula.

Outside diameter (piston pin):

19.991 ~ 20.000 mm
(0.7870 ~ 0.7874 in)
<Limit>: 19.971 mm (0.7863 in)

Piston pin bore inside diameter:

20.004 ~ 20.015 mm
(0.7876 ~ 0.7880 in)
<Limit>: 20.045 mm (0.7892 in)

Piston pin-to-piston clearance =

Bore size (piston pin) 

b

 –

Outside diameter (piston pin) 

a


4 - 32

ENG

CYLINDER AND PISTON

If out of specification, replace the piston.

*****************************************************

Piston pin-to-piston clearance:

0.004 ~ 0.024 mm
(0.00016 ~ 0.00094 in)
<Limit>: 0.074 mm (0.0029 in)

INSTALLING THE PISTON 

1.Install:

Piston rings
(onto the piston)

NOTE:

Be sure to install the piston rings so that the
manufacturer’s marks or numbers are
located on the upper side of the rings.

Lubricate the piston and piston rings liberally
with engine oil.

2.Position:

Top ring

2nd ring

Oil ring
Offset the piston ring end gaps as shown.

a

Top ring end

b

Oil ring end (upper)

c

Oil ring end (lower)

d

2nd ring end

3.Install:

Piston 

1


Piston pin 

2


Piston pin clips 

3


NOTE:

Apply engine oil onto the piston pin, piston
ring and piston.

Be sure that the arrow mark 

a

 on the piston

points to the exhaust side of the engine.

Before installing the piston pin clip, cover the
crankcase with a clean rag to prevent the
piston pin clip from falling into the crankcase.

New

4 - 33

ENG

CYLINDER AND PISTON

4.Lubricate:

Piston

Piston rings

Cylinder

NOTE:

Apply a liberal coating of engine oil.

INSTALLING THE CYLINDER 

1.Install:

Cylinder

NOTE:

Install the cylinder with one hand while
compressing the piston rings with the other
hand.

CAUTION:

Be careful not to damage the timing chain
damper during installation.

Pass the timing chain through the timing
chain cavity.


Content      ..     8      9      10      11     ..