Suzuki GSX-R1000. Service Manual - part 37
 

  Index      Manuals     Suzuki GSX-R1000. Service Manual


Search            copyright infringement  


Content      ..     35      36      37      38     ..


Suzuki GSX-R1000. Service Manual - part 37


6B-9 Steering / Handlebar: 

Steering stem upper bracket

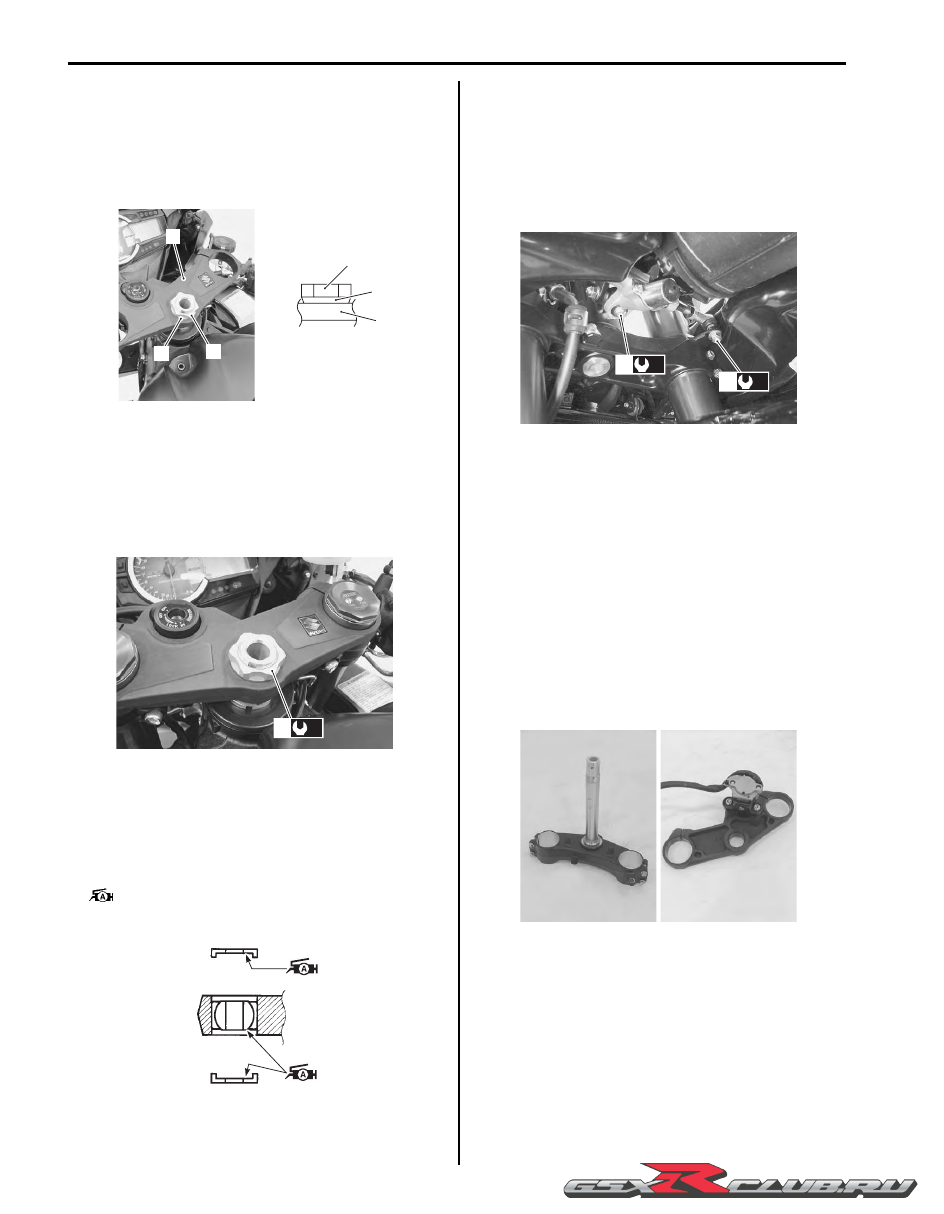
Install the front forks and steering stem upper bracket in 
the following points:

• Temporarily install the upper bracket (1), washer (2) 

and steering stem head nut (3). Refer to “Handlebar 
Removal and Installation” (Page 6B-2).

• Temporarily install the front forks.

• Tighten the steering stem head nut (3) to the specified 

torque.

Tightening torque
Steering stem head nut (a):  90 N·m (9.0 kgf-m, 
65.0 lbf-ft)

• Tighten the front fork upper and lower clamp bolts. 

Refer to “Front Fork Removal and Installation” in 
Section 2B (Page 2B-2).

Steering damper

• Apply grease to the bearings and dust seals.

:  Grease 99000–25010 (SUZUKI SUPER 

GREASE “A” or equivalent)

• Install the steering damper and tighten the bolt (1) and 

nut (2).

Tightening torque
Steering damper bolt (a):  23 N·m (2.3 kgf-m, 16.5 
lbf-ft)
Steering damper nut (b):  23 N·m (2.3 kgf-m, 16.5 
lbf-ft)

Inspection after installation

• Check the steering tension. Refer to “Steering Tension 

Adjustment” (Page 6B-11).

Steering / Steering Damper Related Parts 
Inspection

B947H16206007

Refer to “Steering / Steering Damper Removal and 
Installation” (Page 6B-6).
Inspect the removed parts for the following 
abnormalities:

Steering Stem

• Distortion of the steering stem and brackets.

1

2

3

2

3

1

I947H1620031-01

(a)

3

I947H1620032-01

I823H1620019-02

(b)

2

(a)

1

I947H1620033-02

I947H1620034-01

-------------------------------------------------------------------------------------------------------------------------------------------------------------

Steering / Handlebar:  6B-10

Bearing

• Bearing wear or damage

• Abnormal bearing noise

• Race wear or damage

• Bearing lower seal damage

Steering Damper

• Inspect the steering damper body, bearing and oil seal 

for damage and oil leaking.

• Move the steering damper rod by hand to inspect for a 

smooth movement.

• If any defects are found, replace the steering damper 

with a new one.

NOTE

The steering damper operation can be 
checked without removing it. Refer to “DTC 
“C93” (P1769): Steering Damper Solenoid 
Valve Circuit Malfunction” in Section 1A 
(Page 1A-134).


Steering System Inspection

B947H16206008

Refer to “Steering System Inspection” in Section 0B 
(Page 0B-18).

Steering Stem Bearing Removal and Installation

B947H16206009

Removal

1) Remove the steering stem upper bearing and 

steering stem lower bracket. Refer to “Steering / 
Steering Damper Removal and Installation” 
(Page 6B-6).

2) Remove the steering stem lower bearing inner race 

using a chisel.

3) Remove the steering stem upper and lower bearing 

races using the steel rod.

Installation

Install the steering stem bearings in the reverse order of 
removal. Pay attention to the following points:

CAUTION

!


The removed bearings and races should be 
replaced with new ones.


I947H1620035-01

I947H1620036-01

I947H1620037-01

I649G1620033-02

I837H1620033-01

-------------------------------------------------------------------------------------------------------------------------------------------------------------

6B-11 Steering / Handlebar: 

Outer race

• Press in the upper and lower outer races using the 

special tool.

Special tool

(A):  09941–34513 (Bearing installer)
(B):  09913–70210 (Bearing installing set (10 

– 75 

Φ

))

Inner race

• Press in the lower bearing inner race using the special 

tool.

Special tool

(A):  09925–18011 (Bearing installer)

• Install the steering. Refer to “Steering / Steering 

Damper Removal and Installation” (Page 6B-6).

Steering Tension Adjustment

B947H16206010

Check the steering movement in the following 
procedures:

1) By supporting the motorcycle with a jack, lift the front 

wheel unit is off the floor 20 – 30 mm (0.8 – 1.2 in).

2) Remove the steering damper. Refer to “Steering 

Damper Construction” (Page 6B-6).

3) Check to make sure that the cables and wire 

harnesses are properly routed.

4) With the front wheel in the straight ahead state, hitch 

the spring scale (special tool) on one handlebar grip 
end as shown in the figure and read the graduation 
when the handlebar starts moving.

Initial force
200 – 500 grams

Special tool

(A):  09940–92720 (Spring scale)

5) Do the same on the other grip end.

6) If the initial force read on the scale when the 

handlebar starts turning is either too heavy or too 
light, adjust it till it satisfies the specification.

a) First, loosen the front fork upper clamp bolts, 

handlebar clamp bolts, steering stem head nut 
and steering stem lock-nut, and then adjust the 
steering stem nut by loosening or tightening it.

b) Tighten the steering stem lock-nut, stem head 

nut, handlebar clamp bolts and front fork upper 
clamp bolts to the specified torque and re-check 
the initial force with the spring scale according to 
the previously described procedure.

c) If the initial force is found within the specified 

range, adjustment has been completed.

NOTE

Hold the front fork legs, move them back and 
forth and make sure that the steering is not 
loose.


(B)

(A)

(B)

(A)

I947H1620038-01

(A)

I947H1620039-01

(A)

I649G1620040-02

I947H1620040-01

-------------------------------------------------------------------------------------------------------------------------------------------------------------

Steering / Handlebar:  6B-12

Specifications

Tightening Torque Specifications

B947H16207001

NOTE

The specified tightening torque is described in the following.
“Handlebar Components” (Page 6B-1)
“Steering Components” (Page 6B-5)
“Steering Damper Construction” (Page 6B-6)


Reference:

For the tightening torque of fastener not specified in this section, refer to “Tightening Torque List” in Section 0C 
(Page 0C-9)
.

Fastening part

Tightening torque

Note

N

m

kgf-m

lbf-ft

Front fork upper clamp bolt

23

2.3 

16.5 

)

(Page 6B-3)

Handlebar clamp bolt

23

2.3 

16.5 

)

(Page 6B-3)

Steering stem head nut

90

9.0 65.0 

)

(Page 6B-3) / 

)

(Page 6B-9)

Steering stem nut

45 N

m (4.5 kgf-m, 32.5 lbf-ft) then turn 

back 1/4 – 1/2

)

(Page 6B-8)

Steering stem lock-nut 

80

8.0 

58.0 

)

(Page 6B-8)

Steering damper bolt

23

2.3 

16.5 

)

(Page 6B-9)

Steering damper nut

23

2.3 

16.5 

)

(Page 6B-9)

-------------------------------------------------------------------------------------------------------------------------------------------------------------

6B-13 Steering / Handlebar: 

Special Tools and Equipment

Recommended Service Material

B947H16208001

NOTE

Required service material is also described in the following.
“Handlebar Components” (Page 6B-1)
“Steering Components” (Page 6B-5)
“Steering Damper Construction” (Page 6B-6)


Special Tool

B947H16208002

Material

SUZUKI recommended product or Specification

Note

Grease

SUZUKI SUPER GREASE “A” or 
equivalent

P/No.: 99000–25010

)

(Page 6B-4) / 

)

(Page 6B-

8) / 

)

(Page 6B-9)

Handle grip bond

Handle Grip Bond (commercially 
available)

)

(Page 6B-4)

09913–70210

09925–18011

Bearing installing set (10 – 
75 

Φ

)

Bearing installer

)

(Page 6B-11)

)

(Page 6B-11)

09940–14911

09940–14960

Steering stem nut socket 
wrench

Steering stem nut socket 
wrench

)

(Page 6B-7) / 

)

(Page 6B-

8) / 

)

(Page 6B-8)

)

(Page 6B-7) / 

)

(Page 6B-

8) / 

)

(Page 6B-8)

09940–92720

09941–34513

Spring scale

Bearing installer

)

(Page 6B-11)

)

(Page 6B-11)

-------------------------------------------------------------------------------------------------------------------------------------------------------------

Table of Contents 9- i

9

Section 9

CONTENTS

Body and Accessories

Precautions .................................................9-1

Precautions............................................................. 9-1

Precautions for Electrical System ......................... 9-1

Component Location ............................................. 9-1

Electrical Components Location ........................... 9-1

Wiring Systems........................................ 9A-1

Schematic and Routing Diagram........................9A-1

Wiring Diagram ................................................... 9A-1
Wiring Harness Routing Diagram........................ 9A-7

Specifications.....................................................9A-11

Service Data ..................................................... 9A-11
Tightening Torque Specifications...................... 9A-11

Special Tools and Equipment ...........................9A-11

Recommended Service Material ....................... 9A-11

Lighting Systems..................................... 9B-1

Repair Instructions ..............................................9B-1

Headlight Components ....................................... 9B-1
Headlight Removal and Installation .................... 9B-1
Headlight Bulb and Position Light Bulb 

Replacement ..................................................... 9B-2

Headlight Beam Adjustment ............................... 9B-3
Front Turn Signal Light Components .................. 9B-3
Front Turn Signal Light Removal and 

Installation ......................................................... 9B-4

Front Turn Signal Light Bulb Replacement ......... 9B-4
Rear Lighting System Construction..................... 9B-5
Rear Combination Light Removal and 

Installation ......................................................... 9B-6

Rear Combination Light Replacement ................ 9B-6
License Plate Light Components ........................ 9B-7
License Plate Light Removal and Installation ..... 9B-7
License Plate Light Bulb Replacement ............... 9B-8
Rear Turn Signal Light Components................... 9B-9
Rear Turn Signal Light Removal and 

Installation ......................................................... 9B-9

Rear Turn Signal Light Bulb Replacement........ 9B-10
Reflex Reflector Construction ........................... 9B-10
Turn Signal / Side-Stand Relay Inspection ....... 9B-11
Turn Signal / Side-Stand Relay Removal and 

Installation ....................................................... 9B-11

Hazard Switch Inspection ................................. 9B-11
Turn Signal Switch Inspection........................... 9B-12
Dimmer / Passing Light Switch Inspection ........ 9B-12

Specifications .....................................................9B-13

Service Data......................................................9B-13
Tightening Torque Specifications......................9B-13

Special Tools and Equipment ...........................9B-13

Recommended Service Material .......................9B-13
Special Tool ......................................................9B-13

Combination Meter / Fuel Meter / Horn.. 9C-1

General Description .............................................9C-1

Combination Meter System Description ..............9C-1

Repair Instructions ..............................................9C-2

Combination Meter Components ........................9C-2
Combination Meter Removal and Installation .....9C-2
Combination Meter Disassembly and 

Assembly...........................................................9C-3

Combination Meter Inspection ............................9C-3
Engine Coolant Temperature Indicator Light 

Inspection..........................................................9C-4

ECT Sensor Removal and Installation ................9C-4
Fuel Level Indicator Inspection ...........................9C-5
Fuel Level Gauge Inspection ..............................9C-5
Speedometer Inspection .....................................9C-5
Speed Sensor Removal and Installation .............9C-5
Speed Sensor Inspection ....................................9C-6
Oil Pressure Indicator Inspection ........................9C-6
Oil Pressure Switch Removal and Installation ....9C-7
Oil Pressure Switch Inspection ...........................9C-7
Ignition Switch Inspection....................................9C-7
Ignition Switch Removal and Installation.............9C-7
Horn Inspection ...................................................9C-8
Horn Removal and Installation ............................9C-8

Specifications .......................................................9C-9

Service Data........................................................9C-9
Tightening Torque Specifications........................9C-9

Special Tools and Equipment .............................9C-9

Special Tool ........................................................9C-9

Exterior Parts ........................................... 9D-1

Repair Instructions ..............................................9D-1

Exterior Parts Construction .................................9D-1
Rear Fender Construction...................................9D-2
Frame Cover Construction ..................................9D-3
Rear View Mirror Construction ............................9D-4
Fastener Removal and Installation......................9D-5
Exterior Parts Removal and Installation ..............9D-6

-------------------------------------------------------------------------------------------------------------------------------------------------------------

-------------------------------------------------------------------------------------------------------------------------------------------------------------

Precautions: 9-1

Body and Accessories

Precautions

Precautions

Precautions for Electrical System

B947H19000001

Refer to “General Precautions” in Section 00 (Page 00-1) and “Precautions for Electrical Circuit Service” in Section 00 
(Page 00-2).

Component Location

Electrical Components Location

B947H19003001

Refer to “Electrical Components Location” in Section 0A (Page 0A-7).

-------------------------------------------------------------------------------------------------------------------------------------------------------------

9A-1 Wiring Systems: 

Body and Accessories

Wiring Systems

Schematic and Routing Diagram

Wiring Diagram

B947H19102001

Refer to “Wire Color Symbols” in Section 0A (Page 0A-5).

For E-02, 19, 24, 51

HEADLIGHT (LO) 

HEADLIGHT (HI) 

POSITION LIGHT (LH)

STEERING
DAMPER
SOLENOID 
VALVE

POSITION LIGHT (RH)

FRONT TURN SIGNAL LIGHT (RH)

FRONT TURN SIGNAL LIGHT (LH)

COMBINATION METER

OFF
RUN

OFF

ON

PUSH

FREE

HANDLEBAR SWITCH (RH)

ENGINE

STOP

SWITCH 

IMMOBILIZER

METER
SWITCH

STARTER
BUTTON

FRONT BRAKE
SWITCH

ON

OFF
LOCK

P

IGNITION SWITCH

SPEED
SENSOR

SIDE-STAND
SWITCH

FREE

PUSH

ON

OFF

BRAKE LIGHT
SWITCH 

IGNITION
COIL #1

IGNITION
COIL #2

IGNITION
COIL #3

IGNITION
COIL #4

FREE

UP

DOWN

PAIR
CONTROL 
SOLENOID 
VALVE

BATTERY

1: MAIN FUSE (30 A)


STARTER
MOTOR 

1

GENERATOR

HANDLEBAR SWITCH (LH)

ON

OFF

OIL
PRESSURE
SWITCH

FUSE BOX

1. HEAD HI
2. HEAD LO
3. IGNITION 
4. SIGNAL
5. FUEL
6. FAN

10 A
10 A
15 A
10 A
10 A
15 A

1

2

3

4

5

6

B Bl

HI

LO

PASS

DIMMER & PASS

SWITCH 

PUSH

HORN

BUTTON

ON

OFF

HAZARD

SWITCH

PUSH

UP

PUSH

DOWN

L

PUSH

R

TURN SIGNAL

LIGHT SWITCH

HORN

CLUTCH
SWITCH

FREE

M

FUEL PUMP 

COOLING
FAN RELAY 

B/W

B/W


B

B/Bl 
B/W

Dg

Dbr
B/R

P

Y/Bl
B/G

G/Y

B/Lg

Bl/B

W

Br

O/G

Br/Y
R/Bl

Lg

W

B

Br

B/W

Y

B/W

B/Bl

B/O


B

B/W

B/W

B/Br
B/W

Br

B/W

B/Br
B/W

Br

B/W

B/R

B/W

P

R

O

O/G

Br

R

O

Gr

Br

Y

B

G

R

R/Y

B/W

O/Bl

O/W

O/Bl

O/R

B/W

O/B

O/W

B/R

B/Bl

Y/G

O/R

Y/W

Dg

Dbr

B/W

O/B

O/W

O/G

W/B

Y/G

O

W/Y

G

B/W

G

B/W

O

W/B

O/G

W/B

O/W

W/Bl

O/W

B

O/W

Y

O/W

G

O/W

W/G

W/Y

Y/W

W

O

O/Y

O/G

R

R/Bl

O/R

Bl/B

Bl

G

O/Y

Lb

l

O/B

Br

O/R

O/Bl

B/W

B/Bl

Lg

Lb

l

B

B

Lb

l

Lg

Y

Y/W

B/W

B/Y

Y/R

B/W

B/Lg

Y/R

B/W

B/Lg

Bl/B

Bl

G

O/Y

O/B

Br

Lb

l

B

B

B

W

W

W

Y/B

O/W

Y/R

R/Bl

G/Y

B/Bl

B/R

G

Y/G

B/W

B/Bl

B/R

Bl

Dg

B

Lb

l

Lg

Y

O

W

B/W

B/Y

B/Y

Y/G

R

R

B/W

Y

B/R

B/Lg

Dbr

Dg

P

Y/Bl

B/G

G/Y

Br/Y

O/G

R/Bl

Y

Bl/B

B/Bl

B

B/R

B/W

B

O/W

I947H1910901-03

-------------------------------------------------------------------------------------------------------------------------------------------------------------

Wiring Systems:  9A-2

ECM

REGULATOR/
RECTIFIER

PRIMARY

INJECTOR #4

PRIMARY

INJECTOR #2

PRIMARY

INJECTOR #3

PRIMARY

INJECTOR #1

SECONDARY
INJECTOR #4

SECONDARY
INJECTOR #2

SECONDARY
INJECTOR #1

SECONDARY
INJECTOR #3

TP
SENSOR

STVA

IAP
SENSOR

IAT
SENSOR

ISC
VALVE

STP
SENSOR

HO2 SENSOR

COOLING

FAN RELAY 

COOLING 

FAN MOTOR

ECT
SENSOR

AP
SENSOR

EXCVA

CMP
SENSOR

CKP
SENSOR

GEAR
POSITION 
SWITCH  

TO SENSOR

G

B/W

W/R

B/Y

 B/W 

Bl

B/W

O/Bl

Br/Y

O/Bl

Gr

Y

Lg

Lg/W

Lg/B

Lg/Bl

W/G

Y/G

R/Y

Bl/W

Bl/B

O/R

Br

W/Bl

B

Gr/W

Gr/B

Gr/Y

Gr/R

G/R

W/B

Y/B

Bl

Y

G

B/W

B/Br

W/G

Dg

B/Bl

B

B/Lg

G

W

Br

Y/R

B/G

P

G/Bl

G/Y

G/B

Y/W

Bl/G

Bl/Y

Y

R/B

O/G

Y/Bl

R/Bl

G/W

B/Y

R

P/B

B/W

P/W

W/B

P

B/R

B/Br

Bl/W

Bl/B

Bl/G

Bl/Y

R

O/G

W/R

Gr

B/W

Gr/W

Y/R

Gr/B

Y/R

Gr/Y

Y/R

Gr/R

Y/R

Lg

Y/R

Lg/W

Y/R

Lg/B

Y/R

Lg/Bl

Y/R

B/Br

G/Y

R

B

B

B

B

B

Bl

P

B/W

Bl

P

B/W

Bl/Y

W

B/Bl

B

Bl

W

Gr

B

W

B/W

B

G/R

O/W

O/R

B

O/W

B/Br

W/G

W/B

Gr

P

B

Y

W

Bl/Y

B

B/R

R/B

R

Y

B/Br

B/Bl

B/Br

G/Bl

G/W

R

B/Y

B/Br

R

B

B/Br

Dg

B/Br

R

G

Br

Bl

Y

R

P/B

B/Br

Dg

Y/W

P/B

B/Br

R

Y

Br

G

Bl

B

P

G

W/B

B/Lg

P/W

G

W/B

B/Br

G/B

R

Y/W

B/Br

B

B

B

R

R

B/W

B/W

B

B

B

B/R

B/R

B/W

B/W

REAR TURN SIGNAL LIGHT (RH)

REAR TURN SIGNAL LIGHT (LH)

REAR COMBINATION LIGHT

LICENSE PLTE LIGHT

B

B/W

Lg

B/W

Br
Bl

Gr

B

B/W

W/B

Br
Bl

B/W

Lg

B

B

B/W

B

B/W

Br

B/Bl
W/B

Br

B/W
W/B

I947H1910902-03

-------------------------------------------------------------------------------------------------------------------------------------------------------------

9A-3 Wiring Systems: 

For E-03, 28

OFF
RUN

OFF

ON

PUSH

FREE

ON

OFF
LOCK

P

FREE

PUSH

ON

OFF

FREE

UP

DOWN


1

ON

OFF

1

2

3

4

5

6

B Bl

HI

LO

PASS

PUSH

ON

OFF

PUSH

PUSH

L

PUSH

R

FREE

M


B/W

B/W


B

B/Bl 
B/W

Dg

Dbr
B/R

P

Y/Bl
B/G

G/Y

B/Lg

Bl/B

W

Br

O/G

R/Bl

Lg

W

B

Br

B/W

Y

B/W

B/Bl

B/O


B

B/W

B/W

B/Br
B/W

Br

B/W

B/Br
B/W

Br

B/W

B/R

B/W

P

R

O

O/Y

O

/Y

O/G

Br

R

O

Gr

Br

O/Bl

O/R

B/W

O/B

O/W

B/R

B/Bl

Y/G

O/R

Y/W

Dg

Dbr

B/W

O/B

O/W

O/G

W/B

Y/G

O

W/Y

G

B/W

G

B/W

O

W/B

O/G

W/B

O/W

W/Bl

O/W

B

O/W

Y

O/W

G

O/W

W/G

W/Y

Y/W

W

O

O/Y

O/G

R

R/Bl

O/R

Bl/B

Bl

G

O/Y

Lb

l

O/B

Br

O/R

O/Bl

B/W

B/Bl

Lg

Lb

l

B

B

Lb

l

Lg

Y

Y/W

B/W

B/Y

Y/R

B/W

B/Lg

Y/R

B/W

B/Lg

Bl/B

Bl

G

O/Y

O/B

Br

Lb

l

B

B

B

W

W

W

Y/B

O/W

Y/R

R/Bl

G/Y

B/Bl

B/R

G

Y/G

B/W

B/Bl

B/R

Bl

Dg

B

Lb

l

Lg

Y

O

W

B/W

B/Y

B/Y

Y/G

R

R

B/W

Y

B/R

B/Lg

Dbr

Dg

P

Y/Bl

B/G

G/Y

Br/Y

O/G

R/Bl

Y

Bl/B

B/Bl

B

B/R

B/W

B

O/W

HEADLIGHT (LO) 

HEADLIGHT (HI) 

POSITION LIGHT (LH)

STEERING
DAMPER
SOLENOID 
VALVE

POSITION LIGHT (RH)

FRONT TURN SIGNAL LIGHT (RH)

FRONT TURN SIGNAL LIGHT (LH)

COMBINATION METER

HANDLEBAR SWITCH (RH)

ENGINE

STOP

SWITCH 

METER
SWITCH

STARTER
BUTTON

FRONT BRAKE
SWITCH

IGNITION SWITCH

SPEED
SENSOR

SIDE-STAND
SWITCH

BRAKE LIGHT
SWITCH 

IGNITION
COIL #1

IGNITION
COIL #2

IGNITION
COIL #3

IGNITION
COIL #4

PAIR
CONTROL 
SOLENOID 
VALVE

BATTERY

1: MAIN FUSE (30 A)

STARTER
MOTOR 

GENERATOR

HANDLEBAR SWITCH (LH)

OIL
PRESSURE
SWITCH

FUSE BOX

1. HEAD HI
2. HEAD LO
3. IGNITION 
4. SIGNAL
5. FUEL
6. FAN

10 A
10 A
15 A
10 A
10 A
15 A

DIMMER & PASS

SWITCH 

HORN

BUTTON

HAZARD

SWITCH

UP

DOWN

TURN SIGNAL

LIGHT SWITCH

HORN

CLUTCH
SWITCH

FUEL PUMP

COOLING
FAN RELAY 

I947H1910903-03

-------------------------------------------------------------------------------------------------------------------------------------------------------------

Wiring Systems:  9A-4

ECM

G

B/W

W/R

B/Y

 B/W 

Bl

B/W

O/Y

O/Bl

Gr

Y

Lg

Lg/W

Lg/B

Lg/Bl

W/G

Y/G

Bl/W

Bl/B

O/R

Br

W/Bl

B

Gr/W

Gr/B

Gr/Y

Gr/R

G/R

W/B

Y/B

Bl

Y

G

B/W

B/Br

W/G

Dg

B/Bl

B

B/Lg

G

W

Br

Y/R

B/G

P

G/Bl

G/Y

G/B

Y/W

Bl/G

Bl/Y

Y

R/B

O/W

Y/Bl

R/Bl

G/W

B/Y

R

P/B

B/W

P/W

W/B

P

B/R

B/Br

Bl/W

Bl/B

Bl/G

Bl/Y

R

O/W

W/R

Gr

B/W

Gr/W

Y/R

Gr/B

Y/R

Gr/Y

Y/R

Gr/R

Y/R

Lg

Y/R

Lg/W

Y/R

Lg/B

Y/R

Lg/Bl

Y/R

B/Br

G/Y

R

Bl

P

B/W

Bl

P

B/W

Bl/Y

W

B/Bl

B

Bl

W

Gr

B

W

B/W

B

G/R

O/W

O/R

B

O/W

B/Br

W/G

W/B

Gr

P

B

Y

W

Bl/Y

B

B/R

R/B

R

Y

B/Br

B/Bl

B/Br

G/Bl

G/W

R

B/Y

B/Br

R

B

B/Br

Dg

B/Br

R

G

Br

Bl

Y

R

P/B

B/Br

Dg

Y/W

P/B

B/Br

R

Y

Br

G

Bl

B

P

G

W/B

B/Lg

P/W

G

W/B

B/Br

G/B

R

Y/W

B/Br

B

B

B

R

R

B/W

B/W

B

B

B

B/R

B/R

B/W

B/W

B

B/W

Lg

B/W

Br
Bl

Gr

B

B/W

W/B

Br
Bl

B/W

Lg

B

B

B/W

B

B/W

Br

B/Bl
W/B

Br

B/W
W/B

REGULATOR/
RECTIFIER

PRIMARY

INJECTOR #4

PRIMARY

INJECTOR #2

PRIMARY

INJECTOR #3

PRIMARY

INJECTOR #1

SECONDARY
INJECTOR #4

SECONDARY
INJECTOR #2

SECONDARY
INJECTOR #1

SECONDARY
INJECTOR #3

TP
SENSOR

STVA

IAP
SENSOR

IAT
SENSOR

ISC
VALVE

STP
SENSOR

HO2 SENSOR

COOLING

FAN RELAY 

COOLING 

FAN MOTOR

ECT
SENSOR

AP
SENSOR

EXCVA

CMP
SENSOR

CKP
SENSOR

GEAR
POSITION 
SWITCH  

TO SENSOR

REAR TURN SIGNAL LIGHT (RH)

REAR TURN SIGNAL LIGHT (LH)

REAR COMBINATION LIGHT

LICENSE PLTE LIGHT

I947H1910904-03

-------------------------------------------------------------------------------------------------------------------------------------------------------------

9A-5 Wiring Systems: 

For E-14, 33

OFF
RUN

OFF

ON

PUSH

FREE

ON

OFF
LOCK

P

FREE

PUSH

ON

OFF

FREE

UP

DOWN


1

ON

OFF

1

2

3

4

5

6

B Bl

HI

LO

PASS

PUSH

ON

OFF

PUSH

PUSH

L

PUSH

R

FREE

M


B/W

B/W


B

B/Bl 
B/W

Dg

Dbr
B/R

P

Y/Bl
B/G

G/Y

B/Lg

Bl/B

W

Br

O/G

R/Bl

Lg

W

B

Br

B/W

Y

B/W

B/Bl

B/O


B

B/W

B/W

B/Br
B/W

Br

B/W

B/Br
B/W

Br

B/W

B/R

B/W

P

R

O

O/Y

O/Y

O/G

Br

R

O

Gr

Br

O/Bl

O/R

B/W

O/B

O/W

B/R

B/Bl

Y/G

O/R

Y/W

Dg

Dbr

B/W

O/B

O/W

O/G

W/B

Y/G

O

W/Y

G

B/W

G

B/W

O

W/B

O/G

W/B

O/W

W/Bl

O/W

B

O/W

Y

O/W

G

O/W

W/G

W/Y

Y/W

W

O

O/Y

O/G

R

R/Bl

O/R

Bl/B

Bl

G

O/Y

Lb

l

O/B

Br

O/R

O/Bl

B/W

B/Bl

Lg

Lb

l

B

B

Lb

l

Lg

Y

Y/W

B/W

B/Y

Y/R

B/W

B/Lg

Y/R

B/W

B/Lg

Bl/B

Bl

G

O/Y

O/B

Br

Lb

l

B

B

B

W

W

W

Y/B

O/W

Y/R

R/Bl

G/Y

B/Bl

B/R

G

Y/G

B/W

B/Bl

B/R

Bl

Dg

B

Lb

l

Lg

Y

O

W

B/W

B/Y

B/Y

Y/G

R

R

B/W

Y

B/R

B/Lg

Dbr

Dg

P

Y/Bl

B/G

G/Y

Br/Y

O/G

R/Bl

Y

Bl/B

B/Bl

B

B/R

B/W

B

O/W

HEADLIGHT (LO) 

HEADLIGHT (HI) 

POSITION LIGHT (LH)

STEERING
DAMPER
SOLENOID 
VALVE

POSITION LIGHT (RH)

FRONT TURN SIGNAL LIGHT (RH)

FRONT TURN SIGNAL LIGHT (LH)

COMBINATION METER

HANDLEBAR SWITCH (RH)

ENGINE

STOP

SWITCH 

METER
SWITCH

STARTER
BUTTON

FRONT BRAKE
SWITCH

IGNITION SWITCH

SPEED
SENSOR

SIDE-STAND
SWITCH

BRAKE LIGHT
SWITCH 

IGNITION
COIL #1

IGNITION
COIL #2

IGNITION
COIL #3

IGNITION
COIL #4

PAIR
CONTROL 
SOLENOID 
VALVE

BATTERY

1: MAIN FUSE (30 A)

STARTER
MOTOR 

GENERATOR

HANDLEBAR SWITCH (LH)

OIL
PRESSURE
SWITCH

FUSE BOX

1. HEAD HI
2. HEAD LO
3. IGNITION 
4. SIGNAL
5. FUEL
6. FAN

10 A
10 A
15 A
10 A
10 A
15 A

DIMMER & PASS

SWITCH 

HORN

BUTTON

HAZARD

SWITCH

UP

DOWN

TURN SIGNAL

LIGHT SWITCH

HORN

CLUTCH
SWITCH

FUEL PUMP

COOLING
FAN RELAY 

I947H1910905-03

-------------------------------------------------------------------------------------------------------------------------------------------------------------

Wiring Systems:  9A-6

ECM

EVAP
SYSTEM
PURGE
CONTROL
SOLENOID 
VALVE

G

B/W

W/R

B/Y

 B/W 

Bl

B/W

O/Y

O/Bl

Gr

Dbr

Y

Lg

Lg/W

Lg/B

Lg/Bl

W/G

Y/G

Bl/W

Bl/B

O/R

Br

W/Bl

B

Gr/W

Gr/B

Gr/Y

Gr/R

G/R

W/B

Y/B

Bl

Y

G

B/W

B/Br

W/G

Dg

B/Bl

B

B/Lg

G

W

Br

Y/R

B/G

P

G/Bl

G/Y

G/B

Y/W

Bl/G

Bl/Y

Y

R/B

O/W

Y/Bl

R/Bl

G/W

B/Y

R

P/B

B/W

P/W

W/B

P

B/R

B/Br

Bl/W

Bl/B

Bl/G

Bl/Y

R

O/W

O/W

Dbr

W/R

Gr

B/W

Gr/W

Y/R

Gr/B

Y/R

Gr/Y

Y/R

Gr/R

Y/R

Lg

Y/R

Lg/W

Y/R

Lg/B

Y/R

Lg/Bl

Y/R

B/Br

G/Y

R

Bl

P

B/W

Bl

P

B/W

Bl/Y

W

B/Bl

B

Bl

W

Gr

B

W

B/W

B

G/R

O/W

O/R

B

O/W

B/Br

W/G

W/B

Gr

P

B

Y

W

Bl/Y

B

B/R

R/B

R

Y

B/Br

B/Bl

B/Br

G/Bl

G/W

R

B/Y

B/Br

R

B

B/Br

Dg

B/Br

R

G

Br

Bl

Y

R

P/B

B/Br

Dg

Y/W

P/B

B/Br

R

Y

Br

G

Bl

B

P

G

W/B

B/Lg

P/W

G

W/B

B/Br

G/B

R

Y/W

B/Br

B

B

B

R

R

B/W

B/W

B

B

B

B/R

B/R

B/W

B/W

B

B/W

Lg

B/W

Br
Bl

Gr

B

B/W

W/B

Br
Bl

B/W

Lg

B

B

B/W

B

B/W

Br

B/Bl
W/B

Br

B/W
W/B

REGULATOR/
RECTIFIER

PRIMARY

INJECTOR #4

PRIMARY

INJECTOR #2

PRIMARY

INJECTOR #3

PRIMARY

INJECTOR #1

SECONDARY
INJECTOR #4

SECONDARY
INJECTOR #2

SECONDARY
INJECTOR #1

SECONDARY
INJECTOR #3

TP
SENSOR

STVA

IAP
SENSOR

IAT
SENSOR

ISC
VALVE

STP
SENSOR

HO2 SENSOR

COOLING

FAN RELAY 

COOLING 

FAN MOTOR

ECT
SENSOR

AP
SENSOR

EXCVA

CMP
SENSOR

CKP
SENSOR

GEAR
POSITION 
SWITCH  

TO SENSOR

REAR TURN SIGNAL LIGHT (RH)

REAR TURN SIGNAL LIGHT (LH)

REAR COMBINATION LIGHT

LICENSE PLTE LIGHT

I947H1910906-03

-------------------------------------------------------------------------------------------------------------------------------------------------------------

9A-7 Wiring Systems: 

Wiring Harness Routing Diagram

B947H19102002

1

1

“C”

“D”

“F”

4

“A”, “B”

“A”

3

“E”

2

I947H1910907-03

1. Wiring harness No. 2

“B”: Pass the left position light lead wires under the wiring harness No. 2.

2. Tapping clamp

: Insert the clamp from the front side. Place the turn signal 
and position light couplers in front of the clamp.

“C”: Route the steering damper lead wire under the wiring harness No. 2. 

Do not pass it over the harness.

3. Steel clamp

: Clamp the wiring harness at the blue taping point. Bend 
the steel clamps to the front side.

“D”: Pass the wiring harness No. 2 in front of the air intake pipe mounting 

fastener.

4. Clamp:

Face the clamp end upward.

“E”: Place the small coupler inside and the big one outside.

“A”: Take care not pinch the position light lead wires between 

the headlight assembly and cowling brace.

“F”: Pass the right handlebar switch lead wire above the ignition switch 

lead wire.

-------------------------------------------------------------------------------------------------------------------------------------------------------------

Wiring Systems:  9A-8

6

7

Upside

“B”

1

“A”

“D”

“E”

3

4

5

12

16

13

15

14

17

“ a ”

2

11

13

14

9

8

9

10

“C”

I947H1910908-03

1. Clamp

: Pass the side-stand switch lead wire left side of the water by-
pass hose and clamp them in this range. Cut off the excess tip 
of the clamp.

13. Battery negative lead wire

: Pass the battery negative lead wire in front of the PCV hose. (For E-33, pass 
the lead wire below the EVAP solenoid hoses, and between the EVAP solenoid 
lead wire and wiring harness.)

2. Clamp

: Bind the lead wires at the blue taping point and face the clamp 
end to the engine side.

14. Rear brake light switch lead wire

: Pass the rear brake light switch lead wire below the wiring harness and battery 
negative lead wire at the frame bridge part, then above the wiring harness at 
the fuel tank rail part. (For E-33, pass the brake light switch lead wire between 
EVAP solenoid bracket and frame.)

3. IAT sensor

15. Crankcase breather (PCV) hose

4. ISC valve

16. Starter motor lead wire

5. Clamp

: Bind the lead wires with throttle body at blue taping point and 
face the clamp end forward.

17. CKP sensor lead wire

: Route the CKP sensor lead wire in front of the PCV hose and above the 
battery negative lead wire.

6. White coupler (for ignition coil #1)

“A”: Pass the side-stand switch lead wire between the water hoses.

7. Clamp:

Face the clamp end upward.

“B”: Plate the joint coupler to the engine side and pass the side-stand switch lead 

wire and speed sensor lead wire left side of the water by-pass hose.

8. STVA lead wire

“C”: Pass the rear brake light switch lead wire between the frame and drain hose, 

and under the clamp.

9. Wiring harness

“D”: Pass the CMP sensor lead wire between ignition coil #1 and #2.

10. ISC valve lead wire

“E”: Pass the wiring harness above the air cleaner duct.

11. Regulator/rectifier lead wire

“a”: 60 

±

 5

°

12. EVAP system purge control solenoid valve lead wire (E-33 only)

-------------------------------------------------------------------------------------------------------------------------------------------------------------


Content      ..     35      36      37      38     ..