CFMoto ATV CF500-A 4x4. Service Manual - part 4


  Index      Manuals     CFMoto ATV CF500-A 4x4. Service Manual


Search            copyright infringement  


Content      ..     2      3      4      5     ..


CFMoto ATV CF500-A 4x4. Service Manual - part 4


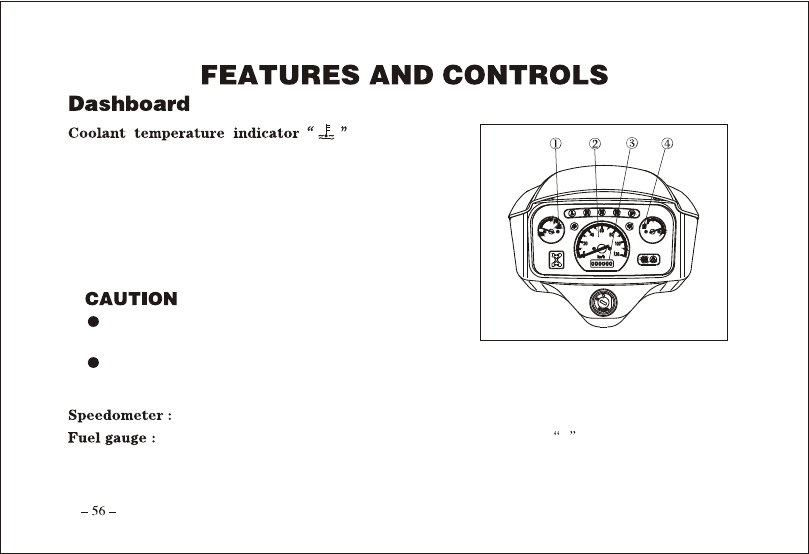
when the temperature indicator is in the white area of side C, it 

means that the temperature is normal. The red area of side H 

indicates that the temperature is high. In that case please stop 

the engine until the coolant temperature goes down. In case the 

temperature frequently goes high, check coolant capacity or 

consult the local dealer.

The engine may overheat if the ATV is overloaded. If this 

happens, reduce the load to specification.

After restarting, make sure that the temperature indicator is in the white area of side C. Continuous use 

while the temperature indicator is in the red area of side H may cause damage to the engine.

shows the riding speed. Odometer : shows the total distance traveled.

  indicates the remaining amount of the gasoline in the fuel tank.

F

indicates the total amount 

of fuel is 19L. When the indicator reaches the first point of red mark, fuel should be refilled as soon as possible.

The red mark indicates that the remaining fuel is only about 4.0L.

-------------------------------------------------------------------------------------------------------------------------------------------------------------

The break-in period for your new ATV is defined as twenty first ten hours of operation, or the time it takes to 
use the first four full tanks of gasoline. No single action on your part is as important as following the 
procedures for a proper break-in. Careful treatment of a new engine will result in more efficient performance 
and longer life for the engine. Perform the following procedures carefully.

Excessive heat build-up during the first three hours of operation will damage close-fitted engine parts. Do 
not operate at full throttle or high speeds for extended periods during the first three hours of use.
Use of any oils other than those recommended may cause serious engine damage.  We recommend the use of 
4 Synthetic Oil for your 4-cycle engine.

1. Fill the fuel tank with gasoline.
2. Check the oil level on the dipstick.

Add 4 Synthetic Oil if necessary to maintain the oil level between the minimum and maximum level marks.

3. Drive slowly at first. Select an open area that allows room to familiarize yourself with vehicle operation and 

handling.

4. Vary throttle positions.  Do not operate at sustained idle.
5. Perform regular checks on fluid levels, controls and areas outlined on the daily pre-ride inspection checklist.  

See page 58.

-------------------------------------------------------------------------------------------------------------------------------------------------------------

6. Pull only light loads.

7. During the break-in period, change both the oil and the filter at 25 hours or one month.

If a proper inspection is not done before each use, severe injury or death could result.  Always inspect the 

vehicle before each use to ensure it s in proper operating condition.

-------------------------------------------------------------------------------------------------------------------------------------------------------------

-------------------------------------------------------------------------------------------------------------------------------------------------------------

Engine exhaust contains poisonous carbon monoxide and can cause loss of consciousness resulting in severe 
injury or death. Never run an engine in an enclosed area.

Operating the vehicle immediately after starting could cause engine damage. Allow the engine to warm up 
for several minutes before operating the vehicle.

1. Apply the rear brake pedal.
2. Turn the main switch to

ON

.

3. Shift the gear selector into the neutral or park position.

 When the gear selector is in the neutral or park position, if either indicator light does not come on, ask 

your dealer to inspect its electric circuit.

 The engine can be started in any gear if the rear brake pedal is applied. However, it is recommended to 

shift into neutral or park before starting the engine.

4. Use the starter (choke) in reference to the figure:

o

Position 

 : Cold engine start ambient temperature below 5

(40  F).

o

o

Position 

 : Cold engine start ambient temperature at 0 

(30  F)

30 

 (90  F) and warming up position.

-------------------------------------------------------------------------------------------------------------------------------------------------------------

Position 

 : Cold engine start ambient temperature Above 

o

25 

 (80  F) and warm engine start position.

5. Completely close the throttle lever and start the engine by 

pushing the start switch.

If the engine fails to start, release the start switch, then 
push the start switch again. Pause a few seconds before 
the next attempt. Each cranking should be as short as 
possible to preserve battery energy. Do not crank the 
engine more than 10 seconds on each attempt.
If the battery is discharged, pull the recoil starter to 
start the engine.

6. If the engine is started with the starter (choke) in position 

, the starter (choke) should be returned to 

position

 to warm up the engine. If the engine is started with the starter (choke) in position 

, keep the 

starter (choke) in this position to warm up the engine.

7. Continue warming up the engine until it idles smoothly and return the starter (choke) to position 

before 

riding.

-------------------------------------------------------------------------------------------------------------------------------------------------------------

See the

Break-In Period

section prior to operating the engine for the first time.

To start a warm engine, refer to the

Starting a cold engine

section. The starter (choke) should not be used. 

The throttle should be opened slightly.

Before shifting, you must stop the machine and return 
the throttle lever to the closed position. Otherwise, the 
transmission may be damaged.
Shifting: Neutral to High and High to Low

1. Bring the machine to a complete stop and return the 

throttle lever to the closed position.

2. Apply the brakes, then shift by moving the gear selector along the shift guide.

Make sure that the gear selector is completely shifted into position.

-------------------------------------------------------------------------------------------------------------------------------------------------------------

3. Open the throttle lever gradually.
Shifting: Neutral to Reverse and Reverse to Park

The gear selector cannot be shifted into reverse (R) or 
park(P) without applying the rear brake.

1. Bring the machine to a complete stop and return the 

throttle lever to the closed position.

2. Apply the rear brake pedal.
3. Shift from neutral to reverse or from reverse to park and 

vise versa by moving the gear selector along the shift guide.

When in reverse, the reverse indicator light should be on. If the light does not come on, ask your dealer to 
inspect the reverse indicator light electrical circuit.
Due to the synchronizing mechanism in the engine, the light may not come on until the ATV starts moving.

4. Check behind for people or obstacles, then release the rear brake pedal.
5. Open the throttle lever gradually and continue to watch rear while moving backward.

When you shift into reverse, make sure there are no obstacles or people behind you. When it is safe to 
proceed, go slowly.

-------------------------------------------------------------------------------------------------------------------------------------------------------------

Overloading the vehicle or carrying or towing cargo improperly can alter vehicle handling and may cause 
loss of control or brake instability. Always follow these precautions when hauling cargo:

 Never exceed the stated load capacity for this vehicle.

 Reduce speed and allow a greater distance for braking.

 When operating over rough or hilly terrain, reduce speed and cargo to maintain stable driving conditions.


In the rear rack should be as far forward and as low as possible. Carrying a high load raises the center of 
gravity and creates a less stable operating condition. Reduce load weight when cargo is high. When 
handling off-centered loads that cannot be centered, secure the load and operate with extra caution.


Unsecured loads may shift and create unstable operating conditions, which could result in loss of control 
of the vehicle. Always be sure that the rear rack is lowered.


when operating with loads extending beyond the rack. Stability and maneuverability may be adversely 
affected, causing the machine to overturn. 

-------------------------------------------------------------------------------------------------------------------------------------------------------------

Carrying a load on only the front rack or the rear rack may cause an imbalanced condition and increases 
the possibility of vehicle overturn. Balance loads proportionally between the front rack and the rear rack, 
but do not exceed the stated load capacity.
Use extreme caution when applying brakes with a loaded vehicle. Avoid terrain or situations that may 
require backing down- hill.
Always attach the tow load to the hitch point.
The vehicle should never exceed 10 mph (16 km/h) while towing a load on a level surface.  Vehicle speed 
should never exceed 5mph (8 km/h) when towing loads in rough terrain, while cornering, or while 
ascending or descending a hill.
Do not obstruct the headlight when loading the front rack.

-------------------------------------------------------------------------------------------------------------------------------------------------------------

Your ATV has been designed to carry or tow a certain amount of load. Always read and understand the load 
distribution warnings listed on the warning labels, and never exceed the specified weights.
Cargo weight should be mounted as low as possible.  When operating over rough or hilly terrain, reduce speed 
and cargo to maintain stable driving conditions.
1. Always load the cargo as far forward as possible.
2. Always operate the vehicle with extreme caution whenever hauling or towing loads. Balance, handling, and 

control may be affected.

3. Slow down.

-------------------------------------------------------------------------------------------------------------------------------------------------------------

1. Sit upright with both feet on the footrests and both hands on the handlebars.
2. Start the engine and allow it to warm up, apply the brakes, then shift the transmission into gear.
3. Check your surroundings and determine your path of travel.
4. Release the brakes.
5. Slowly depress the throttle with your right thumb and begin driving. Vehicle speed is controlled by the amount 

of throttle opening.

6. Drive slowly. Practice maneuvering and using the 

throttle and brakes on level surfaces.

-------------------------------------------------------------------------------------------------------------------------------------------------------------

To make a turn, steer in the direction of the turn, leaning your upper 
body to the inside of the turn while supporting your weight on the 
outer footrest. This technique alters the balance of traction between 
the wheels, allowing the turn to be made smoothly. The same leaning 
technique should be used for turning in reverse.

Practice making turns at slow speeds before attempting to turn at 
faster speeds.

Turning at sharp angles or at excessive speeds can result in vehicle 
overturn and lead to serious injury.  Avoid turning at sharp angles.  
Never make turns at high speeds.

-------------------------------------------------------------------------------------------------------------------------------------------------------------

Whenever riding on slippery surfaces such as wet trails or loose 
gravel, or during freezing weather, follow these precautions:
1. Slow down when entering slippery areas.
2. Maintain a high level of alertness, reading the trail and avoiding 

quick, sharp turns which can cause skids.

3. Correct a skid by turning the handlebars in the direction of the 

skid and shifting your body weight forward.

4. Driving with AWD engaged can assist in controlling the vehicle in slippery areas.

Severe damage to drive train may occur if the AWD is engaged while the wheels are spinning. 
Always engage AWD when the wheels have traction or are at rest.

Failure to exercise care when operating on slippery surfaces can result in loss of tire traction and cause loss 
of control, accident, and serious injury or death.
Never apply the brakes during a skid.
Do not operate on excessively slippery surfaces. Always reduce speed and use additional caution.

-------------------------------------------------------------------------------------------------------------------------------------------------------------

Whenever traveling uphill, follow these precautions:
1. Always travel straight uphill.

2. Avoid steep hills (25

maximum).

3. Keep both feet on the footrests.
4. Shift your weight forward.
5. Proceed at a steady rate of speed and throttle opening.
6. Remain alert and be prepared to take emergency action. This may 

include quick dismounting of the vehicle.

If all forward speed is lost:

Keep your weight uphill.
Apply the front brake. When fully stopped, apply rear brake as well, then shift gear selector into park position.

If the ATV begins rolling backwards:

Keep your weight uphill. Never apply engine power. Never apply the rear brake while rolling backwards.
Apply the front brake. When fully stopped, apply the rear brake as well, and then shift gear selector into park 
position.
Dismount on uphill side, or to either side if ATV is pointed straight uphill. Turn the ATV around and remount, 
following the procedure described on page 73.

-------------------------------------------------------------------------------------------------------------------------------------------------------------

Braking and handling are greatly affected when operating in hilly terrain.  Improper procedure could cause 
loss of control or overturn and result in serious injury or death.

Avoid climbing steep hills (25

maximum).

Use extreme caution when operating on hills, and follow 
proper operating procedures outlined in the owner s manual.

Improperly crossing hills or turning on hills can result in 
loss of control or vehicle overturn, resulting in severe 
injury or death. Avoid crossing the side of a hill when 
possible.  Follow proper procedures as outlined in the owner s manual.

Sidehilling can be a dangerous type of driving and should be avoided if at all possible. If you do enter into a 
situation where sidehilling is necessary, follow these precautions:
1. Slow down.

-------------------------------------------------------------------------------------------------------------------------------------------------------------


Content      ..     2      3      4      5     ..