CFMoto motorcycle CF150-A, CF150-C. Service Manual - part 2
 

  Index      Manuals     CFMoto motorcycle CF150-A, CF150-C. Service Manual


Search            copyright infringement  


Content      ..      1      2      3      ..


CFMoto motorcycle CF150-A, CF150-C. Service Manual - part 2


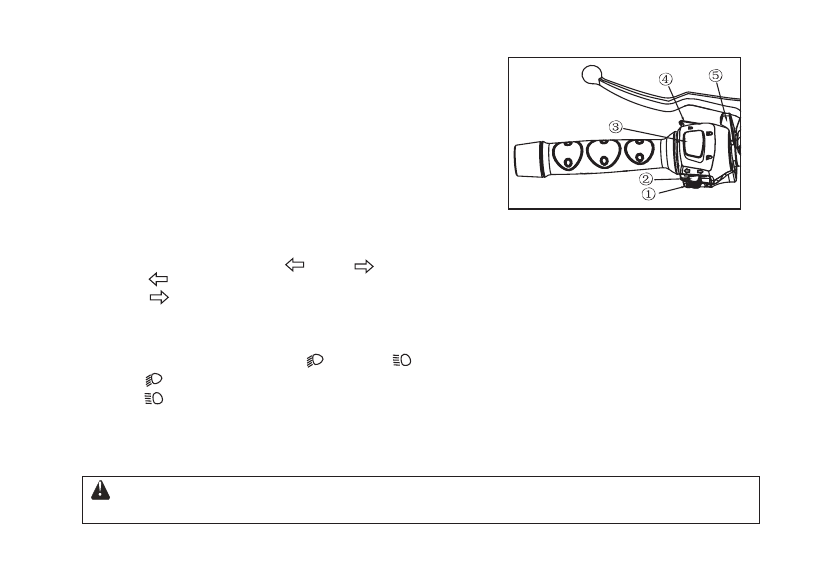
(4)Left handlebar switch comp.

Horn button
Turn light switch
Headlight switching beam control
Passing light switch
Choke cable lever

[Horn button]

Press this button, horn will speak to remind other

 driver or people.

[Turn light switch]

There’re 3 positions             


and “Middle” for


turn light switch.

“     ”:  

Left turn light on and turn left.

“     ”:  

Right


turn


light


on


and


turn


right.

“Middle” :     In


the


middle


position

go


straight.

“      ”  

“       ”

[Headlight switching beam control]

There’re two position           


and


      : 

Low


beam


      : 

High


beam

[Passing light switch]

When press passing light switch, passing light 

ON

”,

it


means


passing


action


will


be


taken

.

When making turn or lane change, be sure to switch on turn light 
and switch off until go straight.

WARNING:

“   ”

“   ”

“   ”

“   ”


Pic 7: LH handlebar switch Comp

-1 4-

-------------------------------------------------------------------------------------------------------------------------------------------------------------

Choke lever

Turn the choke lever backwards to close the choke and turn it forth to open.

[                      ]

Note: Please close the choke while start a cold engine; Choke must be 

fully open after engine is pre-heated for 2 to 5 minutes(steady idle)

(5)Fuel and fuel tank cap

【Fuel】

It is recommended to use fuel of 90# or above

;

【How to open the fuel tank cap】

Insert the key into fuel tank hole and then turn close wise

;

Press the pin on the fuel tank cap into


groove of fuel tank neck and then take out the key

.

Pic 8: Fuel tank cap

Warning:  1.Fuel is highly flammable, and refuel

 must be performed after engine is off 

and in well-ventilated ploce; It is

 forbidden to smoke and create related
 fire in surrounding;

2.Never over refuel (below the refuel

 neck );

3.Never mix oil and fuel to avoid damage

 to engine.

(6)Fuel switch (see pic 9)


The fuel switch is on the left rear position of fuel tank

.

Fuel flows into carburetor through the

- 15-

-------------------------------------------------------------------------------------------------------------------------------------------------------------


filter

see illustration

.

There are three positions for the switch.  


is

OFF

and


“  ”

“  ”

  is 

ON

”  

is spare fuel pipe.

In 


position

,

it means no fuel to the carburetor and in

“  ”

position, fuel is flowing tothe 

carburetor

in


“  ”

position, it is for spare fuel with capacity of 1.5L


and


refuel


must


be


carried shortly.

1. In order to avoid sudden stop due to lack of fuel, fuel switch must be in

 position of 

WARNING:

“  ”

position;

2. Do not get burnt by heated engine while operating the switch.

Pic 9: Fuel switch

OFF 

ON 

Ready

-1 6-

and

“ ”

-------------------------------------------------------------------------------------------------------------------------------------------------------------

(7)Use of engine oil:


Use of quality and proper engine oil can extend the engine life

;

engine oil should be SG or over


SG level with


SAE

1 5

W

-40.

If this is not available

,

please select as following:


1 0

W

-30 

should be used in cold areas

.

SG level


Sheet 3

                SAE20W-50

SAE15W-40

20

W-50

15W-40

10W-30

-20 -10   0

10   20  30 40

Pic 10: Engine oil 

Engine life and performance will be damaged due to unqualified engine oil.

WARNING:

(8)Tire (Illustration 11)

Appropriate tire pressure will promise steady and enjoyable drive and also will prolong the tire 
life. Inspection of the tire pressure should be carried out in a 

cold ” situation.

See chart 4 to check tire specs of tires:

- 17-

-------------------------------------------------------------------------------------------------------------------------------------------------------------

kgf / cm

2

1. 7 5

2. 0 0

2 .75 - 18  4 2 P

kPa

2 00

1 7 5

3 .2 5 -18  5 2 P

k Pa

225

1 75

psi

29

25

kgf /cm

2

2 .25

1. 75

p si

2 5

3 3

Sheet4

It is dangerous to ride on worn tires and also will defect tire performance , turning, operating ,

 stability, etc. Tire must be replaced when tire is worn to 

position. Check before ride if there

 are cuts or nails, or deformation of tires and rims.

Note:
1. Extra tire wearing can be caused by improper tire pressure and lead 

accidents;

2. Damage of the tire or tire off the rims can be caused due to insufficient

 tire pressure. 

Pic 11: Tire

Tire pressure

 at cold con-

dition

Front wheel

Rear wheel

Tire size

For one person

For two persons

Front wheel

Rear wheel

-1 8-

-------------------------------------------------------------------------------------------------------------------------------------------------------------

(1).Break-in

Break-in period is to guarantee parts surface to be polished well and  keep a good performance 

in future ride.
New vehicle break-in mileage: 1500km

.

Notes:
1.During break-in, do not drive in full throttle, and keep engine below
 6500rpm;

2.Each gear should be practiced;
3.Do not drive at a fixed throttle position;
4.Do not carry over max loading capacity;
Replace three times of engine oil.

Operation tips during break-in period:

1.  0

- 300

km

:

Keep throttle open less than a half and speed within 35km/h

;

2.  300-600km:
Keep throttle open less than a 2/3 and speed within 45km/h

;

3.  600-1500km:
Keep throttle open less than a 3/4 and speed within 55km/h

.

【Replace engine oil three times during break-in】


Replace engine oil three times at 300km

,

600km and 1000km

,

and replace after each


1500km

.

- 19-

OPERATION GUIDE

-------------------------------------------------------------------------------------------------------------------------------------------------------------

Engine oil: SG or above.

Note:
1.Replace the enginge oil in engine warming condition ;
2.Contact CFMOTO for service or inspection if necessary during break-in;
Maintenance in the service place is needed when break-in is over. 

(2)Inspection before driving.

To ensure the performance and safety, a routine inspection shall be performed before daily drive.

Procedures: 

1. Check engine oil(see P29) and make sure there is no leakage

;

2. Check if there is enough fuel

;

3. Check if there is enough coolant and make sure there is no leakage

;

4. Check front and rear brakes(free distance: front 10

- 2 0

mm

 & 

rear

 1 0 - 2 0

mm

for


smooth


operation

;

5. Check front and rear tire air pressure and for cuts or wearing

;

6. Check driven chain to see if lubrication status is good

;

7. Check throttle hand lever: free distance is 2 to 6 mm

,

and


easy


operation

;

8. Check lights and signals: front headlights, tail lights, brake lights, turning lights, signals, and 
horns

;

9. Check the battery and add distilled water if necessary

;

10. Checking steering for smooth operation, no loose position

;

11. Check clutch lever: free distance should be between 10 to 20 mm


and


easy


handling

;

-2 0-

-------------------------------------------------------------------------------------------------------------------------------------------------------------

1

2. Tightening inspection: front and rear shocks, wheel shafts, engine suspension, steering,

 handlebar, front and rear brakes, clutch, rear suspension, rack, and electronic parts, bolts, 

screws, etc.

(3)Starting(Illustration 12)

Clutch  lever        

Kill switch         

Throttle handle grip     

Ignition switch

【Starting preparations】

1.Turn on and to position


“   ”  

and turn kill switch to

“   ”  

and turn throttle lever to start the

 engine.

2.Put gear position at low or neutral

;

3.Left hand hold 


tight


and


clutch


lever.

Starting preparations are finished to finish above three steps.

Pic12: Ready to start

- 21-

-------------------------------------------------------------------------------------------------------------------------------------------------------------

Notes:
1.Always drive after 2 to 5 minutes for pre-warming;

【Starting the vehicle】

After finishing starting preparations, press button 

and turn throttle lever to start the engine. 

2.Release

button after 3 to 5 minutes to avoid damage to the battery;

3.After starting, release 

immediately; never press starting button to

 avoid damage to the engine;

4.Make sure side stand will be ok for smooth drive or operation;
5.Increase the throttle slowly;
6.Never drive in limited space to avoid danger from exhaust gas;
7.Replace clutch switches if necessary;
8.Never start engine with clutch switch on, or parts will be damaged and 
lead to accident.

-2 2-

“   ”  

“   ”  

“   ”  

-------------------------------------------------------------------------------------------------------------------------------------------------------------

(4).Ride 

Gear shifting operation

This the model CF150-A  has five gear, 1 and 2 is low gear, 3 is middle gear and 4 and 5 are high

 gear. And the model CF150-C has 6 gear, 1-speed and 2-speed are low speed gear, 3-speed is

middle speed gear and 4

、5、6 -

speed


are


high


gear. 

shifting operations procedures as follows: 
a.  During idle, release clutch lever and put foot on the gear lever to position     

;

Slowly increase engine turning


and


release


clutch


lever


slowly


to


start


the


     engine steadily

;

b

.

When vehicle steadily drive, decrease engine turning and release clutch lever and put foot

 onto gear lever and to 


position;


Increase


engine


turning


and


release


clutch


lever


slowl y

;

d

.

Gears of                    

follow


operation


of  “b” procedure.in case of decrease gear , follow

 operation of  “a” procedure;


e

.

During gear shifting, make sure gear lever is pressed to bottom and then release clutch lever.

③、④、⑤、⑥

【                                          】

- 23-

c.

-------------------------------------------------------------------------------------------------------------------------------------------------------------

1

0

← →

← →

← →

← →

2

3

4

5

Never perform gear shifting with open throttle or do not hold the clutch

 lever, this will lead to damage to engine and transmission, and cause 

accidents.

WARNING:

Pic14: Gear shift flowchart

Pic13: Location of gear shift

Gear shift arm

-2 4-

1

0

← →

← →

← →

← →

2

3

4

5

6

-------------------------------------------------------------------------------------------------------------------------------------------------------------

CLIMBING OR TURNING

1. During climbing, power is also very limited due to high gear. In this case, shift to low gear 
when climbing to avoid clutch slippery


due


to


too


sharp


speed


deceleration

;

2. During turning, clutch slippery may occur due to sudden throttle


release and deceleration. 

In this case.

BRAKE


Pic

15: 

1. During acceleration

,

front and rear brake are both needed

(

Slowly grasp front brake lever and

 put foot on rear brake, never brake with only front or rear brake

)

for


brake

;

2. In case of emergency, switch off vehicle and use front and rear brake to stop

;

3. Try to avoid sudden brake, because sudden brake will cease the front and rear wheel suddenly 
and cause vehicle out of control

;

Front brake lever

Foot brake lever

Brake position

【                                           】

【           】

- 25-

-------------------------------------------------------------------------------------------------------------------------------------------------------------

4. Do not accelerate or decelerate or turn sharply on soft or slipper road to avoid falling and

 vehicle out of control

;

5. During long downgrade, use the front or rear brake once in a while and shift to low gear. 
Brake with the engine to avoid


paws


and rims too hot and reduce the braking capability.

1. Slowly


release


throttle


and


decelerate

;

2. Gently use the front and rear brake to stop the vehicle

;

3. Switch off vehicle


“     ”

, or turn off the engine switch

;

5. Lock the wheel for anti-theft.

【                         】

4. Use the main stand to support the vehicle;

-2 6-

STOP VEHICLE

-------------------------------------------------------------------------------------------------------------------------------------------------------------

Follow suggestions and instructions in below chart for vehicle maintenance and vehicle


must


be cleaned before


maintenance

.

Sheet 5

- 27-

VEHICLE MAINTENANCE

  1000

km

           4000

km         

8000

km

          12000

km

I

I

I

I

I

I

I

I

       ①

I

       ①

                            ③

I

I

I

I

I

I

I

I

I

I

I

I

I

I

I

I

I

I

I

I

I

I
I

I
I

I

I
I

I
I

I

I
I
I

I

I

I
I
I
I


I

I

I

I

*

*

*

*
*

*

*

*

*

*
*

*

*

*

*

*

*
*

*

*

*

Times

Items

Intervals

Odometer KM (Remarks 2)

Remaek

Fuel  tank  and  fuel hos e

Throttle

Coolant

Air filter element
Spark plug
Engine oil
Oil filter

Drive chain/chain sprocket

Brake pads

Brake fluid

Front/Rear brake system

Switches

Lighting & Horn
Battery

Fuse or overload protector

Connecting wiring

Valve clearance

Clutch

Suspension system

Tightening bolt
Wheels

Be aring of steering ha ndlebar

Engine overhaul

Remarks

Remarks

Remarks

Every month

Remarks

Remarks


Remarks

Replace in case of damage or aging

C for every 2000Km

I for every 2000Km

Replace at 300, 600, 1000Km for new vehicle and replacement for every 1500Km 

I and L for every 500Km

I and R for every 1000Km

Change for every 2 years

Initial: 20 hours or I for 200Km

I


for


every

 8 0 

hours


or

 2 0 00

Km

I for every 80 hours or 2000Km.

Pre-ride
Pre-ride
Pre-ride

R for ev ery 20 000Km

R for every 6000Km

Pre-ride
Pre-ride
Pre-ride

Pre-ride

Pre-ride
Pre-ride

-------------------------------------------------------------------------------------------------------------------------------------------------------------

REMARK: I means on-time inspection, cleaning, adjustment, lubrication or replacement.

 C means cleaning, R means replacement, L means lubrication.

   No such mark means customers can do the service himself or go to CFMOTO 
service point for service or maintenance;

   One such mark means service should be done in CFMOTO service station, but can
 also be handled by customer himself if tools, parts are available;

   Two marks mean service must be done in CFMOTO service station for safety  dri ve;

Remark

 means cleaning period should be reduced in drive roads with a lot of sand or dust;

Remark

 means service periods must be respected again after odometer data is over maximum


reading data

;

Remark

 means


related service or adjustment must be done in CFMOTO service station.

 Engine o

il

 inspection or c

hange


Uses of engine lubrication oil

:

reduce scrub

,

increase sealing

,

cool down parts

,

clean parts and


anti

-

corrosion

;

Engine life can be reduced or parts wear due to poor quality, lasting use or insufficient volume of

 engine oil.


And also they will cause engine overheating

,

clutch wear or burnt

,

power decrease ,


abnormal noise or engine oil over consumed

.

Please refer to Page 8 for choice of the oil.

*

*

*

(2) E

ngine


oil

 inspection

Before every use

,

check level of engine oil

,

which should be over the marked level (see Pic 16)

on oil window on cover of right crankcase

 .

1. Use main stand on flat surface of the road

;

2. In case of insufficient engine oil

,

add


SAE

15

W

-40/

SG or oil above to upper marked level

;

3. Install the engine oil cap to check for oil leakage.

-2 8-

-------------------------------------------------------------------------------------------------------------------------------------------------------------

Engine can be seriously damaged due to lack of engine oil.

WARNING:

Pic16: Inspection of engine oil 

【Change of engine oil】

1. Please refer to Page 19 

Run-in period 

for engine oil change for new vehicles ;


2. Run-in period should be every time of 1500 km

;

3. Before change , heat the engine and then switch off the key and then drain engine oil (Do not
get burnt by the warm up)

;

4. Place an empty case for drained oil and remove the drain bolt

;

5. Clean oil filter and drain bolt after oil drainage and check if it is necessary to replace gasket as


well

.

Install oil filter

,

spring

,

gasket and then drain bolt cap

;

6. Add 1200 ml of engine oil and install engine oil cap if there is no oil leakage. If oil filter has to
be replaced at the same time , 1250ml oil should be filled.

Cap of 
engine Oil

Upper limit

Lowe r limi t

Oil drain bolt

- 29-

-------------------------------------------------------------------------------------------------------------------------------------------------------------


Content      ..      1      2      3      ..