CFMoto motorcycle CF650NK. Service Manual - part 7
 

  Index      Manuals     CFMoto motorcycle CF650NK. Service Manual


Search            copyright infringement  


Content      ..     5      6      7      8     ..


CFMoto motorcycle CF650NK. Service Manual - part 7


WARNING

This unit contains high pressure nitrogen gas. Mishandling can cause explosion.
Read Service Manual for instructions. Do not incinerate, puncture or open.

Wheels

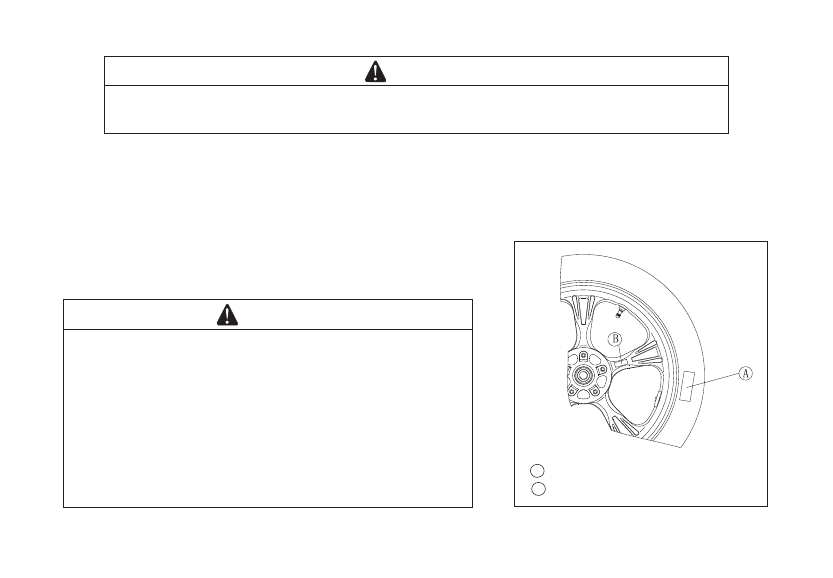
Tubeless tires are installed on the wheels of this motorcycle.
The indication of TUBELESS on the tire side wall and the rim show that the tire and rim are 
specially designed for tubeless use.

B

A

TUBELESS Mark on the tire


TUBELESS Mark on the rim

WARNING

The tires, rims, and air valves on this motorcycles
are designed only for tubeless type wheels.
The recommended standard tires, rims and air valves
must be used for replacement.
Do not install tube-type tires on tubeless rims.
The beads may not seat properly on the rim causing
Tire deflation. 
Do not install a tube inside a tubeless tire. Excessive
Heat build-up may damage the tube causing tire
deflation.

-91-

-------------------------------------------------------------------------------------------------------------------------------------------------------------

Tires

Payload and Tire Pressure

Failure to maintain proper inflation pressures or observe payload limits for your tires may adversely

 affect handing and performance of your motorcycle and can result in loss of control.

The maximum recommended load on addition to vehicle weight is 180kg

 (

397lb

) , 

including rider

 passenger

,

baggage and accessories

Remove the air valve cap.

Check the tire pressure often, using an accurate gauge.

Make sure to install the air valve cap securely

.

NOTE

Measure the tire pressure when the tires are cold (that is, when the motorcycle

 has not been ridden more than a mile during the past 3 hours).

Tire pressure is affected by changes in ambient temperature and altitude and so 
the tire pressure should be checked and adjusted when your riding involves wide

 variations in temperature or altitude. 

-92-

-------------------------------------------------------------------------------------------------------------------------------------------------------------

Tire Air Pressure(When cold)

280kPa 

280kPa 

Front

Rear

A

Tire pressure Gauge

Tire Wear, Damage

As the tire tread wears down, the tire becomes more susceptible to puncture and failure.

An accepted estimate is that 90% of all tire failures occur during the last 10% of tread life (90% worn).

So it is false economy and unsafe to use the tires until they are bald.

In accordance with the Periodic Maintenance Chart, measure the depth of the tread with a depth 

gauge, and replace any tire that has worn down to the minimum allowable tread depth. 

Minimum Tread Depth

0.8

1mm

0.8

1mm

Front

Rear

-93-

-------------------------------------------------------------------------------------------------------------------------------------------------------------

A

Tire Depth Gauge

Visually inspect the tire for cracks and cuts, replacing the tire in case of bad damage.

Swelling or high spots indicate internal damage, requiring tire replacement.

Remove any imbedded stones or other foreign particles form the tread.

NOTE

Most countries may have their own regulations requiring a minimum tire tread 
depth; Be sure to follow them.
Have the wheel balance inspected whenever a new tire is installed.

-94-

-------------------------------------------------------------------------------------------------------------------------------------------------------------

WARNING

To ensure safe handling and stability, use only the recommended standard pressure.
Tires that have been punctures and repaired do not have the same capabilities as

 undamaged tires. Do not exceed 100km/h (60 mph) within 24 hours after repair, and
 180 km/h (110 mph) at any time after that.

NOTE

When operating on public roadways, keep maximum speed under traffic law limits.

Standard Tire (Tubeless)

             120/70R17 M/C

58H

             160/60R17 M/C

69H

Front

Rear

Size

Size

WARNING

Use the same manufacturer's tires on both front and rear wheels.

-95-

-------------------------------------------------------------------------------------------------------------------------------------------------------------

Battery Sulfation

Sulfation occurs when the battery is left in a discharged condition for an extended time. Sulfate is a

 normal byproduct of the chemical reactions within a battery. But when continuous discharge allows

 the sulfate to crystallize in the cells,


the


battery


plates


become


permanently


damaged


and


will


not


hold


a


charge

If


this


happens

you


must


replace


it


with


a


new


battery

.

Battery Maintenance 

Always keep the battery fully charged. Failure to do so can damage the battery and result in a shorter


life

If


you


ride


your


vehicle


infrequently

inspect


the


battery


voltage


weekly


with


a


voltmeter

.


If


it


drops


below

 12.8 

volts

the


battery


should


be


charged


with


an


appropriate


charger

 (

check


with


your


dealer

) .

If


you


will


not


use


the


vehicle


for


longer


than 2 weeks, the battery should be 

charged with an appropriate charger. Don

'

t use an automotive-type quick charger that may overc-

harge the battery and damage it.

Battery recharger

Contact your dealer for the charger specification.

Battery Charging

Remove


the


battery


from


the


vehicle

refer to Battery Removal

Attach the leads from the charger and charge the battery at a rate that is a tenth of the battery

 capacity. For example, the charging rate for a 10Ah battery would be 1.0 ampere.

Ensure that the battery is fully charged before installation.

see Battery Installation

).

-96-

-------------------------------------------------------------------------------------------------------------------------------------------------------------

CAUTION

Never remove the sealing strip, or the battery can be damaged. Don't install a

 conventional battery in this motorcycle , or the electrical system can't work
 properly.

NOTE

If you charge the sealed battery, never fail to observe the instructions shown in

 the label on the battery.

-97-

-------------------------------------------------------------------------------------------------------------------------------------------------------------

Battery Removal

Remove the front seat.

Disconnect the wires from the battery, first from the (-) terminal, then the (+) terminal.

Take the battery out of the case.

Clean the battery with a solution of baking soda and water. Ensure that the wire connections are

 clean.


B

A

Battery Installation

Place the battery in the battery case.

Connect the wire to the (+) terminal first, then connect the 

wire to the (-) terminal.

CAUTION

Routing the (-) cable to the (+) terminal of the battery or 
the (+) cable to the (-) terminal can seriously damage the 
electrical system. 

-98-

+

Terminal


Terminal

_

-------------------------------------------------------------------------------------------------------------------------------------------------------------

Coat the terminals with dielectric grease to prevent corrosion.

Cover the terminals with their caps.

Reinstall the parts removed.

Foot pedal

Lubricate foot pedal with silicone oil periodically

 (

refer to maintenance chart for more information

).

-99-

-------------------------------------------------------------------------------------------------------------------------------------------------------------

Headlight Beam

Horizontal Adjustment

The headlight beam is adjustable horizontally. If improperly adjusted

,

the beam will point to left or

 right

.

You can use a screw driver to turn the horizontal adjuster clockwise or counterclockwise until


the beam points straight ahead

.

B

C

A

Horizontal Adjuster              Vertical Adjuster  

View From Back Side

Vertical Adjustment

    The headlight beam is adjustable vertically. If adjusted too low, neither low nor high beam will

 illuminate the road far enough ahead. If adjusted too high, the high beam will fail to illuminate the

-100-

-------------------------------------------------------------------------------------------------------------------------------------------------------------

 road close ahead, and the low beam will blind oncoming drivers. Turn the vertical adjuster clockwise
 or counterclockwise to adjust the vertical angle of the beam. 

NOTE

On high beam, the standard point should be slightly below with the motorcycle 
on its wheels and the rider seated. Adjust the beam according to local regulations.

-101-

-------------------------------------------------------------------------------------------------------------------------------------------------------------

Rear Turn Light

650NK is equipped with LED turn light. If damaged, you need to replace it with a complete turn light.

B

A

Front Turn Light

When replacing the front LED turn light, you need to

 remove the side panel.

C

D

Front Turn Light      Side Panel

-102-

Cover, rear turn signal

Screw

-------------------------------------------------------------------------------------------------------------------------------------------------------------

Fuses

Fuse box is located under the front seat. The main fuse is fitted on the starter relay under the left side

 cover. If a fuse is blown, inspect the electrical system to determine the cause and replace it with the
 same ampere.

A

B

Fuse Box        Spare


Fuses

C

D

Main Fuse       Left Side Cover

Remove the front seat

Remove the left side cover

-103-

-------------------------------------------------------------------------------------------------------------------------------------------------------------

WARNING

Don't use any substitute for the standard fuse. Replace the blown fuse with a new

 one of the same ampere .

B

A

Normal                                       Failed

-104-

-------------------------------------------------------------------------------------------------------------------------------------------------------------

Cleaning Your Motorcycle

General Precautions

Keeping your motorcycle clean will improve its appearance, optimize its performance and extend the

 life of various components. Covering your motorcycle with a high quality, breathable motorcycle

 cover will help protect its finish from harmful UV rays, pollutants, and reduce the amount of dust


reaching


its


surfaces

.

Always wash the motorcycle before the engine and muffler cool down. 

Avoid applying degreaser to seals, brake pads, and tires.

Always use non-abrasive wax and cleaner.

Avoid all harsh chemicals, solvents, detergents, and household cleaning products like ammonia-

based window cleaners. 
Gasoline, brake fluid, and coolant will damage the finish of painted and plastic surfaces: wash them

 off immediately.

Avoid wire brushes, steel wool, and all other abrasive pads or brushes.

Be careful when washing the windshield, headlight cover, and other plastic parts as they can be

 easily scratched.

Avoid high water pressure, as it may penetrate seals and electrical components, resulting in vehicle

 damage.

Avoid spraying water in delicate areas such as air intakes, fuel line, brake components, electrical

 components, muffler outlets and fuel tank openings.

-105-

-------------------------------------------------------------------------------------------------------------------------------------------------------------

Washing Your Motorcycle

Rinse with cold water from a garden hose to remove any loose dirt.

Mix a mild neutral detergent (specified for motorcycles or automobiles) and water in bucket. Use 

a soft cloth or sponge to wash your motorcycle. If needed, use a mild degreaser to remove any oil

 or grease build up.

After washing, rinse your motorcycle with clean water to remove any residue (residue from the

 detergent can damage the components of your motorcycle.) 

Dry off your motorcycle with a soft cloth to avoid scratches.

Start the engine and allow it idle from several minutes. The heat from the engine will help dry off

 the moist areas.

Carefully ride your vehicle at a low speed and apply the brake several times. Doing so help dry the

 brakes and restores them to normal operating performance. 

Lubricate the drive chain to prevent rusting.

NOTE

After a ride in an area where the roads are salted or near the ocean, immediately wash your 
motorcycle with cold water. Don't use warm water to wash your vehicle as it accelerates the

 chemical reaction of the salt. After drying, apply an anti-corrosion sprays on all metal or
 chrome surfaces to prevent corrosion. In the case of riding in the rain or washing the 

motorcycle, condensation may form on the inside of the headlight lens. To remove the 
moisture, start the engine and turn on the headlight, gradually the condensation formed on

 the inside of the lens will clear off.

-106-

-------------------------------------------------------------------------------------------------------------------------------------------------------------


Content      ..     5      6      7      8     ..