Parker Variable Speed Drive AC30 series. User’s Manual (2017) - page 7
 

  Index      Manuals     Parker Variable Speed Drive AC30 series. User’s Manual (2017)


Search            copyright infringement  


Content      ..     5      6      7      8     ..


Parker Variable Speed Drive AC30 series. User’s Manual (2017) - page 7


6-20 

Safe Torque Off  


EXAMPLE USER WIRING 


WARNING 

THE WIRING EXAMPLES SHOWN IN THIS SECTION ARE FOR ILLUSTRATION ONLY. THEY ARE NOT TO BE CONSIDERED 

FINAL DESIGNS, NOR AS AN ATTEMPT TO CREATE A DESIGN FOR SPECIFIC SOLUTIONS. 
THE USER / INSTALLER IS RESPONSIBLE FOR DESIGNING A SUITABLE SYSTEM TO MEET ALL REQUIREMENTS OF THE 

APPLICATION INCLUDING ASSESSING AND VALIDATING IT. PARKER WILL NOT ACCEPT ANY LIABILITY FOR FAILURE TO 

DO THIS OR FOR ANY CONSEQUENTIAL LOSS OR DAMAGE. 


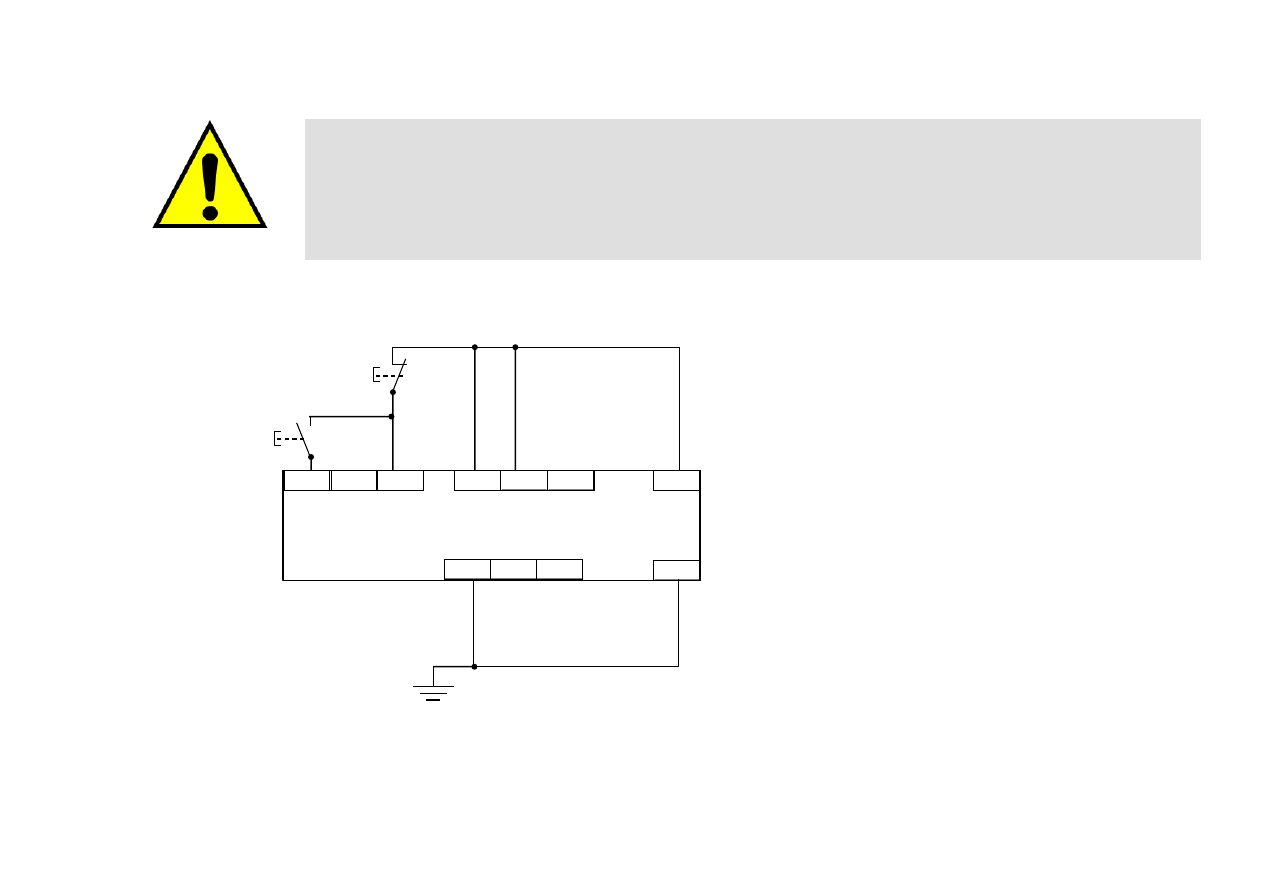
APPLICATIONS THAT DO NOT REQUIRE STO FUNCTION 


Here the STO inputs X10/01 and X10/03 have been set to the inactive state (tied to +24V). Drive control is performed solely through software with no 

inherent safety function. The drive is controlled with its own start and stop pushbuttons. 

Note:

 Only X10/02 or X10/4 must be earthed, i.e. they should not both be earthed otherwise it is possible to create an earth loop. 

STO inputs X10/01 and X10/03 must be 

connected to 24VDC with respect to 

terminals X10/02 or X10/04. 
STO Status output on X10/05 and X10/06 

may be left disconnected. 
All wiring shown is within the control cubicle. 

DRIVE 

START 

DRIVE 

STOP 

24VDC 

X13/02 

X12/01 


X10/01  X10/03 X10/06

X12/05 

X12/06

X10/05

X10/04

X10/02

Safe Torque Off  

6-21


MINIMUM STO IMPLEMENTATION 

This example shows the minimum connections required. To reset from STO requires that STO Request contacts are closed to permit normal drive 

operation. The user must do a risk assessment to ensure that all safety requirements are met. The user must select and assess appropriate equipment. 


Note:

 all wiring shown is within the control cubicle. 


To run the drive: 

Ensure the STO Request contacts are closed. 
Press the DRIVE START button. 

To perform operational (not STO) stop: 

Press the DRIVE STOP button.  
Wait for the motor to come to rest. 

To invoke STO: 

Press the DRIVE STOP button. 
Wait for the motor to come to rest. 
Open the STO Request contacts simultaneously. The 

contacts must remain open for the entire duration that STO 

is required: they must not be momentary action switches. 

The drive will confirm via X10/05 that STO has been invoked 

by the lamp being ON.  
If the lamp is OFF, do not access the machine as a fault may 

be present. 

Note:

 if the STO Request contacts open while the motor is 

rotating, the motor will coast to rest (unless external forces 

act on it). 

DRIVE 

START 

DRIV

STOP 

STO 

REQUEST 


INVERTER STO 

24VDC 

X13/02  

X12/01

X10/01 X10/03  

X10/06

X12/05

X10/02 X10/04


X10/05 

X12/06

6-22 

Safe Torque Off  


STO IMPLEMENTATION WITH SAFETY CONTROL UNIT 

This example improves on the previous one by showing the resetting from a STO stop. The example shows wiring and terminal numbering for a 

Siemens 3TK2827, but similar products are available from other vendors. Use of this Siemens part does not imply it is suitable for the user’s application. 

The user must select and assess appropriate equipment. 


Note:

 On power-up, the safety control unit outputs are OPEN; thus the STO state is requested of the inverter. The latter responds by energising KA1 if both 

channels are active and healthy. KA1 is used as a self-check for the reset cycle of the safety control unit. If a reset cannot be achieved due to KA1 

being de-energised, a fault may be present and must be resolved by the user before relying on the STO function. See Fault Operation on page 6-14. 


DRIVE 

START 

DRIVE 

STOP 

SAFETY 

DEMAND 


INVERTER STO 

24VDC 


SAFETY CONTROL UNIT 

RESET 

KA1 

KA1 


POWER 

SUPPLY 

THIS WIRING MUST BE WITHIN THE CONTROL CUBICLE. 

X10/01 X10/03 X10/06

X13/02

X12/01 


X12/05

X10/02 X10/04 X10/05

X12/06 

A1 

Y10  Y11  Y12  Y21  Y22 

13 

23 

A2 

PE  Y33 

Y34 

14 

24 

Safe Torque Off  

6-23


To start the drive: 

Ensure the Safety Demand switch is reset (contacts closed). Press the RESET button to ensure the Safety Control Unit is reset; its 

contacts to the inverter should close making the STO function inactive. The inverter STO output should then turn OFF. Then press the 

DRIVE START button. 

To perform operational stop (non STO): 

Press the DRIVE STOP button.  
Wait for the motor to come to rest. 

To invoke STO: 

Press the DRIVE STOP button. 
Wait for the motor to come to rest. 
Operate the Safety Demand switch (contacts open) that causes the safety control unit to open its output contacts together. In response, 

the drive will confirm, by energising KA1 via X10/05, that STO has been invoked. The user may wish / require that this is verified by 

mechanisms not shown on this drawing. 


DANGER 

IF KA1 IS DE-ENERGISED, DO NOT ACCESS THE MACHINE AS A FAULT MAY BE PRESENT. 
THE USER MUST RESOLVE THE DETECTED FAULT BEFORE USING THE STO FEATURE. FAILURE TO DO SO COULD 

RESULT IN STO NOT BEING ACHIEVABLE, AND THUS THE MOTOR MAY ROTATE UNEXPECTEDLY AND COULD RESULT IN 

INJURY, DEATH OR DAMAGE. PARKER WILL NOT ACCEPT ANY LIABILITY FOR FAILURE TO DO THIS OR FOR ANY 

CONSEQUENTIAL LOSS OR DAMAGE. 


Note:

 if either channel of the Safety Demand is requested while the motor is rotating, the motor will coast to rest unless external forces act on it. 

6-24 

Safe Torque Off  


SS1 IMPLEMENTATION USING SAFETY CONTROL UNIT 

This Safe Stop 1 (SS1) implementation causes the drive to come to rest in a controlled manner, and STO is actioned after a time delay determined by 

the safety delay relay. This conforms to SS1 defined in EN61800-5-2:2007 para 4.2.2.3 c). The example shows wiring and terminal numbering for a 

Siemens 3TK2827, but similar products are available from other vendors. Use of this Siemens part does not imply it is suitable for the user’s application. 

The user must select and assess appropriate equipment.  


Note:

 On power-up, the Safety Control Unit outputs are OPEN; thus STO is requested of the inverter. This responds by energising KA1 if both channels 

are active and healthy. KA1 is used as a self-check for the reset cycle of the Safety Control Unit. If a reset cannot be achieved due to KA1 being de-

energised, a fault may be present and must be resolved by the user before relying on the STO function. See Fault Operation on page 6-14. 


A2  PE  Y33 

24VDC 

SAFETY 

DEMAND 

KA1 


POWER 

SUPPLY 


SAFETY CONTROL UNIT


THIS WIRING MUST BE WITHIN THE CONTROL CUBICLE. 

KA1 


INVERTER STO 

RESE

DRIVE 

START 

DRIVE STOP 

X13/02 X12/01

X10/01 X10/03 X10/06

X12/05

X10/02 X10/04 X10/05

X12/06 

A1  Y10  Y11  Y12  Y21  Y22  13  47 

57 

Y34  14  48 

58 

Safe Torque Off  

6-25


To start the drive: 

Ensure the Safety Demand switch is reset (contacts closed). Press the RESET button to ensure the Safety Control Unit is reset; its 

contacts to the inverter should close making the STO function inactive. The inverter STO output should then turn OFF. Then press the 

DRIVE START button. 

To perform operational stop (non STO): 

Press the DRIVE STOP button.  
Wait for the motor to come to rest. 

To invoke SS1: 

Operate the Safety Demand switch (contacts open). This should cause the Safety Control Unit to open its instantaneous output, shown 

here as a single channel. This causes the drive to decelerate to rest using its own software which is not safety critical in this instance. 

Note: the drive’s block diagram must be configured to provide this ramp to rest functionality. 
After a time delay set in the Safety Control Unit, the pair of delayed OFF output contacts open together. This time delay must be set 

longer than the worst case time for the motor to come to rest. 
In response, the drive will confirm, by energising KA1 via X10/05, that STO has been invoked. The user may wish / require that this is 

verified by mechanisms not shown on this drawing. 


DANGER 


IF KA1 IS DE-ENERGISED, DO NOT ACCESS THE MACHINE AS A FAULT MAY BE PRESENT. 


THE USER MUST RESOLVE THE DETECTED FAULT BEFORE RELYING FURTHER ON THE STO FEATURE. FAILURE TO 

DO SO COULD RESULT IN STO NOT BEING ACHIEVABLE, AND THUS THE MOTOR MAY ROTATE UNEXPECTEDLY AND 

COULD RESULT IN INJURY, DEATH OR DAMAGE. PARKER WILL NOT ACCEPT ANY LIABILITY FOR FAILURE TO DO THIS 

OR FOR ANY CONSEQUENTIAL LOSS OR DAMAGE. 


Note:

 if either of the delayed OFF output contacts in the Safety Control Unit open while the motor is rotating, the motor will coast to rest 

(unless external forces act on it). 


6-26 

Safe Torque Off  


STO Function Checking 

Two levels of checking are required: a comprehensive check and a regular check.  
The user / machine builder must determine the frequency of these checks based on their knowledge, use of the machine, appropriate standards and 

any legal requirements. 


DANGER 

ALL TESTS MUST PASS. IF ANY TEST FAILS, IT MUST BE INVESTIGATED AND RECTIFIED BEFORE ATTEMPTING TO PUT 

THE EQUIPMENT INTO SERVICE. 
FURTHER OPERATION OF THE INVERTER WITHOUT RESOLVING THIS FAILURE IS ENTIRELY AT THE USER’S OWN RISK. 

FAILURE TO DO SO COULD RESULT IN INJURY, DEATH OR DAMAGE. PARKER WILL NOT ACCEPT ANY LIABILITY FOR 

FAILURE TO DO THIS OR FOR ANY CONSEQUENTIAL LOSS OR DAMAGE. 
SEE SAFETY CATEGORY DEFINITIONS AND LIMITATIONS, REFER TO EN ISO 13849-1:2008. 


When STO becomes active during any test, power to the motor must be seen by the user to be quenched instantaneously. Note: the drive should 

respond in less than 10 milliseconds. 
All STO checks should be performed after the inverter has been commissioned for speed control. 

Safe Torque Off  

6-27


Comprehensive Check 

A comprehensive check of the STO function ensures the overall integrity of the STO functionality. It proves the independent operation of each channel 

individually (including during the normal dual channel operation), the STO user feedback operation, and the essential single fault detection. 
It must always be performed: 

  During factory test 

  During commissioning activities 

  After repair or replacement of the inverter 

  After any hardware or software design changes which may affect the inverter concerned. 

  After each intervention into the system and control wiring. 

  At defined maintenance intervals as determined by the machine builder and /or user risk assessments and associated verification 

assessments. 

  If the machine has been idle for more than a period of time determined by the machinery builder and user risk assessments. 

The check must be made by suitably qualified professional personnel following all necessary safety precautions. They must be fully conversant with all 

equipment concerned. 

NOTE

:  In the following text where it is required that “all power” is removed.  Remove power and wait 5 minutes. 

The performance of the individual test steps of the STO function should be logged. 


WARNING 

DURING THIS TEST, THE SAFETY FUNCTION MUST NOT BE RELIED ON BECAUSE AT TIMES ONLY ONE CHANNEL WILL 

BE ACTIVATED AND THEREFORE THE INTENDED SAFETY FUNCTION MAY NOT BE AVAILABLE.  
ALSO STO WILL BE ACTIVATED WHILE THE MOTOR IS ROTATING, WHICH IS NOT THE NORMAL OPERATION.  
THEREFORE THE USER MUST ENSURE IT IS SAFE TO DO THIS TEST BY USING AN APPROPRIATE RISK ASSESSMENT 

AND TAKING ANY ADDITIONAL RISK REDUCTION MEASURES. 

6-28 

Safe Torque Off  


THE FOLLOWING TEST STEPS MUST BE PERFORMED: 

 
Initial Check: 

STO test


Comprehensive Check, Activity


Expected reaction and effect


Ensure that no harm can come to personnel or equipment if the motor turns. 


Apply +24V DC to terminals X10/01 and X10/03. 


Switch on power to the drive. 

No error must be present in the drive system. 
X10/05 and /06 must be OFF. 

Configure the drive and associated equipment if necessary so that it can be started 

and stopped, and a speed setpoint provided. 

No error must be present in the drive system. 
X10/05 and /06 must be OFF. 

Try to start the drive with a non-zero setpoint. This setpoint value will be referred to as 

SPT1 for brevity in these tests. Leave this set throughout all tests. 

Drive must start and motor must turn at SPT1. 
X10/05 and /06 must be OFF. 


Safe Torque Off  

6-29


Channel A Check: 

STO test 

Comprehensive Check, Activity 

Expected reaction and effect 

With drive running and motor turning at SPT1, momentarily disconnect terminal 

X10/01 (maximum duration of disconnect = 1 second), while retaining +24V at 

terminal X10/03. 

Motor must immediately coast to rest. 
Drive must report STO trip immediately. 
X10/05 and /06 must remain OFF. 

Ensure terminals X10/01 and X10/03 are both 24V. Try to restart the drive. 

Drive must restart at SPT1. 
STO trip must clear. 
X10/05 and /06 must remain OFF. 

 
Channel B Check: 

STO test 

Comprehensive Check, Activity 

Expected reaction and effect 

With drive running and motor turning at SPT1, momentarily disconnect terminal 

X10/03 (maximum duration of disconnect = 1 second), while retaining +24V at 

terminal X10/01. 

Motor must immediately coast to rest. 
Drive must report STO trip immediately. 
X10/05 and /06 must remain OFF. 

Ensure terminals X10/01 and X10/03 are both 24V. Try to restart the drive. 

Drive must restart at SPT1. 
STO trip must clear. 
X10/05 and /06 must remain OFF. 


6-30 

Safe Torque Off  


Channel A Fault Check: 

STO test 

Comprehensive Check, Activity 

Expected reaction and effect 

10 

Ensure the drive is running and the motor is turning at SPT1. 
Disconnect terminal X10/01 for approximately 5 seconds (must exceed 3 seconds). 

Motor must immediately coast to rest. 

Drive must report STO trip immediately. 

X10/05 and /06 must remain OFF. 

11 

The STO function has latched in hardware to disable the drive. 
Re-apply 24V to terminal X10/01, and then try to restart drive. 

Drive must not start. 

Drive must continue to report STO trip. 

X10/05 and /06 must remain OFF. 

12 

Remove and re-apply all power to the drive 

X10/05 and /06 must be OFF. 

13 

Try to restart drive at SPT1. 

Drive must start at SPT1. 

X10/05 and /06 must remain OFF. 

Channel B Fault Check: 

STO test 

Comprehensive Check, Activity 

Expected reaction and effect 

14 

Ensure the drive is running and the motor is turning at SPT1. 
Disconnect terminal X10/03 for approximately 5 seconds (must exceed 3 seconds). 

Motor must immediately coast to rest. 

Drive must report STO trip immediately. 

X10/05 and /06 must remain OFF. 

15 

The STO function has latched in hardware to disable the drive. 
Re-apply 24V to terminal X10/03, and then try to restart drive. 

Drive must not start. 

Drive must continue to report STO trip. 

X10/05 and /06 must remain OFF. 

16 

Remove and re-apply all power to the drive 

X10/05 and /06 must be OFF. 

17 

Try to restart drive at SPT1. 

Drive must start at SPT1. 

X10/05 and /06 must remain OFF. 

18 

Stop the drive. 

Drive must decelerate to rest. 

X10/05 and /06 must remain OFF. 

Safe Torque Off  

6-31


User Output Check: 

STO test 

Comprehensive Check, Activity 

Expected reaction and effect 

19 

Remove connections to X10/01 and X10/03 within 1 second of each other. 

X10/05 and /06 must be ON. 

20 

Try to restart the drive. 
Wait for at least 10 seconds with the run command active, then remove it. 

Drive must not start while run command is given.  
Drive must report STO trip immediately. 
X10/05 and /06 must remain ON. 

21 

Reconnect X10/01 and X10/03 to 24V. 

X10/05 and /06 must turn OFF immediately. 

22 

Try to restart the drive at SPT1. 

STO trip must clear. 
The drive must restart at SPT1. 

23 

Stop the drive. 
Test is complete. 

Drive must stop. 

 
The tests specified above are the minimum set; further test steps may be required depending on the application, for example a controlled stop should be 

verified in a SS1 application. 

6-32 

Safe Torque Off  


REGULAR CHECK 

A comprehensive check must take precedence if it coincides with a regular check. 
A regular check is intended only to demonstrate the STO is functional. It will not always detect the loss of a single channel. It is therefore important for 

the user and / or machinery builder to determine the frequency of the comprehensive checks based on their knowledge and application of the machine. 

The following tests should be performed:- 


STO test


Regular Check, Activity


Expected reaction and effect


Ensure that no harm can come to personnel or equipment if the motor turns. 


Apply +24V DC to terminals X10/01 and X10/03. 

No error must be present in the drive system 

Apply power to the drive. 

X10/05 and /06 must be OFF. 
No error must be present in the drive system. 

Try to start the drive with a non-zero setpoint. This setpoint value will be 

referred to as SPT1 for brevity in these tests.  
Leave this set throughout all tests. 

The drive should start and the motor should turn at SPT1. 
X10/05 and /06 must remain OFF. 

Disconnect X10/01 and X10/03 within 1 second of each other  and leave 

disconnected for approximately 5 seconds (must exceed 3 seconds).. 

Drive must stop immediately, and report STO trip. 
X10/05 and /06 must be ON. 

Re-apply 24V to X10/01 and X10/03. 

STO trip indication must remain. 
X10/05 and /06 must turn OFF.  

Try to restart drive. 

STO trip indication should clear. 
Drive must restart at SPT1. 

Stop the drive. 
Test is complete. 

Drive must stop. 

Safe Torque Off  

6-33


Troubleshooting 

Symptom 

Examine: 

Probable cause 

Remedy 

GKP display 

User 

output 

6


User inputs 

7


Drive won’t start when 

given a start 

command 

*** TRIPPED *** 

SAFE TORQUE OFF 

On 

Both < 15V 

STO is invoked. 

When safe to do so, connect X10/01 and 

X10/03 to 24V ± 10% 

*** TRIPPED *** 

SAFE TORQUE OFF 

Off 

Both >15V and < 

30V 

Fault latch might have 

tripped 

Remove all power from drive and re-apply. If 

symptom persists, immediately return the 

inverter for repair.  

See the DANGER box below. 

Any other trip message, e.g. 

overvoltage 

Off 

Both >15V and < 

30V 

Drive is tripped, but 

not due to STO.  

Reset the trip, and remove its cause. If 

symptom persists, return the inverter for repair. 

Any other message 

Off 

Both >15V and < 

30V 

Faulty hardware 

Return for repair 

Drives starts 

unexpectedly 

Don’t care 

Don’t care 

Both < 5V 

Faulty hardware 

Immediately return the inverter for repair. 

See the DANGER box below. 

Don’t care 

Off 

Both > 5V 

STO not invoked by 

the user. 

Use STO according to instructions elsewhere 

in this chapter. 

Drive fails 

comprehensive or 

regular STO test 

Don’t care 

Don’t care 

Don’t care 

Faulty hardware 

Immediately return the inverter for repair. 

See the DANGER box below. 

The table above is only a guide. It may not be a comprehensive list of all possible symptoms relating to STO. Parker will not accept responsibility for any 

consequences arising from its incompleteness or inaccuracy. 


Important note:  

  There are no user-serviceable parts in the inverter drive. Refer to the Safety Warnings and Limitations section on page 6-18 of this chapter. 


6

 Continuity through X10/05 and X10/06 

7

 Measure X10/01 and X10/03 relative to X10/02 or X10/04 

6-34 

Safe Torque Off  


DANGER 

IF ANY FAULTY OPERATION OF THE STO FUNCTION IS OBSERVED OR SUSPECTED, OPERATION OF THE INVERTER 

SHOULD CEASE IMMEDIATELY AND THE UNIT SHOULD BE RETURNED TO PARKER FOR INVESTIGATION AND REPAIR. 

FAILURE TO DO SO COULD RESULT IN INJURY, DEATH OR DAMAGE.  

FURTHER OPERATION OF THE INVERTER WITHOUT RESOLVING THIS FAILURE IS ENTIRELY AT THE USER’S OWN RISK.  

SEE SAFETY CATEGORY DEFINITIONS AND LIMITATIONS. REFER TO EN ISO 13849-1:2008 


The Graphical Keypad  

7-1


AC30

Chapter 7:  

The Graphical Keypad 

 
The inverter is fitted with a Graphical Keypad referred to throughout as GKP. 
 
It provides for local control of the inverter, monitoring, and complete access for application 
programming. 
 
Insert the Keypad into the front of the inverter (replacing the blank cover); or if supplied 
separately to be used remotely, up to 3 meters away, use the mounting kit with connection 
lead, see Chapter 4 for full details.  
 
For remote installation refer to page 4-14 Fitting a Remote GKP. 


Content      ..     5      6      7      8     ..