BMW Motorcycle (R1100RT, R1100RS, R850/1100GS, R850/1100R). Manual - part 23
 

  Index      Manuals     BMW AG Motorcycle (R1100RT, R1100RS, R850/1100GS, R850/1100R). Repair Manual


Search            


Content   ..  21  22  23  24   ..


BMW Motorcycle (R1100RT, R1100RS, R850/1100GS, R850/1100R). Manual - part 23


16.9

Removing and installing fuel filter, 
fuel pump and fuel level sensor

e

 Caution:

Fuel is flammable and a hazard to health. 
Observe relevant safety regulations.

Drain fuel tank.

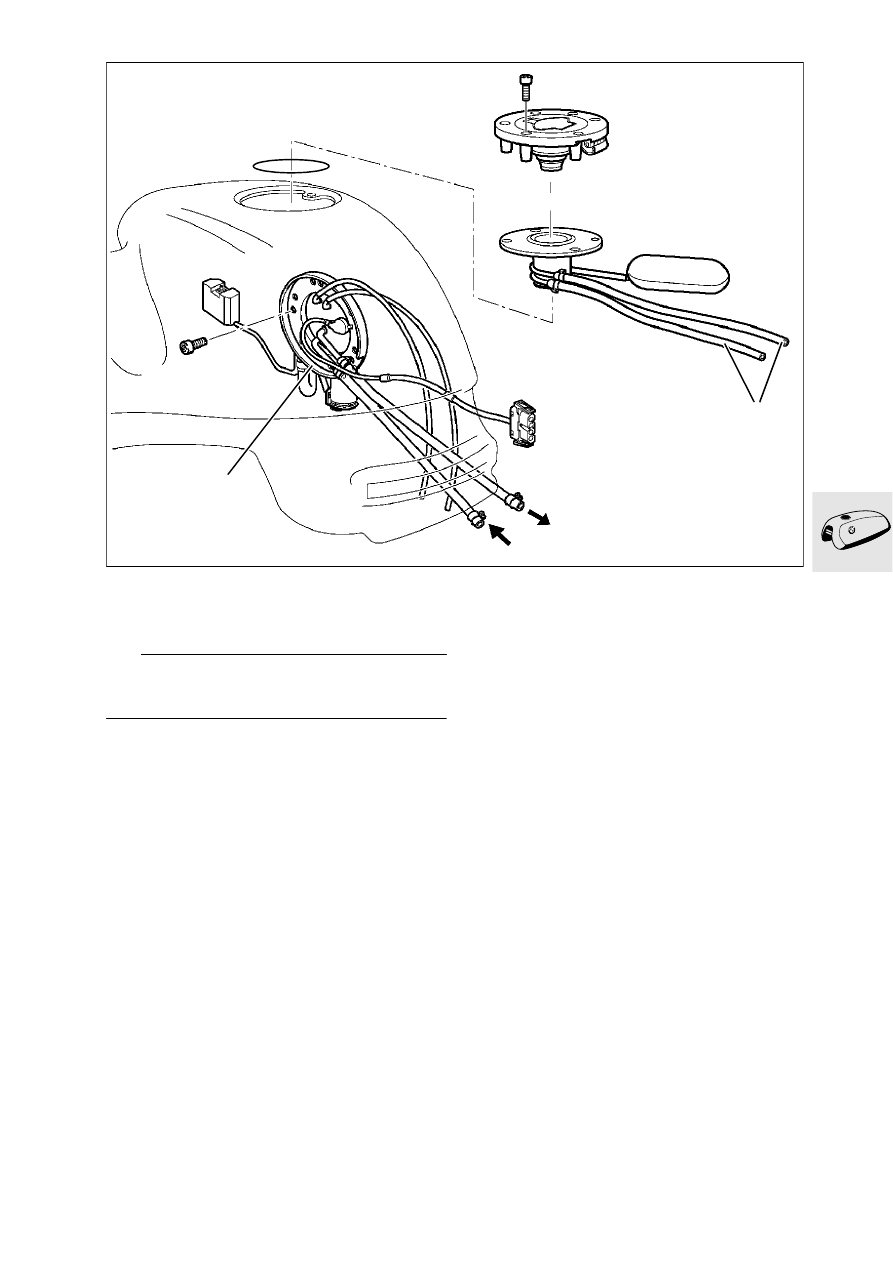
Remove fuel pump unit (1) and detach hoses (2).

1

2

RS160020

16.10

Removing and installing fuel filter

e

 Caution:

Note direction of fuel flow through filter (1).

Removing and installing fuel pump and 
fuel level sensor

Unfasten electrical connections (2) at fuel 
pump (3).

Unscrew hose clip (4). 

Remove fuel pump.

Install in the reverse order of work.

Tighten non-reusable hose clips with special 
pliers, BMW No. 13 1 500.

e

 Caution:

Use only an O-ring (5) in good condition. After 
assembly, check fuel pump unit for leaks.

X

 Tightening torque:

Fuel pump assembly to tank .......................... 6 Nm

1

3

4

5

2

RS160030

16.11

Checking fuel pump pressure

Connect test pressure gauge, 
BMW No. 16 1 500, on the discharge side.

Run engine at idle speed.

Fuel pressure:
Nominal value................................ 3 bar (43.51 psi)

L

  Note:

If fuel pressure is low, check pump, fuel filter, 
pressure regulator and fuel line.

Removing and installing fuel distrib-
utor and pressure regulator

Remove air cleaner box.

a

See Group 23, Removing gearbox

Pressure regulator (1).

16 1 500

RS160040

1

RS160050

18.1

Contents

Page

18

Removing and installing exhaust system 

........................................................................3

Removing and installing muffler (silencer)

 ............................................................................3

Removing and installing front exhaust pipes

 ......................................................................4

18 Exhaust system

18.2

18.3

18

Removing and installing exhaust 
system

Removing and installing muffler 
(silencer)

[KAT] Detach fuel tank and pull it to rear.

Separate plug connector (1) for oxygen sensor 
and detach cable.

e

 Caution:

Do not pull the oxygen sensor cable.

Loosen pipe clip (2).

Unfasten retaining screws (3).

[RS/RT] Take off the retainer at the rear muffler 
mount.

[GS/R] Unscrew the rear pipe clip.

Remove rear muffler.

Install in the reverse order of work.

e

 Caution:

Note position of wiring for oxygen sensor.

X

 Tightening torque:

RS/RT] Muffler to footrest ............................ 35 Nm
[GS/R] Muffler at rear frame ......................... 24 Nm
Muffler to support plate for center stand ...... 20 Nm
Clip on muffler 
(Grease clamping surface with Never Seeze) 50 Nm

[CAT] Remove and install oxygen sensor (5).

e

 Caution:

After trial run, read out Motronic fault memory.

X

 Tightening torque:

Oxygen sensor
(Grease with Never Seez) ............................. 55 Nm

5

2

GS/R

3

RS/RT

RS180020

1

RS180050

18.4

Removing and installing front exhaust 
pipes

Loosen pipe clip (2).

Unscrew exhaust pipe mount (6).

Take off front exhaust pipes.

Install in the reverse order of work.

L

  Note:

When installing, use new seals (7).

X

 Tightening torque:

Front exhaust pipes 
(with plate) at cylinder head .......................... 22 Nm
Front exhaust pipes
(with outer pipe) at cylinder head.................. 18 Nm
Clip at muffler 
(coat clamping surface with Never Seez) ...... 50 Nm

6

7

7

6

2

RS180030

21.1

Contents

Page

21

Technical Data

............................................................................................................................... 3

Removing and installing clutch 

............................................................................................7

Removing clutch

 ..............................................................................................................................9

Installing clutch

 ................................................................................................................................9

Adjusting clutch operating clear-ance 

...........................................................................10

21 Clutch


Content   ..  21  22  23  24   ..