BMW Motorcycle (R1100RT, R1100RS, R850/1100GS, R850/1100R). Manual - part 5


  Index      Manuals     BMW AG Motorcycle (R1100RT, R1100RS, R850/1100GS, R850/1100R). Repair Manual


Search            


Content   ..  3  4  5  6   ..


BMW Motorcycle (R1100RT, R1100RS, R850/1100GS, R850/1100R). Manual - part 5


00.30

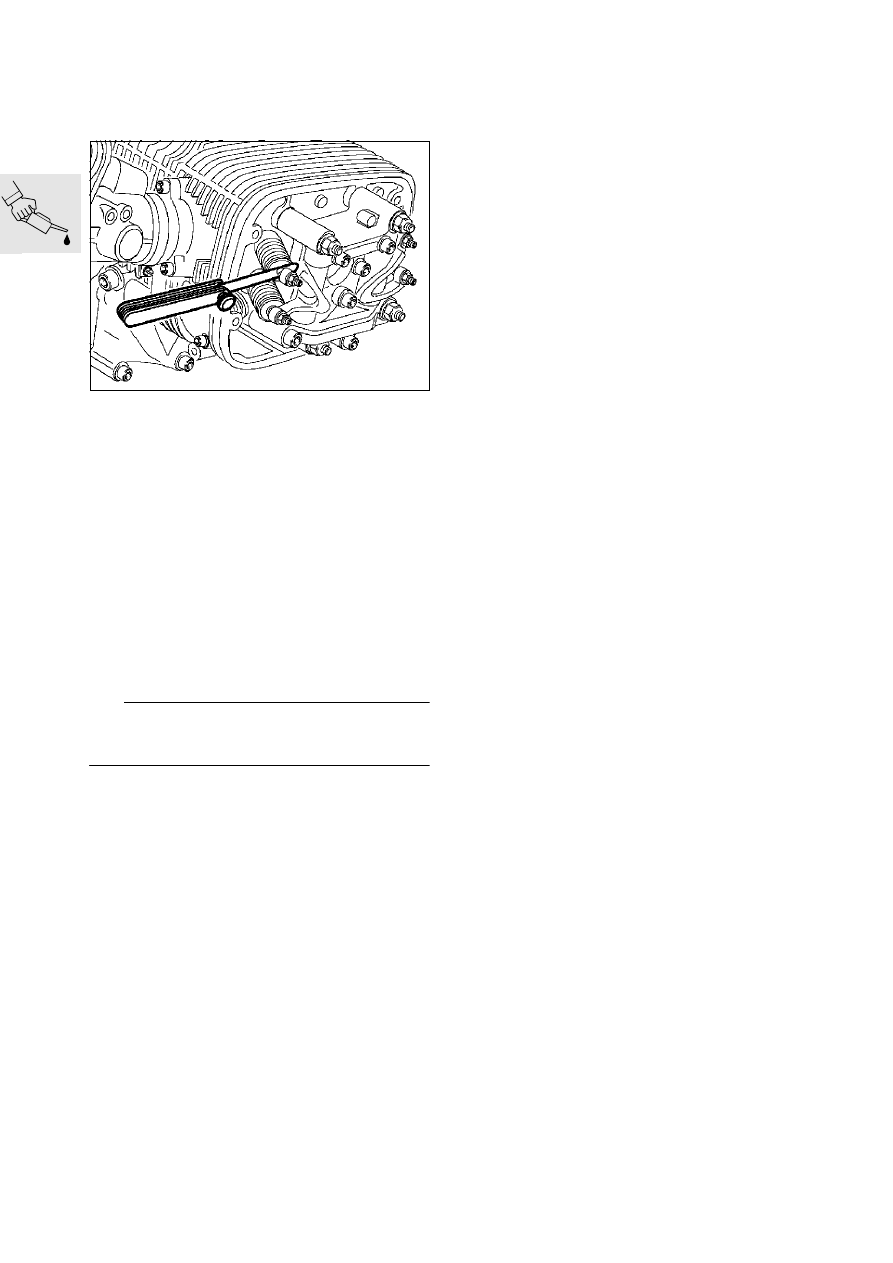
Checking/adjusting valve operating 
clearances

(Inspection I, II, III)

Check valve clearance with feeler gauge and, if 
necessary, correct with adjusting nut/lock.

Adjust valve clearances with the engine cold 
(max. 35°
C):
Inlet .......................................... 0.15 mm ( 0.006 in)
Exhaust .................................... 0.30 mm (0.012 in )

X

 Tightening torque:

Locknut .......................................................... 8 Nm

Check valve clearance again; it must be possible 
to insert the feeler gauge between valve stem 
and rocker with only slight resistance to move-
ment.

Assemble in reverse order

e

 Caution:

Make sure that gasket is correctly seated. Gaskets 
and sealing faces must be free from oil or grease

X

 Tightening torqu

Cover screw ................................................... 8 Nm
Spark plug (without lubricant) ....................... 20 Nm

RS110980

00.31

Adjusting Poly-V belt

(Inspection I, II, III)

Renewing Poly-V belt 

(40 000 km/24 000miles)

(renew maintenance-free belts every 60 000 km/
36 000 miles)

[RS/RT] Remove left side fairing.

[R] Remove left fuel tank cover.

Remove front cover.

Slacken off alternator mounting screws (1,3,4) 
and install a new Poly-V belt if necessary.

Poly-V belt adjusting procedure:

Poly-V belt installation procedure:

Place the Poly-V belt in position, tension it and 
turn the engine over once, then release belt ten-
sion.

Poly-V belt tensioning procedure:

Screw hex nut (1) on adjusting screw (2) up 
handtight (no tools to be used!)

Tighten adjusting screw (2) with a torque wrench, 
fully tighten retaining nut (3), slacken adjusting 
screw and tighten screws fully.

X

 Tightening torque:

Poly-V belt preload......................................... 8 Nm
Alternatorto alternator support cover............ 20 Nm

L

 Note:

a

See also Service Information 12 020 95 (700).

2

1

4

3

RS110480

RS110490

00.32

Checking brake pads and discs for 
wear/renewing

(Inspection III)
(ABS: Inspection II, III)

Checking brake pads for wear

[RS] Measure brake pad thickness (arrows).

[GS/R/RT] Check wear marks.

e

 Caution:

Brake pad thickness must not fall below the minimum 
value.
Change pads only as a complete set.

Minimum lining thickness: ........ 1.5 mm (0.059 in)

Renewing brake pads


– front brake

Unfasten/remove brake caliper.

e

 Caution:

[RS/R/RT] Do not scratch the wheel rim; mask it off 
with tape if necessary

Remove keeper from retaining pin (1).

Drive out retaining pin (1).

Remove brake pads by pulling downwards.

.

Before installing the brake caliper, push the 
pistons back fully with resetting tool, 
BMW No. 34 1 500.

Install in the reverse order of work.

X

 Tightening torque:

Brake caliper to rear wheel drive .................. 40 Nm

1

LT000090

GS000390

RS340020

34 1 500

LT000100

00.33

[RS] Renewing brake pads - rear brake

Lever off cap from brake caliper.

Drive out retaining pins (1), working from the 
wheel side.

Lift brake pads upwards to remove.

Install in the reverse order of work.

If necessary, push pistons fully back with reset-
ting tool, BMW No. 34 1 500.

[GS/R/RT] Renewing brake pads - rear 
brake

[RT] Take out the rear wheel.

Unfasten/remove brake caliper.

Remove keeper from retaining pin (1).

Drive out retaining pin (1) towards the wheel side.

Remove brake pads.

Before installing the brake caliper, depress the 
piston fully.

Install in the reverse order of work.

X

 Tightening torque:

Brake caliper at rear wheel drive: ................. 40 Nm

Checking brake discs for wear

Carefully inspect brake discs for cracking, dam-
age, distortion, wear and scoring.

Brake disc wear limit:................ 4.5 mm (0.177 in)
[RS] rear:.................................... 4.6 mm (0.181 in)

Checking brake fluid level/topping 
up

(Inspection III)

Remove reservoir cover together with dia-
phragm.

Add brake fluid up to the MAX mark.

Fit diaphragm and reservoir cover.

Carefully tighten retaining screws.

Brake fluid grade:
Use only brake fluid of DOT 4 quality classification 
(e.g. ATE "SL“ brake fluid)

1

LT000120

1

GS000400

LT000110

Max.

Min.

Max.

Min.

RS000160

00.34

Bleeding/renewing the brake fluid 
using the handbrake lever/brake 
pedaln

(Inspection III, IV)

Bleeding front brake circuit/renewing 
fluid

Remove front brake pads.

e

 Caution:

Do not tilt the brake calipers when removing. There 
is a risk of dmage to the brake pads.

Unscrew brake fluid reservoir cover and remove 
together with diaphragm.

Add brake fluid up to the MAX mark.

e

 Caution:

During the bleeding process, brake fluid level must 
not drop below the MIN mark, or else air will be 
drawn into the brake system.
If this occurs, repeat the bleeding operation.

Connect a vessel to the brake caliper to trap 
brake fluid as it emerges from the bleed screw; 
slacken off the bleed plug by a half-turn.

Press the brake pistons fully back with the piston 
resetting tool, BMW No. 34 1 500.

Remove the piston resetting tool and insert 
spacer, BMW No. 34 1 520, in its place.

Press the pistons back in the second brake cali-
per, and leave the resetting tool in position.

Apply handbrake lever several times until brake 
pressure can be detected.

Maintain pressure on handbrake lever, then open 
bleed screw while maintaining firm pressure on 
the handbrake lever.

e

 Caution:

Do not release the lever/pedal until the bleed screw 
has been closed.

Close bleed screw and release handbrake lever.

Allow brake fluid to emerge from both brake cal-
ipers in succession until it is clear and free from 
bubbles.

Close bleed screw.

Install brake pads/brake calipers.

Brake fluid level = MAX mark.

Fit diaphragm and reservoir cover.

Carefully tighten retaining screws.

Turn handlebar from lock to lock, actuating brake 
several times while doing so.

Perform a functional check on the brake system.

Bleeding rear brake circuit/renewing 
brake fluid

[RS/GS] The rear brake caliper does not have to 
be removed, nor the pistons pushed back.

[R/RT] To bleed, slacken off the brake caliper 
and position it so that the bleed nipple is at the 
highest point.

After this, the procedure is the same as for 
bleeding/renewing the front brake fluid.

34 1 500

LT000100

00.35

Grease the centre stand [RS], side 
stand and clutch cable nipple

(Inspection II, III, IV)

Clean and grease the nipple with a grease gun 
until grease starts to emerge at the bearing point.

Lubricant:.................. e.g. Staburags NBU 30 PTM

Lubricant:................................ e.g. Shell Retinax A

[RS] Cleaning and greasing the 
windshield adjusting shaft

(Inspection III)

Unscrew, clean and grease the shaft, then screw 
it back in.

Lubricant:................................ e.g. Shell Retinax A

[RS] Grease front suspension strut at 
its lower attachment lug
(version with plain bearing only)

(Inspection II, III)

Lubricant:.................................... e.g. Never Seeze

X

 Tightening torque:

Spring strut to control arm ........................... 43 Nm

RS000330

RS330320

RS000360

00.36

Checking/adjusting clutch operat-
ing clearance

(Inspection I, II, III)

Set distance A at the adjusting screw.

Distance A:.................................. 12 mm (0.472 in)

[GS] If necessary, slacken off hydraulic spring 
adjuster with 6 mm Allen key, 
BMW No. 31 5 600.

[RT] Slacken off the power socket holder.

Using socket wrench, BMW No. 21 3 610,  
slacken off locknut (1) at adjusting screw (2) on 
the clutch release lever/gearbox.

Set to distance B at the handlebar clutch lever, 
using the adjusting screw on the release lever.

Distance B:  ............................... 7.0 mm (0.276 in)

X

 Tightening torque:

Locknut on adjusting screw ......................... 22 Nm

A

RS210020

1

2

21 3 610

RS210030

B

RS210040

00.37

Checking tightness of rear wheel 
studs

(Inspection I)

X

 Tightening torque:

Rear wheel nuts ......................................... 105 Nm

[RS] Check tightness of screws at 
adjustable handlebar

(Inspection I)

X

 Tightening torque:

Handlebar adjusting screw ........................... 20 Nm

[R] Check steering damper

(Inspection II, III)

Freedom from play at ball head.

Freedon from play at piston rod.

Turn steering to left and rock to and fro radially at 
front end of housing.

Taking up slack on hose clips at 
intake stub pipen

(Inspection I, III)

X

 Tightening torque:

Hose clips on air intake pipe .......................... 2 Nm

Checking front wheel bearings/
checking tilt play at rear wheel

(Inspection III)

Relieve load on front wheel.

Tilt the front wheel to and fro across the axle.

No play should be detected.

If play is detected in the wheel bearings, renew 
them.

Tilt the rear wheel to and fro across the wheel 
axle.

If play is detected, fit new shims to rear wheel 
drive or renew bearings.

Checking swinging arm bearings, 
adjusting if necessary

(Inspection I, II, III)

Grip rear tyre and try to move it sideways, 
bracing against the frame.

RS000350


Content   ..  3  4  5  6   ..