BMW AG Motorcycle (F 650 GS). Manual - part 20
 

  Index      Manuals     BMW AG Motorcycle (F 650 GS). Repair Manual


Search            


Content   ..  18  19  20  21   ..


BMW AG Motorcycle (F 650 GS). Manual - part 20


17.8

11 51 025 

Installing coolant pump

L

 Note:

Check shaft for score-marks at sealing ring tracks. 
Always replace shaft and sealing rings as a set.

Install gearwheel, shaft, pin and washer in engine 
cover.

L

 Note:

Check sealing ring for water pump cover and renew 
if necessary.

Lower the engine.

a

....................................................See Group 11

Remove oil return line.

Attach the left engine housing cover.

Connect the oil return line to the engine.

Install the engine.

a

....................................................See Group 11

Pack the space between the sealing rings with 
Shell Retinax EP2.

Drive inner sealing ring onto its seat with drift, 
BMW No. 11 6 540.

Drive in outer sealing ring flush with the friction 
face, using the appropriate adapter.

Install impeller wheel with locking collet.

Renew sealing ring on drain plug.

Tighten the hose clips with hose clip pliers, 
BMW No. 17 5 500.

Connect the clutch cable to the releaser shaft.

Attach the gear shift lever.

Install the seat.

Add  coolant.

a

......................................................... See below

Tightening torques:

Engine block cover, left ................................ 10 Nm
Water pump cover........................................ 10 Nm
Water pump drain screw .............................  10 Nm
Oil line to cylinder head .................................. 8 Nm
Oil line to engine block ................................. 35 Nm

17 00 035 

Adding coolant

Place motorcycle on its centre stand.

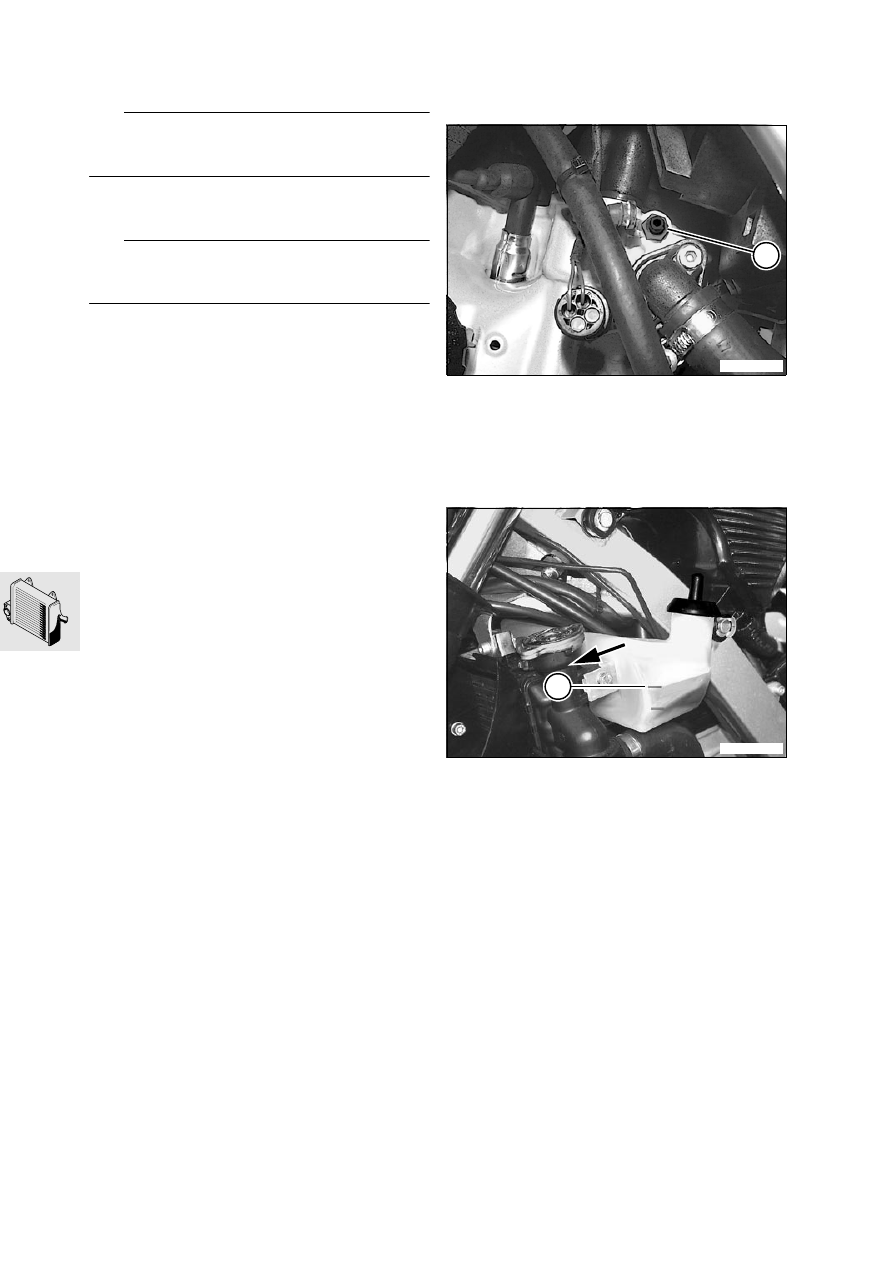
Slacken bleed screw (1) in cylinder head.

Connect a hose to the bleed screw.

Fill the radiator until coolant escapes at the bleed 
screw; repeatedly squeeze the coolant hoses to 
expel the air.

Tighten bleed screw (1).

Top up coolant until the level reaches the top of 
the filler neck (arrow).

Top up the coolant in the expansion tank until the 
level reaches the MAX mark (A).

Filling capacity
Cooling 
system .......... 1.2 l (2.11 Imp. pints/1.27 US quarts)
In expansion 
tank............ + 0.1 l (1.18 Imp. pints/0.11 US quarts)

E170090

1

E000020

A

17.9

Antifreeze
Use only nitrite-free long-term antifreeze and corro-
sion inhibitor.

Concentration
Antifreeze .........................................................50%
Water ...............................................................50%

Run the engine for a short time, then switch it off.

Check coolant level and top up if necessary.

Installation is the reverse of the removal proce-
dure: pay particular attention to the following.

L

 Note:

Do not reinstall the cover at this stage, if other main-
tenance work has to be performed.

Tightening torques:

Drain plug..................................................... 10 Nm
Expansion tank to radiator.............................. 9 Nm
Bleed screw ................................................. 12 Nm

Removing and installing 
coolant-temperature sensor

Drain coolant.

a

....................................................See Group 00

Place motorcycle on its centre stand.

Remove plug from coolant temperature 
sensor (1).

Remove coolant-temperature sensor (2).

Installation is the reverse of the removal proce-
dure.

Tightening torque:

Temperature sensor ..................................... 15 Nm

E170050

1

2

17.10

17 00 010 

Checking cooling system 

for leaks

Remove left cover.

a

....................................................See Group 46

Open the filler cap on the radiator.

Connect pump, BMW No. 17 0 500, with adapt-
er and neck, BMW No. 17 5 520, to filler neck.

Pressure-test the system; the pressure must re-
main unchanged for at least 5 minutes.

Setting:
Test pressure ............................. 1.5 bar (21.34 psi)

Installation is the reverse of the removal proce-
dure.

Removing and installing coolant 
hoses

Place motorcycle on its centre stand.

Remove left cover.

Drain  coolant.

a

.................................................... See Group 00

Remove the right-hand coolant hose.

Remove the left-hand coolant hose between ra-
diator and frame.

17 12 036 

Replacing coolant hose 

(radiator/water pump)

Use pliers, BMW No. 17 5 500, to open the 
clamp securing the coolant hose to the water 
pump.

Disconnect the coolant hose from the radiator.

17 12 068 

Replacing coolant hose 

(filler bowl/expansion tank)

Disconnect the expansion tank from the radiator 
and pull it to one side.

Disconnect the coolant hose from the radiator 
and the expansion tank.

Tightening torque:

Coolant hoses to radiator/engine/frame ......... 2 Nm

17 00 035 

Replacing coolant

See Group 00

17 40 000 

Removing and installing fan

Remove right cover.

Unclip the MoDiTeC plug from its holder.

Disconnect plug for fan.

Disengage the clips at top and bottom and re-
move the fan.

Installation is the reverse of the removal proce-
dure: pay particular attention to the following.

Slide the rubber grommet of the fan onto the pin 
of the expansion tank and then engage the tabs 
of the fan on the radiator.

E170080

17 0 500

17 5 520

17.11

17 11 007 

Removing and installing 

radiator

Place motorcycle on its centre stand.

Remove left, right and centre covers.

Drain  coolant.

a

....................................................See Group 00

Disconnect the expansion tank from the radiator, 
pull it to one side and let it dangle from the hose.

Remove the fan.

Disconnect the coolant hose (arrow) at the frame 
on the left and drain the radiator.

Use pliers, BMW No. 17 5 500, to open the 
clamp securing the coolant hose to the water 
pump housing (1).

Remove the radiator fasteners.

L

 Note:

Take care not to damage the radiator on the cylinder 
head cover.

Raise the radiator and release the pin at the bot-
tom from the lug.

Pull the radiator complete with expansion tank to 
the left and remove.

Installation is the reverse of the removal proce-
dure.

Tightening torque:

Radiator to main frame ................................... 9 Nm
Coolant hoses to radiator/engine/frame ......... 2 Nm

17 11 045 

Removing and installing 

thermostat

Remove left cover.

Drain coolant.

a

....................................................See Group 00

Do not close the radiator cap.

Remove spring clip (2).

Use a screwdriver to pry cover (3) out of the 
groove in the housing (arrow).

Remove thermostat insert (5) with thermostat (4) 
from the housing.

L

 Note:

Check O-ring for cracks and replace if necessary.

Installation is the reverse of the removal proce-
dure.

E170030

1

E170040

2

3

E170100

4

5

17.12

18.1

Contents

Page

18

Technical Data

............................................................................................................................... 3

Removing and installing exhaust system 

........................................................................5

Removing and installing right-hand silencer

 .......................................................................5

Removing and installing left-hand silencer

 ..........................................................................5

Removing and installing exhaust manifold and oxygen sensor

 .................................6

Removing exhaust manifold and oxygen sensor ..................................................................................6
Installing exhaust manifold and oxygen sensor ....................................................................................6

Replacing guard for silencer 

..................................................................................................7

18 Exhaust system

18.2

18.3

18

Technical Data

F 650 GS

Exhaust system

Emission control

3-way catalytic converter

Silencer (muffler)

Reflection/absorption-type silencer


Content   ..  18  19  20  21   ..