Motorcycle BMW R1150RT. Manual - part 58
 

  Index      motorcycles     Motorcycle BMW R1150RT - service repair manual 2001 year


Search            


Content   ..  56  57  58  59   ..


Motorcycle BMW R1150RT. Manual - part 58


32.15

32 73 056 

Removing and installing 

Bowden-cable divider, Bowden 
cable for throttle actuation and 
starting-speed increase

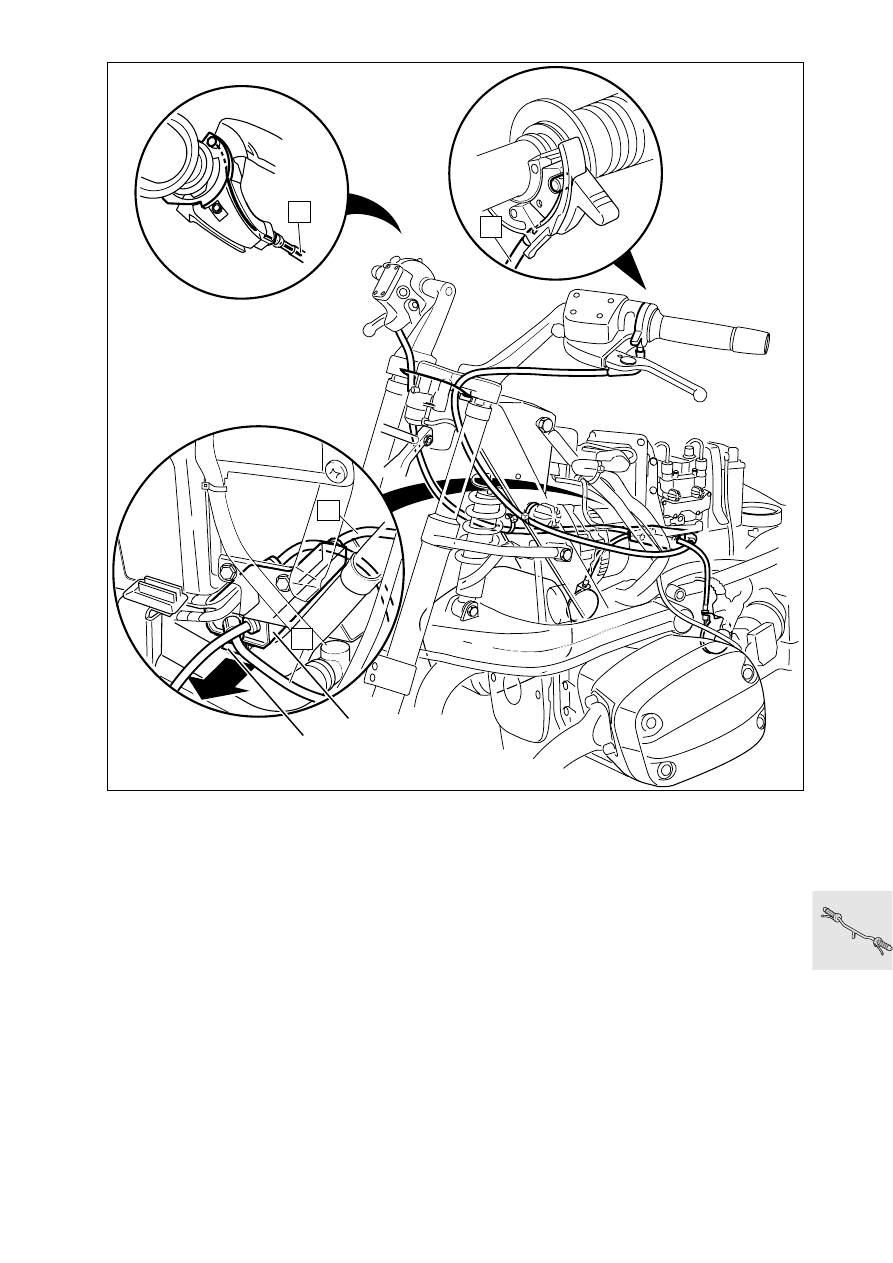
Remove side panels.

Remove fuel tank.

Remove actuating cable for starting-speed in-
crease.

Disengage cable (A) from grip unit.

Remove Bowden-cable shroud from fitting for 
throttle actuation.

Release cable (B) and disengage it from grip unit.

Disengage throttle cables from right and left 
throttle flap stubs.

Remove cable ties securing Bowden cables.

Release the plug for the fuel pump from the 
frame.

Press down tab (1) and pull cable divider (2) out 
of its retainer in direction indicated by arrow.

Installation is the reverse of the removal proce-
dure.

Adjust Bowden cables (

a

00.59).

B

A

B

A

R22320050

1

2

32.16

32 73 

Disassembling Bowden-cable 

divider

Remove fasteners of Bowden cables at entry to 
Bowden-cable divider.

Remove Bowden cable for starting-speed in-
crease (1).

Remove retainer (2) and remove roller of Bow-
den-cable divider.

Remove Bowden cables.

Prior to installation, clean housing of Bowden ca-
ble divider, pulley, and wedge for starting-speed 
increase, and do not grease.

Installation is the reverse of the removal proce-
dure.

L

 Note:

The Bowden cable to the right throttle valve (3) is 
shorter than the cable to the left throttle valve (4).

e

 Attention:

Make sure that Bowden cables are free of kinks.
Do not kink the strands of the Bowden cables when 
installing.

Adjust Bowden cables (

a

00.59).

R

L

R

L

R

L

R28320050

2

4

3

1

33.1

Contents

Page

33

33 Rear wheel drive

Technical Data

............................................................................................................................... 3

Removing, disassembling, reassembling and installing rear wheel drive 

....5

Removing rear wheel drive 

.........................................................................................................5

Removing and installing taper roller bearing in rear wheel drive 

...............................6

Removing input bevel pinion 

......................................................................................................7

Disassembling input bevel pinion 

............................................................................................8

Removing needle roller bearing for input bevel pinion ..........................................................................9
Installing needle roller bearing for input bevel pinion  ...........................................................................9

Assembling input bevel pinion 

..................................................................................................9

Installing input bevel pinion 

.................................................................................................. 10

Removing and disassembling crown wheel 

...................................................................... 12

Assembling and installing crown wheel 

.............................................................................. 13

Shimming input bevel pinion and crown wheel 

............................................................... 14

Checking tooth contact pattern 

............................................................................................. 15

Checking and adjusting backlash 

......................................................................................... 16

Shimming housing cover 

........................................................................................................... 17

Installing housing cover 

............................................................................................................. 17

Installing splined element 

.......................................................................................................... 17

Installing rear-wheel drive unit 

................................................................................................. 18

Removing and installing spring strut 

............................................................................... 19

Removing and installing rear swinging arm 

................................................................20

Removing rear swinging arm. 

..................................................................................................20

Removing and installing taper roller bearing 

....................................................................21

Removing and installing flexible gaiter 

................................................................................21

Removing drive shaft 

...................................................................................................................21

Checking universal joint for wear  .......................................................................................................21

Installing drive shaft 

.....................................................................................................................21

33.2

Contents

Page

Installing rear swinging arm 

.................................................................................................22


Content   ..  56  57  58  59   ..