Motorcycle BMW R1150RT. Manual - part 10
 

  Index      motorcycles     Motorcycle BMW R1150RT - service repair manual 2001 year


Search            


Content   ..  8  9  10  11   ..


Motorcycle BMW R1150RT. Manual - part 10


00.36 

61 20 029 

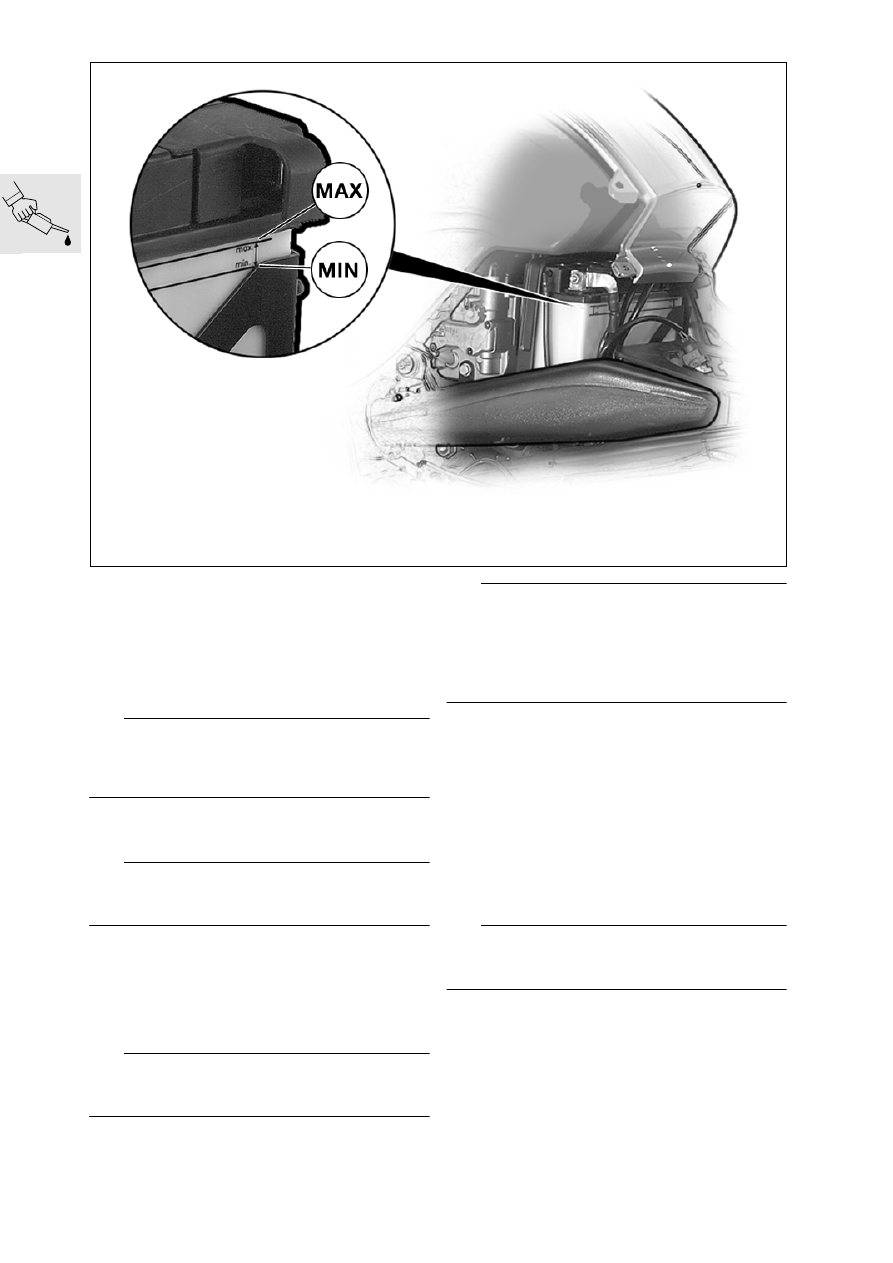
Checking battery fluid level 

and topping up if necessary; 
cleaning and greasing the battery 
posts

(Inspections III and IV)

d

 Warning:

Battery acid is highly caustic.
It must not contact the eyes, face hands, clothing or 
the motorcycle’s paintwork.

Remove front and rear seats.

Check the battery fluid level.

L

 Note:

Remove the battery if the acid level is incorrect or 
cannot be read correctly.

Remove the left side case.

Remove left cover and side trim panel.

Remove the air filter cover.

Remove air intake pipe.

Disengage the rubber strap holding the battery.

Disconnect the battery breather hose.

e

 Attention:

Disconnect the negative battery terminal first, then 
the positive terminal.

L


Note:

Disconnecting the battery means that the entries in 
the fault memory of the Motronic MA2.4 control unit 
are deleted and the adaptation values are reset.
This can temporarily impair the operating character-
istics when the engine is restarted.

Disconnect the negative terminal of the battery.

Pull the battery to the left to remove.

Disconnect the positive terminal of the battery.

If necessary, top up the acid level to 
the “MAX” mark with distilled water.

Clean and grease the battery terminals.

Installation is the reverse of the removal proce-
dure.

Switch on the ignition.

Without starting the engine, fully open the throttle 
once or twice so that the Motronic control unit 
can register the throttle-valve positions.

e

 Attention:

Connect the positive battery terminal first, then the 
negative terminal.

Acid proof battery-post grease:

................................................e.g. Bosch Ft 40 V1

R22000120

 00.37

13 72 000 

Replacing intake air filter 

element

(Inspection III)
in very dirty and dusty operating conditions, 
replace every 10,000 km (6,000 miles) or even 
more frequently if necessary

Open clips securing air filter cover.

Replace air filter element.

Close air filter cover.

R22000130

00.38 

Checking brake fluid level

(Inspections II and III)

L

 Note:

The brake fluid level in the sight glass/brake fluid 
reservoirs of control circuits remains constant de-
spite wear of the brake pads.
If the level drops below the MIN mark, this indicates 
some other fault.

Front brake

Place the motorcycle on its centre stand.

Turn the handlebars fully to the left.

Check brake fluid level at sight glass.

Specified level 
not below ......................................................... MIN
(top edge of the marking ring)

Correct the fluid level if necessary.

Brake fluid....................................................DOT 4

Rear brake

Place the motorcycle on its centre stand.

Remove case and right trim panel.

Check the brake fluid level.

Specified level
not below ......................................................... MIN

Correct the fluid level if necessary.

Brake fluid ...................................................DOT 4

Checking brake system for correct 
operation and freedom from leaks; 
repairing/replacing if necessary

(Inspection III)

Check all brake lines and their holders for dam-
age and correct positioning.

Wipe down all threaded unions on the brake lines 
and check them.

Switch on the ignition.

L

 Note:

After switching on the ignition, always wait for the 
BMW Integral ABS to complete its self-diagnosis.
Do not operate the brake lever until self-diagnosis 
has completed.

d

 Warning:

When performing maintenance and repair work on 
BMW Integral ABS, never pump quickly or
vigorously.

Apply firm pressure to the brake lever and brake 
pedal and keep this pressure applied for a few 
moments.

After this, inspect the brake lines for leaks.

d

 Warning:

Defective lines and threaded unions in the brake 
system must always be replaced without delay.

R22000140

R22000150

 00.39

Checking brake pads and discs for 
wear/replacing

(Inspections II and III)

Checking brake pads for wear

Brake pads, front brake

Visually inspect the brake pads.

Wear indicators (1) must be clearly visible.

If necessary, check/measure thickness of brake 
pads.

e

 Attention:

Do not permit the brake pads to wear past the specified 
minimum thickness. Always replace the brake pads 
as a complete set.

Minimum pad thickness: ......... 1.0 mm (0.0393 in)

Check that colour codes of brake pads and 
brake calipers (2) match.

Colour code: ................................................. white

Brake pads, rear brake

Visually inspect the brake pads.

Make sure that the brake disc is not visible 
through the bore (arrow) in the inner brake pad.

If necessary, check/measure thickness of brake 
pads.

e

 Attention:

Do not permit the brake pads to wear past the specified 
minimum thickness. Always replace the brake pads as 
a complete set.

Minimum pad thickness: ......... 1.0


mm (0.0393 in)

If the brake disc is visible through the bore in the 
wheel-side brake pad, the brake lining is worn to 
its minimum permissible thickness.

R22000160

1

2

R22000170


Content   ..  8  9  10  11   ..