Volvo XC60 Recharge Plug-in Hybrid (2021 year). Manual in english - page 26


  Index      Manuals     Volvo XC60 Recharge Plug-in Hybrid (2021 year). Manual in english


Search            copyright infringement  


Content      ..     24      25      26      27     ..


Volvo XC60 Recharge Plug-in Hybrid (2021 year). Manual in english - page 26


||

STARTING AND DRIVING

* Option/accessory.

442

This drive mode is adapted for optimal per-
formance and response during acceleration. It
changes the throttle response, gear shifting
program and turbo boost system. Chassis set-
tings and steering and brake response are also
optimized. The 

Power

 drive mode is always

available regardless of the hybrid battery's
charge status.

Power

 mode is also available in a 

Polestar

Engineered

*

 version.

Individual

Customizes drive mode to personal prefer-
ences.

Select one of the drive modes as a basis and
adjust the settings to achieve your preferred
driving characteristics. These settings will be
stored in your driver profile.

Individual drive mode is only available if it has
been activated in the center display.
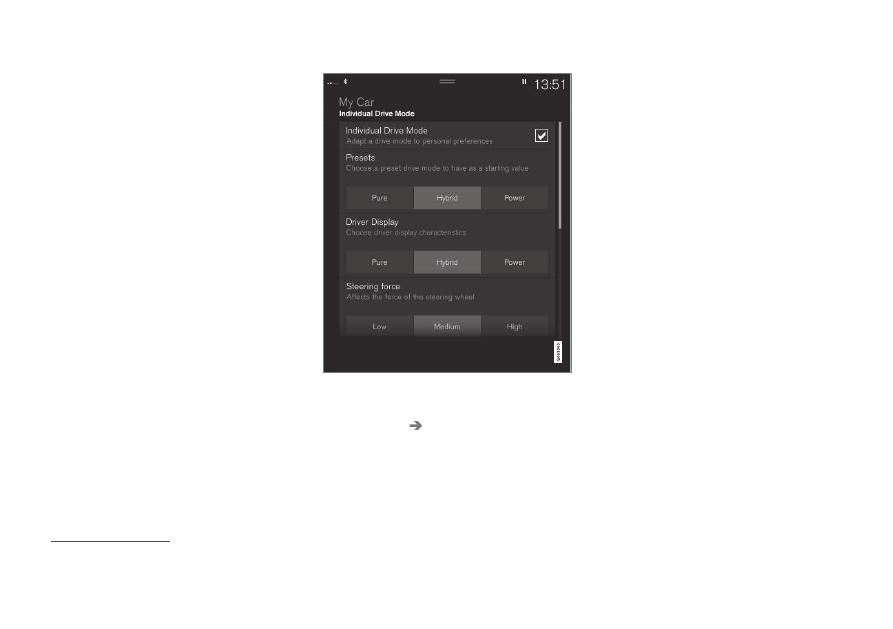
Settings view

8

 for Individual drive mode.

1. Tap 

Settings

 in the Top view.

2. Tap 

My Car

Individual Drive Mode

and select 

Individual Drive Mode

.

3. Under 

Presets

, select one of the following

drive modes as a basis: 

Pure

Hybrid

,

Power

 or 

Polestar Engineered

*

.

The following settings can be modified:

Driver Display

Steering Force

Powertrain Characteristics

Brake Characteristics

Suspension Control

ECO Climate

Using the electric or combustion
engine

An advanced control system determines the
distance that the vehicle can be driven on the
combustion engine, electric motor, or both at
the same time.

Its primary function is to use the motor/engine
and the current available in the hybrid battery
as efficiently as possible based on the charac-
teristics of the various drive modes and the
power output requested by the driver by
pressing the accelerator pedal.

In certain cases, temporary limitations in the
system or mandatory functions to help main-
tain a low overall emissions level may result in
greater use of the combustion engine.

8

The illustration is generic - details may vary according to vehicle model.

-------------------------------------------------------------------------------------------------------------------------------------------------------------

STARTING AND DRIVING

* Option/accessory.

443

Related information

Changing drive mode (p. 443)

Range (p. 454)

Energy distribution using map data

*

(p. 444)

Hybrid gauge (p. 91)

General information about electric vehi-
cles (p. 394)

Regenerative braking

*

 (p. 430)

Changing drive mode

Select the drive mode that is adapted to the
current driving conditions.

The drive mode is changed using the control
in the tunnel console.

Keep in mind that not all drive modes are
available in all situations.

To change drive mode:

1. Press the 

DRIVE MODE

 control.

> A pop-up menu will appear in the cen-

ter display.

2. Roll the wheel upward or downward to

the desired drive mode.

3. Press the drive mode control or tap its

button in the center display to confirm the
selection.
> The selected drive mode is shown in

the instrument panel.

Related information

Drive modes (p. 438)

Activating and deactivating Low Speed
Control using the function button (p. 451)

Activating and deactivating Hill Descent
Control using the function button (p. 452)

-------------------------------------------------------------------------------------------------------------------------------------------------------------

STARTING AND DRIVING

* Option/accessory.

444

Energy distribution using map

data

*

In 

Hybrid

 drive mode, the vehicle is powered

by both the electric motor and the gasoline
engine. If a destination has been selected in
the navigation system

*

, the Predictive Effi-

ciency

9

 function can use map data to distrib-

ute electric power consumption throughout
the trip.

In addition to map data, the function also
takes into account speed limits, traffic condi-
tions and differences in altitude.

The electric motor is primarily used when driv-
ing at low speeds, for example during stop-
and-go city driving. The gasoline engine is pri-
marily used when driving at high speeds and
can, under favorable conditions, generate elec-
tricity to the electric motor.

Requirements for the function

Certain conditions must be met for the func-
tion to be possible:

A destination must be set in the navigation
system and the distance to the destination
must be longer than the possible range
using only the electric motor.

Hybrid

 drive mode must be selected.

The 

Hold

 and 

Charge

 functions must be

disabled.

Usage tips

If you commute and it is not possible to
charge the vehicle at work, enter your work-
place as a waypoint and your home as the
destination. Discharging of the hybrid battery
will then be distributed over the entire com-
mute to and from work.

Add similar commutes, i.e. the route between
two charges, as 

Favorites

 in the navigation

system to facilitate access.

Related information

Regenerative braking

*

 (p. 430)

Drive modes (p. 438)

Range (p. 454)

9

Only certain markets.

-------------------------------------------------------------------------------------------------------------------------------------------------------------

STARTING AND DRIVING

}}

* Option/accessory.

445

Leveling control

*

 and suspension

The vehicle's leveling control system adjusts
the suspension and shock absorbers auto-
matically to help optimize comfort and con-
trol while driving. Leveling can also be con-
trolled manually to facilitate loading or get-
ting in and out of the vehicle.

Manually adjustable shock absorbers

*

The suspension on Polestar Engineered

*

 vehi-

cles can be manually adjusted. There are three
recommended modes: Performance,
engineered and Comfort.

Performance mode

In Performance mode, the vehicle's suspen-
sion feels stiffer.

Engineered, factory setting

Engineered is designed for daily driving.

Comfort mode

In Comfort mode, the vehicle's suspension
feels softer.

Pneumatic suspension and shock
absorbers

The system is adapted to the selected drive
mode and vehicle speed. The pneumatic sus-

pension reduces the vehicle's ground clear-
ance at higher speeds to reduce air resistance
and increase stability. The shock absorbers are
normally set to help optimize comfort and are
adjusted continuously according to the road
surface and the vehicle's acceleration, braking
and cornering.

The instrument panel indi-
cates when the suspension
level is being adjusted.

The following apply if a door or the tailgate is
opened:

If a door is opened, the level can only be
adjusted upwards.

If the tailgate is open, the level can only be
adjusted downwards.

Parking

When parking, make sure that there is ade-
quate space above and below the vehicle
since ground clearance may vary depending
on e.g. ambient temperature, how the vehicle

is loaded, if loading mode is used, which drive
mode is selected after the engine is started,
etc.

The level may also be adjusted a period after
the vehicle is parked. This is to compensate
for any height changes that may occur due to
temperature changes in the air springs when
the vehicle cools.

Transporting

When transporting the vehicle on a ferry, train
or truck, only secure (lash) the vehicle around
the tires, not using any other parts of the chas-
sis. Changes in the pneumatic suspension
may occur during transport, which could
adversely affect the lashing and result in dam-
age.

Symbols and messages

If a problem occurs with the leveling control, a
message will be displayed in the instrument
panel.

-------------------------------------------------------------------------------------------------------------------------------------------------------------

||

STARTING AND DRIVING

446

Symbol

Message

Meaning

Suspension

Deactivated by user

Active chassis has been switched off manually by the user.

Suspension

Temporarily reduced performance

Active chassis performance has been temporarily reduced due to extensive system use.

Suspension

Service required

A fault has occurred. Visit a workshop

A

 as soon as possible.

Suspension failure

Stop safely

A critical fault has occurred. Stop safely, and have the car transported (raised with all
wheels on the flatbed) to a workshop

A

.

-------------------------------------------------------------------------------------------------------------------------------------------------------------

STARTING AND DRIVING

* Option/accessory.

447

Symbol

Message

Meaning

Suspension

Slow down Vehicle too high

A fault has occurred. If the message appears while driving, contact a workshop

A

.

Suspension

Auto adjusting vehicle level

Level control to target height is in progress.

A

An authorized Volvo workshop is recommended.

Related information

Leveling control settings

*

 (p. 448)

Drive modes (p. 438)

Adjusting suspension settings Polestar
Engineered

*

 (p. 448)

-------------------------------------------------------------------------------------------------------------------------------------------------------------

STARTING AND DRIVING

* Option/accessory.

448

Leveling control settings

*

Turn off leveling control before lifting the
vehicle with a jack to help avoid problems
with the pneumatic suspension.

The vehicle can be lowered or raised to make
it easier to load or for passengers to get in
and out.

Adjusting loading mode

Use the buttons in the cargo compartment to
raise or lower the rear section of the vehicle to
facilitate loading or unloading the vehicle or
connecting or disconnecting a trailer.

Center display settings

Easy Entry and Exit Suspension Control

The vehicle can be lowered to make it easier
to get in and out.

Activating easy entry in the center display:

1. Tap 

Settings

 in the Top view.

2. Tap 

My Car

Mirrors and Convenience

.

3. Select 

Easy Entry and Exit Suspension

Control

.

> When the vehicle is parked and the

engine is turned off, the level is low-
ered. (Level adjustment will stop if a
side door is opened and will resume
after a slight delay when the door has
been closed.) When the engine is
started and the vehicle begins to move,
the level will be raised to the height set
by the selected drive mode.

Disable Leveling Control

In certain situations this function must be
turned off e.g. before the vehicle is raised
using a jack

*

. The level difference caused by

raising the vehicle with a jack could cause
problems with the pneumatic suspension.

Turning off the function in the center display:

1. Tap 

Settings

 in the Top view.

2. Tap 

My Car

Parking Brake and

Suspension

.

3. Select 

Disable Leveling Control

.

Related information

Leveling control

*

 and suspension (p. 445)

Loading recommendations (p. 594)

Adjusting suspension settings

Polestar Engineered

*

The shock absorber settings can be adjusted
for driving in other conditions or on particular
road surfaces.

Location of adjustment knobs

There are four adjustment knobs, two for the
front shock absorbers and two for the rear.
There are adjustment knobs above each
wheel. The adjustment knobs for the front
wheels are located under the engine compart-
ment hood. The adjustment knobs for the rear
wheels are located above each wheel in the
wheel housing.

Location of adjustment knob, front wheel.

-------------------------------------------------------------------------------------------------------------------------------------------------------------

STARTING AND DRIVING

}}

449

Location of adjustment knob, rear wheel.

NOTE

Each adjustment knob has 22 adjustment
positions. The closer to position 0 the knob
is set, the stiffer the suspension.

Adjusting front suspension settings

Make sure the adjustment knob is set to 0
before starting the adjustment. This makes it
easier to determine what adjustment position
is set.

Turn the adjustment knob clockwise or counterclock-

wise to change the adjustment position.

Turn the knob clockwise until it stops to
get to adjustment position 0.

Turn the knob counterclockwise to the
desired adjustment position. You should
feel and hear a click each time the adjust-
ment position is changed.
> Then follow the same procedure for the

second shock absorber.

Adjusting rear suspension settings

The rear adjustment knobs are located above
the tire inside the wheel housing. To access
the rear adjustment knobs, the vehicle must
be raised using a jack; see separate section.

The rubber cap is located above the adjustment

knob.

Turn the adjustment knob clockwise or counterclock-

wise to change the adjustment position.

Remove the protective rubber cap over
the adjustment knob.

Turn the knob clockwise until it stops to
get to adjustment position 0.

-------------------------------------------------------------------------------------------------------------------------------------------------------------

||

STARTING AND DRIVING

* Option/accessory.

450

Turn the adjustment knob counterclock-
wise to the desired adjustment position.
You should feel and hear a click each time
the adjustment position is changed.
> When the desired position has been

reached, replace the protective rubber
cap. Then follow the same procedure
for the second shock absorber.

NOTE

For optimal performance, Volvo recom-
mends setting the adjustment knobs to the
same position for each axle.

Recommended positions

Position

Front

Rear

Performance
mode

adjustment
position 4

adjustment
position 4

Engineered,
factory setting

adjustment
position 10

adjustment
position 10

Comfort mode

adjustment
position 15

adjustment
position 15

Related information

Hoisting the vehicle (p. 614)

Leveling control

*

 and suspension (p. 445)

Low Speed Control

The low-speed function (LSC

10

) facilitates

and improves control and traction on rough
roads and slippery surfaces, e.g. when towing
a trailer on grass or up boat ramps.

The function is included in the 

Off Road

 drive

mode.

Low Speed Control is designed for driving on
rough roads and when towing trailers at low
speeds, up to approximately 40 km/h (25
mph).

Low Speed Control prioritizes low gear posi-
tions and traction. If the vehicle is all-wheel
drive, power is automatically distributed
evenly to provide as much traction as possible
on all wheels and reduce the risk of wheel
spin. The accelerator pedal will be less respon-
sive to improve traction and speed control at
low speeds.

The function is activated together with Hill
Descent Control (HDC

11

), which makes it pos-

sible to control speed going down steep hills
using the accelerator pedal and reduces the
need to use the brake pedal. The system
makes it possible to maintain a low and uni-
form speed when driving down steep hills.

NOTE

When LSC with HDC is activated in the

Off Road

 drive mode, the feel of the accel-

erator pedal and engine response will
change.

NOTE

This drive mode is not designed to be used
for normal street driving.

NOTE

The function is deactivated when driving at
high speeds and must be reactivated at
lower speeds if so desired.

Related information

Activating and deactivating Low Speed
Control using the function button (p. 451)

Changing drive mode (p. 443)

Hill Descent Control (p. 451)

All Wheel Drive (AWD) (p. 436)

10

Low Speed Control

11

Hill Descent Control

-------------------------------------------------------------------------------------------------------------------------------------------------------------

STARTING AND DRIVING

}}

451

Activating and deactivating Low

Speed Control using the function

button

There is a function button for driving at low
speeds with 

Hill Descent Control

 in the cen-

ter display's Function view if the vehicle is
not equipped with a drive mode control in the
tunnel console.

Selecting Low Speed Control in the
center display's Function view

Tap the 

Hill Descent Control

 button to

activate or deactivate the function.

> An indicator light in the button will illu-

minate when the function is activated.

When the engine is switched off, the function
will be automatically deactivated.

NOTE

The function is deactivated when driving at
high speeds and must be reactivated at
lower speeds if so desired.

Related information

Low Speed Control (p. 450)

Changing drive mode (p. 443)

Hill Descent Control

The function for assisting when driving down-
hill (HDC

12

) is a low-speed function with

increased engine braking. The function
makes it possible to increase or decrease the
vehicle's speed on steep downhill gradients
by only using the accelerator pedal, without
applying the brakes.

The function is included in the 

Off Road

 drive

mode.

HDC is designed for driving on rough roads at
low speeds and downhill gradients with slip-
pery or otherwise difficult road surfaces. The
driver does not need to use the brake pedal
but can instead focus on steering.

WARNING

HDC is only intended to be a supplemen-

tary braking aid and it does not function in

all situations.
The driver is always ultimately responsible

for operating the vehicle in a safe manner.

Function

Hill Descent Control allows the vehicle to
move forward or backward at very low speeds
assisted by the brake system. The driver can
increase the speed by pressing the accelerator
pedal. When the accelerator pedal is released,

12

Hill Descent Control

-------------------------------------------------------------------------------------------------------------------------------------------------------------

||

STARTING AND DRIVING

452

the vehicle will return to very low speed
regardless of how steep the hill is and without
the brakes needing to be applied. The brake
lights will illuminate when the function is acti-
vated.

The driver can brake to stop or slow the vehi-
cle at any time by depressing the brake pedal.

HDC is activated along with Low Speed Con-
trol (LSC

13

), which facilitates and improves

traction and control on rough and slippery sur-
faces. The system is intended to be used at
low speeds, up to approximately 40 km/h (25
mph).

To keep in mind when using HDC

If the function is switched off while driving
on a steep downhill gradient, braking
effect will be gradually reduced.

HDC can be used in gear positions 

D

 and

R

, and in manual gears 1 or 2.

It is not possible to manually shift to third
gear or higher when HDC is active.

NOTE

When LSC with HDC is activated in the

Off Road

 drive mode, the feel of the accel-

erator pedal and engine response will
change.

NOTE

This drive mode is not designed to be used
for normal street driving.

NOTE

The function is deactivated when driving at
high speeds and must be reactivated at
lower speeds if so desired.

Related information

Activating and deactivating Hill Descent
Control using the function button (p. 452)

Changing drive mode (p. 443)

Low Speed Control (p. 450)

All Wheel Drive (AWD) (p. 436)

Activating and deactivating Hill

Descent Control using the function

button

There is a function button for assistance on
steep gradients with 

Hill Descent Control

 in

the center display's Function view if the vehi-
cle is not equipped with a drive mode control
in the tunnel console.

Selecting Hill Descent Control in the
center display's Function view

HDC only works at low speeds.

Tap the 

Hill Descent Control

 button to

activate or deactivate the function.

> An indicator light in the button will illu-

minate when the function is activated.

When the engine is switched off, the function
will be automatically deactivated.

NOTE

The function is deactivated when driving at
high speeds and must be reactivated at
lower speeds if so desired.

13

Low Speed Control

-------------------------------------------------------------------------------------------------------------------------------------------------------------

STARTING AND DRIVING

}}

* Option/accessory.

453

Related information

Hill Descent Control (p. 451)

Changing drive mode (p. 443)

Economical driving

To achieve the longest possible driving range,
the driver should plan the trip and adapt driv-
ing style and speed to the current situation.

Before driving

Whenever possible, precondition the vehi-
cle before driving by connecting the
charging cable to an electrical outlet.

If preconditioning is not possible when it
is cold outside, use seat and steering
wheel heating first. Avoid heating the
entire passenger compartment to reduce
the amount of current being taken from
the hybrid battery.

The type of tires and inflation pressure
used could affect energy consumption –
consult an authorized Volvo retailer for
advice on suitable tires.

Remove unnecessary items from the vehi-
cle - the heavier the load, the higher the
fuel consumption.

While driving

Activate 

Pure

 drive mode.

Activate the 

Hold

 function at high speeds

when traveling farther than is possible
using the hybrid battery's capacity.

Whenever possible, avoid using the

Charge

 function to charge the hybrid bat-

tery.

Maintain a steady speed and a generous
following distance to traffic ahead to mini-
mize braking.

When braking, the hybrid battery is
charged by braking lightly using the brake
pedal.

Higher speeds increase energy consump-
tion because air resistance increases with
speed.

In a cold climate, reduce heating of the
windshield/rear window, mirrors, seats
and the steering wheel.

Avoid driving with the windows open.

Do not use the accelerator pedal to keep
the vehicle stationary on an uphill gradi-
ent. Instead, activate the auto-hold brake
function at a standstill.

If possible, turn off the climate system
when driving shorter distances after pre-
conditioning.

After driving

If possible, park in a climate-controlled
garage with vehicle charging outlets or
stations.

Related information

Regenerative braking

*

 (p. 430)

Range (p. 454)

Checking tire pressure (p. 565)

-------------------------------------------------------------------------------------------------------------------------------------------------------------

STARTING AND DRIVING

454

Displaying trip statistics in the center dis-
play (p. 96)

Auto-hold brakes (p. 428)

Hold and Charge (p. 455)

Range

A number of factors can affect vehicle range.
The ability to achieve a long driving range var-
ies according to the outside conditions and to
how the vehicle is driven.

The certified value for the vehicle's range
should not be considered an expected driving
range. The certified value is obtained during
special test cycles and is primarily intended to
be used for comparisons between different
vehicles.

Range in the instrument panel

When the vehicle leaves the factory, or after a
factory reset, range is based on the certified
value

Once the vehicle has been driven for a while,
range is instead based on historical driving
patterns. The amount of history used depends
on the battery's charge level. The lower the

charge level of the hybrid battery, the more
quickly the range adapts to changed driving
patterns.

Factors affecting driving range

There are a number of other factors in addition
to historical trip data that affect range. The
longest range is achieved under very favorable
conditions when all factors positively influence
range.

Factors affecting range include:

speed

climate control settings

topography

preconditioning

tires and tire pressure

the current traffic situation

temperature and weather

road conditions.

-------------------------------------------------------------------------------------------------------------------------------------------------------------

STARTING AND DRIVING

}}

455

Range based on speed and ambient
temperature

20 °C (68 °F) ambient temperature and
passenger compartment climate control
off.
20 °C (68 °F) ambient temperature and
passenger compartment climate control
on.
35 °C (95 °F) ambient temperature and
passenger compartment climate control
on.
-10 °C (14 °F) ambient temperature and
passenger compartment climate control
on.

The graph shows the approximate relationship
between constant speed and driving range.
Driving at a lower constant speed helps
increase the electric motor's driving range.

Higher ambient temperature and deactivated
climate system are also more favorable for
range.

Related information

Displaying trip statistics in the center dis-
play (p. 96)

Checking tire pressure (p. 565)

Hold and Charge

In certain situations, it can be useful to con-
trol the hybrid battery's charge level while
driving. This is possible with the 

Hold

 and

Charge

 functions.

Hold

 and 

Charge

 are available in all drive

modes. The functions will switch off if 

Pure

drive mode is activated.

Activating Hold and Charge

The functions can be activated in the center
display's Function view.

Hold

Battery level sustained for
later use

.

This function retains the
charge in the hybrid battery
for the electric motor and
saves available electrical cur-

rent for use at a later time, such as when driv-
ing in an urban area.

The vehicle will function as in normal hybrid
driving with a discharged battery - in addition
to reusing energy from e.g. regenerative brak-
ing, the combustion engine will be used more
frequently to maintain the charge in the bat-
tery.

-------------------------------------------------------------------------------------------------------------------------------------------------------------

||

STARTING AND DRIVING

* Option/accessory.

456

Charge

Engine charges hybrid
battery

.

This function charges the
hybrid battery with the help
of the combustion engine for
increased use of the electric

motor at a later time.

Symbols in the instrument panel

The 

 symbol is displayed in the hybrid battery

gauge when Hold is activated.

The 

 symbol is displayed in the hybrid battery

gauge when Charge is activated.

Related information

Range (p. 454)

Hybrid gauge (p. 91)

Preparing for a long trip

It is important to have the vehicle's systems
and equipment checked carefully before driv-
ing long distances.

Check that

the engine is running properly and that
fuel consumption is normal

there are no leaks (fuel, oil or other fluid)

the brake pedal is functioning properly

all lights work

tire tread depth and air pressure are at
correct levels. Change to snow tires when
driving in areas where there is a risk of
snowy or icy roads

the start battery is sufficiently charged

the wiper blades are in good condition

Related information

Checking tire pressure (p. 565)

Filling washer fluid (p. 666)

Winter driving (p. 457)

Economical driving (p. 453)

Vehicle modem settings (p. 541)

Loading recommendations (p. 594)

Driving with a trailer (p. 472)

Pilot Assist

*

 (p. 300)

Tire sealing system (p. 579)

-------------------------------------------------------------------------------------------------------------------------------------------------------------

STARTING AND DRIVING

}}

457

Winter driving

It is important to check the vehicle before
driving in cold/snowy conditions to make
sure it can be driven safely.

Before the cold season arrives:

Make sure the engine coolant contains
50% antifreeze. This mixture helps pro-
tect the engine from frost erosion down to
approx. –35 °C (–31 °F). Do not mix dif-
ferent types of antifreeze as this could
pose a health risk.

Keep the fuel tank well filled to prevent
condensation from forming.

Check the viscosity of the engine oil. Oil
with low viscosity (thinner oil) improves
cold-weather starting and reduces fuel
consumption when driving with a cold
engine.

Check the condition and charge level of
the start battery. Cold weather places
greater demands on the start battery and
reduces its capacity.

Use washer fluid containing antifreeze to
help prevent ice from forming in the
washer fluid reservoir.

See separate section for engine oil recommen-
dations.

Slippery driving conditions

To help optimize traction and roadholding,
Volvo recommends using snow tires on all
wheels whenever there is a risk of snow or ice
on the road.

NOTE

Certain countries require use of winter tires
by law. Not all countries permit the use of
studded tires.

Practice driving on slippery surfaces under
controlled conditions to learn how the vehicle
reacts.

Related information

Engine oil specifications (p. 678)

Snow tires (p. 578)

Snow chains (p. 578)

Braking on salted roads (p. 424)

Braking on wet roads (p. 424)

Filling washer fluid (p. 666)

Starter battery (p. 625)

Replacing windshield wiper blades
(p. 664)

Changing rear window wipers (p. 663)

Refilling coolant (p. 623)

Driving through standing water

It may be necessary to drive the vehicle
through standing water e.g. deep puddles or
flooding on the road. This must be done with
great caution.

To help prevent damage to the vehicle when
driving through water:

Do not drive in water higher than the floor
of the vehicle. If possible, check the depth
of the water at its deepest point before
driving through it. Be particularly careful
when driving through flowing water.

Always select the 

Off Road

 drive mode

before driving in water to ensure the gaso-
line engine is running.

Do not drive faster than walking speed.

Do not stop the vehicle in the water. Drive
carefully forward or back the vehicle out of
the water.

Remember that waves created by passing
vehicles could cause the water level to rise
above the vehicle's floor level.

Avoid driving through salt water to help
avoid the risk of corrosion.

-------------------------------------------------------------------------------------------------------------------------------------------------------------


Content      ..     24      25      26      27     ..