Volvo XC60 (2021 year). Manual in english - page 23


  Index      Manuals     Volvo XC60 (2021 year). Manual in english


Search            copyright infringement  


Content      ..     21      22      23      24     ..


Volvo XC60 (2021 year). Manual in english - page 23


||

DRIVER SUPPORT

* Option/accessory.

390

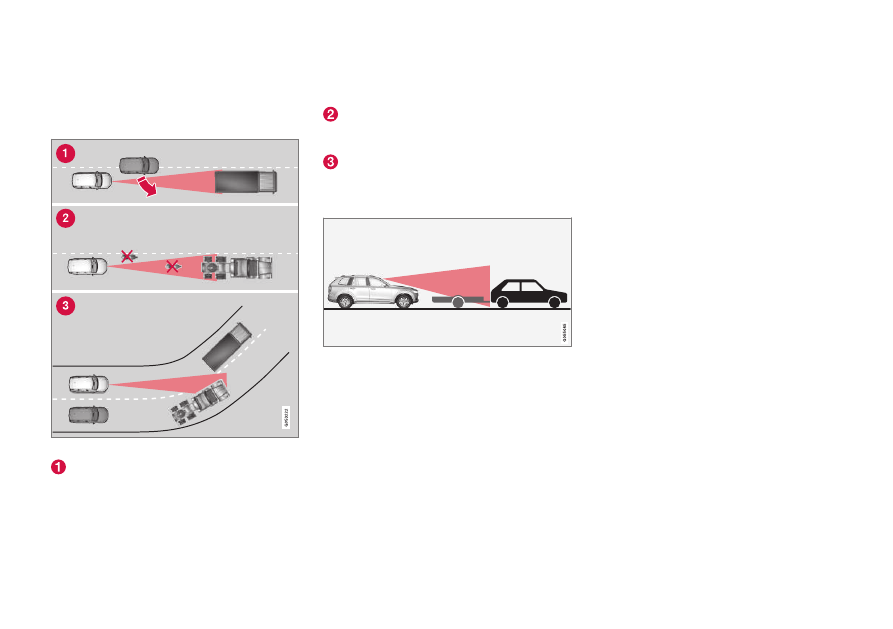
Limited field of vision

The radar sensor has a limited field of vision. In
some situations, it may detect a vehicle later
than expected or not at all.

The radar sensor's field of vision

The radar sensor's detection of vehicles
very close to your vehicle may be delayed
in certain situations, e.g. if a vehicle pulls

in between your vehicle and the vehicle
directly ahead.
Small vehicles, such as motorcycles, or
vehicles that are not driving in the center
of the lane may remain undetected.
In curves, the radar may detect the a dif-
ferent vehicle than intended or lose sight
of a target vehicle.

Low trailers

Low trailer in the radar shadow

Low trailers may also be difficult or even
impossible for the radar to detect. The driver
should be extra alert when driving behind vehi-
cles towing low trailers when Adaptive Cruise
Control

*

 or Pilot Assist

*

 is activated.

Additional camera limitations

Reduced visibility

Cameras have the same limitations as the
human eye. In other words, their “vision" is
impaired by adverse weather conditions such
as heavy snowfall/rain, dense fog, swirling

dust/snow, etc. These conditions may reduce
the function of systems that depend on the
camera or cause these systems to temporarily
stop functioning.

Strong sunlight, reflections from the road sur-
face, ice or snow covering the road, a dirty
road surface, or unclear lane marker lines may
drastically reduce the camera’s ability to
detect the side of a lane, a pedestrian, a
cyclist, a large animal or another vehicle.

-------------------------------------------------------------------------------------------------------------------------------------------------------------

DRIVER SUPPORT

}}

* Option/accessory.

391

Additional Park Assist Camera

*

limitations

Blind sectors

There are "blind" sectors between the cameras' fields

of vision.

With the Park Assist Camera's 360° view

*

selected, objects/obstacles may not be
detected if they are located in the "joints"
where the edges of the individual camera
views meet.

WARNING

Even if it seems as though only a fairly

small section of the screen image is

obstructed, this may mean that a relatively

large sector is hidden and obstacles there

may not be detected until they are very

near the vehicle.

Lighting conditions

The camera image is automatically adjusted
according to the current lighting conditions.
This means that the brightness and quality of
the image may vary slightly. Poor lighting con-
ditions may result in reduced image quality.

NOTE

A bike carrier and other accessories moun-
ted on the rear of the vehicle can obscure
the camera's view.

Related information

Camera (p. 388)

Radar sensor (p. 385)

Recommended camera and radar sensor
maintenance (p. 391)

Park Assist Camera

*

 (p. 367)

Volvo Cars support site (p. 21)

Recommended camera and radar

sensor maintenance

In order for the camera and radar units to
function properly, they must be kept free of
dirt, ice, snow, etc. and should be washed
regularly with water and car washing deter-
gent.

NOTE

Dirt, ice and snow covering the sensors
could cause false warnings, reduced func-
tion, or no function.

Location of the Park Assist sensors

-------------------------------------------------------------------------------------------------------------------------------------------------------------

||

DRIVER SUPPORT

* Option/accessory.

392

Location of rear radar sensors. Keep the marked area

clean (on both the left and right sides of the vehicle).

For best possible performance, it is impor-
tant to keep the areas in front of the sen-
sors clean.

Do not attach any objects, tape or decals
to the surface of the sensors.

Clean the camera lenses regularly using
lukewarm water and car washing deter-
gent. Wash gently to avoid scratching the
lens.

CAUTION

Only a workshop may perform mainte-
nance on driver support components – an
authorized Volvo workshop is recom-
mended.

Related information

Camera (p. 388)

Radar sensor (p. 385)

Camera/radar sensor limitations (p. 388)

Park Assist Camera

*

 (p. 367)

-------------------------------------------------------------------------------------------------------------------------------------------------------------

DRIVER SUPPORT

}}

393

Camera and radar unit symbols

and messages

Here are examples of some of the messages
and symbols related to the camera and radar
units that may be displayed in the instrument
panel.

Sensor blocked

If this symbol and the message

Windscreen sensor


Sensor

blocked, see Owner's manual

 is

displayed in the instrument panel, it

means that the camera and radar unit are
unable to detect other vehicles, cyclists,
pedestrians and large animals in front of the
vehicle and that the vehicle's camera and
radar-based functions may be obstructed.

The following table shows some of the situa-
tions that can cause the message to be dis-
played, and suggested actions:

Cause

Action

The area of the windshield in front of the camera/radar sensor is
dirty or covered by ice or snow.

Clean the windshield in front of the camera/radar sensor and remove dirt, ice
and snow.

Thick fog, heavy rain or snow is blocking the radar signals or the
camera's range of visibility.

No action. Heavy precipitation may sometimes prevent the camera/radar sensor
from functioning.

Water or snow is spraying/swirling up and blocking the radar
signals or the camera's range of visibility.

No action. Very wet or snow-covered roads may sometimes prevent the cam-
era/radar sensor from functioning.

There is dirt between the inside of the windshield and the cam-
era/radar sensor.

Consult a workshop to have the area of the windshield on the inside of the cam-
era's casing cleaned. An authorized Volvo workshop is recommended.

Bright sunlight.

No action. The camera/radar sensor will reset automatically when lighting con-
ditions improve.

-------------------------------------------------------------------------------------------------------------------------------------------------------------

||

DRIVER SUPPORT

394

Defective camera

If a camera sector is dark and
contains this symbol, this
indicates that the camera is
not functioning properly.

The vehicle's left-side camera is malfunctioning.

A dark camera sector may also be displayed in
the following situations, but 

without

 the

defective camera symbol:

a door is open

the tailgate is open

a rearview mirror is folded in

Rear Park Assist Camera

WARNING

Be extra cautious when

reversing if this symbol is

shown when a trailer, bike

carrier or similar is

attached and electrically

connected to the vehicle.
The symbol indicates that

the rear parking assist sensors are 

deacti-

vated

 and will not warn of any obstacles.

Related information

Camera (p. 388)

Radar sensor (p. 385)

Camera/radar sensor limitations (p. 388)

Volvo Cars support site (p. 21)

-------------------------------------------------------------------------------------------------------------------------------------------------------------

STARTING AND DRIVING

* Option/accessory.

396

Starting the vehicle

The vehicle can be started using the start
knob in the tunnel console when the remote
key is in the passenger compartment.

Start knob in the tunnel console.

WARNING

Before starting:

Buckle your seat belt.

Adjust the seat, steering wheel and
mirrors.

Make sure you can fully depress the
brake pedal.

The remote key is not physically used to start
the ignition because the vehicle is equipped
with the keyless Passive Start system.

To start the vehicle:

1. The remote key must be inside the vehicle.

For vehicles with Passive Start, the key
must be in the front section of the passen-
ger compartment. With the optional key-
less locking/unlocking function

*

, the key

can be anywhere in the vehicle.

2. Press and hold down the brake pedal

1

 as

far as possible.

3. Turn the start knob clockwise and release.

The control will automatically return to the
original position.

WARNING

Never use more than one inlay mat at a
time on the driver's floor. If any other
type of floor mat is used, remove the
original mat from the driver's seat floor
before driving. All types of mats must
be securely anchored in the attach-
ment points in the floor. Make sure the
floor mat does not impede the move-
ment of the brake pedal or accelerator
pedal in any way, as this could be a
serious safety hazard.

Volvo's floor mats are specially manu-
factured for your vehicle. They must be
properly secured in the attachment
points in the floor to help ensure they
cannot slide and become trapped
under the pedals.

The starter motor will crank until the engine
starts or until overheating protection is trig-
gered.

Error messages

If the 

Vehicle key not found

 message is

shown in the instrument panel at start, place
the remote key at the backup reader and then
make a new start attempt.

1

If the vehicle is moving, it is only necessary to turn the start knob clockwise to start the engine.

-------------------------------------------------------------------------------------------------------------------------------------------------------------

STARTING AND DRIVING

}}

397

Location of the backup reader in the tunnel console.

NOTE

When the remote key is placed in the
backup reader, make sure that no other
vehicle keys, metal objects or electronic
devices (e.g. cellular phones, tablets, lap-
tops or chargers) are in the backup reader.
Multiple vehicle keys close to each other in
the backup reader can disrupt their func-
tionality.

CAUTION

If the engine has not responded after 3
attempts – wait for 3 minutes before star-
ting a new attempt. Starting capability
increases if the starter battery is given time
to recover.

WARNING

Never

 remove the remote control key from

the vehicle while driving or the vehicle is

being towed.

WARNING

Always remove the remote key from
the passenger compartment when you
leave the vehicle and make sure the
ignition is in mode 

0

.

Always put the gear selector in 

P

 and

apply the parking brake before leaving
the vehicle. Never leave the vehicle
unsupervised while the engine is run-
ning.

Always open the garage door fully and
make sure that ventilation is very good
before starting the engine in a garage.
The exhaust fumes produced by the
vehicle contain carbon monoxide,
which is invisible and odorless but very
toxic.

CAUTION

When starting in cold weather, the
automatic transmission may shift up at
slightly higher engine speeds than nor-
mal until the automatic transmission
fluid reaches normal operating tem-
perature.

Do not race a cold engine immediately
after starting. This could prevent fluids
from properly lubricating vital compo-
nents in the engine before it has
reached the proper operating tempera-
ture.

The engine should be idling when the
gear selector is moved. Never acceler-
ate until the gear is fully engaged.
Accelerating rapidly before a gear is
properly engaged could lead to harder
wear of components.

To help prevent the transmission oil
from overheating, select 

P

 or 

N

 when

idling at a standstill for prolonged peri-
ods of time.

-------------------------------------------------------------------------------------------------------------------------------------------------------------

||

STARTING AND DRIVING

398

NOTE

With a cold start, idling speed may be con-
siderably higher than normal for certain
engine types. This is done to get the emis-
sions system up to normal operating tem-
perature as quickly as possible, which min-
imizes exhaust emissions and protects the
environment.

Related information

Switching off the vehicle (p. 398)

Ignition modes (p. 399)

Adjusting the steering wheel (p. 202)

Jump starting using another battery
(p. 442)

Selecting ignition mode (p. 400)

Switching off the vehicle

The vehicle can be switched off using the
start knob in the tunnel console.

Start knob in the tunnel console.

To switch off the vehicle:

Turn the start knob clockwise and release
to switch off the vehicle. The control will
automatically return to the original posi-
tion.

If the vehicle rolls:

Turn clockwise and hold the knob until the
vehicle switches off.

Related information

Starting the vehicle (p. 396)

Ignition modes (p. 399)

Adjusting the steering wheel (p. 202)

Jump starting using another battery
(p. 442)

Selecting ignition mode (p. 400)

-------------------------------------------------------------------------------------------------------------------------------------------------------------

STARTING AND DRIVING

}}

* Option/accessory.

399

Ignition modes

The vehicle's ignition can be put in various
modes (levels) to make different functions
available.

To enable the use of a limited number of func-
tions when the engine is not running, the igni-
tion can be put in one of three different levels:

0

I

 and 

II

. These levels are referred to as "igni-

The following table shows which functions are
available in each ignition mode:

Mode Functions

0

The odometer, clock and tem-
perature gauge are illumi-
nated

A

.

The power

*

 seats can be

adjusted.

The power windows can be
used.

The center display is activated
and can be used

A

.

The infotainment system can
be used

A

.

In this mode, the functions are
available for a limited time and
then switch off automatically.

Mode Functions

I

The panoramic roof, power
windows, 12-volt electrical
socket in the passenger com-
partment, Bluetooth, naviga-
tion, phone, blower and wind-
shield wipers can be used.

The power seats can be
adjusted.

The 12-volt electrical socket

*

 in

the cargo compartment can be
used.

Electrical current will be taken
from the battery in this ignition
mode.

II

The headlights illuminate.

Warning/indicator lights illumi-
nate for 5 seconds.

A number of other systems are
activated. However, seat and
rear window heating can only
be activated when the engine
is running.

This ignition mode uses a lot of
current from the battery and
should be avoided whenever
possible!

A

Also activated when the door is opened.

-------------------------------------------------------------------------------------------------------------------------------------------------------------

||

STARTING AND DRIVING

400

Related information

Starting the vehicle (p. 396)

Adjusting the steering wheel (p. 202)

Jump starting using another battery
(p. 442)

Selecting ignition mode (p. 400)

Selecting ignition mode

The vehicle's ignition can be put in various
modes (levels) to make different functions
available.

Selecting an ignition mode

Start knob in the tunnel console.

Ignition mode 0

 – Unlock the vehicle and

keep the remote key in the passenger
compartment.

NOTE

To set level 

I

 or 

II


without

 engine start –

do 

not

 depress the brake pedal (or clutch

pedal for vehicles with manual transmis-
sion) when selecting this ignition mode.

Ignition mode I

 – Turn the start knob

clockwise and release it. The control will

automatically return to the original posi-
tion.

Ignition mode II

 – Turn the start knob

clockwise and hold it there for
approx. 5 seconds. Release the knob,
which will automatically return to its origi-
nal position.

Back to ignition mode 0

 – To return to

ignition mode 

0

 from modes 

I

 and 

II

, turn

the start knob clockwise and release it.
The control will automatically return to the
original position.

Related information

Starting the vehicle (p. 396)

Switching off the vehicle (p. 398)

Ignition modes (p. 399)

Adjusting the steering wheel (p. 202)

Jump starting using another battery
(p. 442)

-------------------------------------------------------------------------------------------------------------------------------------------------------------

STARTING AND DRIVING

}}

* Option/accessory.

401

Brake functions

The vehicle's brakes are used to reduce
speed or prevent the vehicle from rolling.

In addition to the wheel brakes and parking
brakes, the vehicle is also equipped with a
number of automatic brake assist functions.
These systems provide assistance by e.g. the
driver not needing to depress the brake pedal
at a traffic light, when starting up a hill or
when driving down a hill.

Depending on how the vehicle is equipped,
the following brake assist functions may be
included:

Auto-hold brake function at a standstill
(Auto Hold)

Hill Start Assist (Hill Start Assist)

Braking assist after a collision

City Safety

Hill Descent Control (Hill Descent
Control)

*

Related information

Brakes (p. 401)

Parking brake (p. 404)

Auto-hold brakes (p. 407)

Braking assist after a collision (p. 409)

Hill Start Assist (p. 409)

City Safety

 (p. 329)

Hill Descent Control

*

 (p. 432)

Brakes

The brake pedal is used to apply the vehicle's
regular brakes, which are part of the brake
system.

The vehicle is equipped with two brake cir-
cuits. If one brake circuit is damaged, the
brake pedal may go down further when
depressed. More pressure will then be
required from the driver for normal braking
effect.

The driver's pressure on the brake pedal is
enhanced by a power braking function.

WARNING

Power braking only functions if the engine

is running.

If the brake pedal is used when the engine is
turned off, the pedal will feel stiffer than usual
and greater pressure must be applied to brake
the vehicle.

In very hilly areas or when driving with a heavy
load, engine braking in manual gear should be
used to augment the brakes. Engine braking is
most effective if the same gear is used both
uphill and downhill. Use the Off Road

*

 drive

mode to increase the engine braking effect
when driving on steep downgrades at low
speeds.

Anti-lock brakes

The vehicle is equipped with an Anti-lock
Braking System (ABS

2

), which helps prevent

the wheels from locking and helps maintain
steering control when braking. Vibrations may
be felt from the brake pedal when ABS is
operating, which is normal.

After the vehicle is started, a brief test of the
ABS system is automatically performed when
the driver releases the brake pedal. An addi-
tional automatic test of the system may be
performed when the vehicle is traveling at a
low speed. During the test, the brake pedal
may feel as though it is pulsating.

-------------------------------------------------------------------------------------------------------------------------------------------------------------

||

STARTING AND DRIVING

402

Symbols in the instrument panel

Symbol Meaning

A

B

Check the brake fluid level. If the
level is low, fill brake fluid and
check to determine the reason
for the loss of brake fluid.

A

B

Steady glow for 2 seconds after
the engine is started: Automatic
function check.

Steady glow for more than 2
seconds: Fault in the ABS sys-
tem. The vehicle's regular brake
system is still working, but with-
out the ABS function.

A

In Canada.

B

In the US.

WARNING

If the warning symbols for both brake fault

and ABS fault are lit simultaneously, there

may be a fault in the brake system.

If the brake fluid reservoir level is nor-
mal when this occurs, drive carefully to
the nearest workshop to have the
brake system checked - an authorized
Volvo workshop is recommended.

If the brake fluid has fallen below the

MIN

 level in the brake fluid reservoir,

the vehicle should not be driven until
the brake fluid has been filled. The rea-
son for the brake fluid loss must be
checked.

Related information

Brake Assist System (p. 402)

Auto-hold brakes (p. 407)

Hill Start Assist (p. 409)

Braking on wet roads (p. 403)

Braking on salted roads (p. 403)

Maintenance of the brake system
(p. 403)

Brake lights (p. 165)

Brake Assist System

The brake enhancing system, (BAS

3

), helps

increase braking force and can thereby
reduce braking distance.

The system monitors the driver's braking hab-
its and increases braking force when neces-
sary. Braking force can be increased up to the
point at which the ABS intervenes.

NOTE

When BAS is activated, depress and hold
down the brake pedal as long as needed.

Related information

Brakes (p. 401)

2

Anti-lock Braking System

3

Brake Assist System

-------------------------------------------------------------------------------------------------------------------------------------------------------------

STARTING AND DRIVING

403

Braking on wet roads

Prolonged driving in heavy rain without brak-
ing may cause braking effect to be slightly
delayed the first time the brakes are applied.

This may also occur after washing the vehicle.
It will then be necessary to apply greater pres-
sure to the brake pedal. You should therefore
maintain a greater distance to the vehicle
ahead.

Firmly apply the brakes after washing the
vehicle or driving on wet roads. This helps
warm up the brake discs, enabling them to dry
more quickly and protecting them against cor-
rosion. Consider the current traffic situation
when braking.

Related information

Brakes (p. 401)

Braking on salted roads (p. 403)

Braking on salted roads

When driving on salted roads, a layer of salt
may form on the brake discs and brake pads.

This could increase stopping distance. Main-
tain an extra large safety distance to the vehi-
cle ahead. Make sure to also:

Apply the brakes from time to time to help
remove salt. Make sure braking does not
pose a risk to any other road users.

Gently apply the brakes when you have
finished driving and before driving again.

Related information

Brakes (p. 401)

Braking on wet roads (p. 403)

Maintenance of the brake system

Regularly check the brake system compo-
nents for wear.

To keep the vehicle as safe and reliable as
possible, follow the Volvo service schedule
specified in the Warranty and Maintenance
Records Information booklet. After replacing
brake pads and brake discs, braking effect is
not adapted until they are "broken in" by driv-
ing a few hundred kilometers (miles). Com-
pensate for the reduced braking effect by
applying greater pressure to the brake pedal.
Volvo recommends only using brake pads
approved for your Volvo.

CAUTION

The brake system's components should be
regularly checked for wear.

Contact a workshop for advice on how to
do this or let a workshop perform the
inspection - an authorized Volvo workshop
is recommended.

Related information

Brakes (p. 401)

-------------------------------------------------------------------------------------------------------------------------------------------------------------

STARTING AND DRIVING

404

Parking brake

The parking brake helps keep the vehicle sta-
tionary by mechanically locking two wheels.

The parking brake controls are located in the tunnel

console between the seats.

When the electric parking brake is being
applied, a faint sound can be heard from the
brake's electric motor. This sound can also be
heard during the automatic function check of
the parking brake.

If the vehicle is stationary when the parking
brake is activated, it will only be applied to the
rear wheels. If it is activated while the vehicle
is moving, the normal brakes will be used on
all four wheels. Braking will be transferred to
only the rear wheels when the vehicle is
almost stopped.

Related information

Activating and deactivating the parking
brake (p. 404)

Parking on a hill (p. 406)

Parking brake malfunction (p. 406)

Auto-hold brakes (p. 407)

Activating and deactivating the

parking brake

Use the parking brake to help keep the vehi-
cle stationary when it is parked.

Activating the parking brake

1. Pull up the control.

> The symbol in the instrument panel will

illuminate when the parking brake is
activated.

2. Make sure the vehicle is stationary.

-------------------------------------------------------------------------------------------------------------------------------------------------------------

STARTING AND DRIVING

405

Symbol in the instrument panel

Symbol Meaning

A

B

The symbol will be illuminated
when the parking brake is acti-
vated.

A flashing symbol indicates that
a fault has been detected. Read
the message in the instrument
panel.

A

Canadian models.

B

US models.

Automatic activation

The parking brake is applied automatically

when the ignition is switched off and the
setting for automatically activating the
parking brake is activated in the center
display.

when the gear selector is moved to 

P

 on a

steep hill.

if the auto-hold brake (automatic brake at
standstill) function is activated and

the vehicle has been stationary for a
prolonged period of time (5-10
minutes).

the vehicle is switched off.

the driver has left the vehicle.

Emergency braking

In an emergency, the parking brake can be
activated when the vehicle is moving by pull-
ing and holding up the control. The braking
process is canceled when the control is
released or if the accelerator pedal is
depressed.

NOTE

In case of emergency braking at high
speeds, a signal sounds during the brake
procedure.

Deactivating the parking brake

Deactivating manually

The parking brake can only be deactivated if
the engine is running.

1. Depress the brake pedal firmly.

2. Press the control.

> The parking brake will release and the

symbol in the instrument panel will go
out.

Deactivating automatically

1. Start the vehicle.

2. Depress the brake pedal firmly. Move the

gear selector to 

D

 or 

R

 and press the

accelerator pedal.
> The parking brake will release and the

symbol in the instrument panel will go
out.

NOTE

For automatic deactivation to be possible,
the driver's seat belt must be buckled or
the driver's door closed.

Related information

Settings for automatically activating the
parking brake (p. 406)

Parking brake malfunction (p. 406)

Parking brake (p. 404)

Parking on a hill (p. 406)

-------------------------------------------------------------------------------------------------------------------------------------------------------------

STARTING AND DRIVING

406

Settings for automatically

activating the parking brake

Choose whether the parking brake should be
activated automatically when the vehicle is
switched off.

To change this setting:

1. Tap 

Settings

 in the center display's Top

view.

2. Tap 

My Car

Parking Brake and

Suspension

 and select or deselect the

Auto Activate Parking Brake

 function.

Related information

Activating and deactivating the parking
brake (p. 404)

Parking brake (p. 404)

Parking on a hill

Always use the parking brake when parking
on a hill.

WARNING

Always apply the parking brake when park-

ing on an incline. Selecting a gear or put-

ting the automatic transmission in 

P

 may

not be sufficient to keep the vehicle sta-

tionary in all situations.

If the vehicle is pointing uphill:

Turn the front wheels so they are pointing

away from

 the curb.

If the vehicle is pointing downhill:

Turn the front wheels so they are pointing

toward

 the curb.

Heavy load uphill

Heavy loads, such as a trailer, could cause the
vehicle to roll backward when the parking
brake is released automatically on steep uphill
gradients. To help avoid this, pull the control
upward while you are driving away. Release
the control when the vehicle gains traction.

Related information

Activating and deactivating the parking
brake (p. 404)

Parking brake malfunction

If you are unable to deactivate or activate the
parking brake after several attempts, contact
an authorized Volvo workshop.

A audible warning signal will sound if the park-
ing brake is activated while the vehicle is
being driven.

If the vehicle must be parked before the prob-
lem is rectified, turn the wheels as when park-
ing on an incline and put the gear selector in

P

.

Low battery charge level

If the battery charge level is too low, it will not
be possible to activate or deactivate the park-
ing brake. Connect an auxiliary battery to the
vehicle if the battery is discharged.

Replacing brake pads

Due to the design of the electric parking
brake, the rear brake pads must be replaced
by a workshop. An authorized Volvo workshop
is recommended.

-------------------------------------------------------------------------------------------------------------------------------------------------------------


Content      ..     21      22      23      24     ..