Volkswagen Golf / Golf GTI / Golf Variant. Manual - part 883


  Index      Volkswagen     Volkswagen Golf / Golf GTI / Golf Variant - service repair manual 2013 year


Search            copyright infringement  


Content   ..  881  882  883  884   ..


Volkswagen Golf / Golf GTI / Golf Variant. Manual - part 883


4.5.2

Wheels and Tires, Radial and Lateral

Run Out, Checking with Tire Dial Gauge

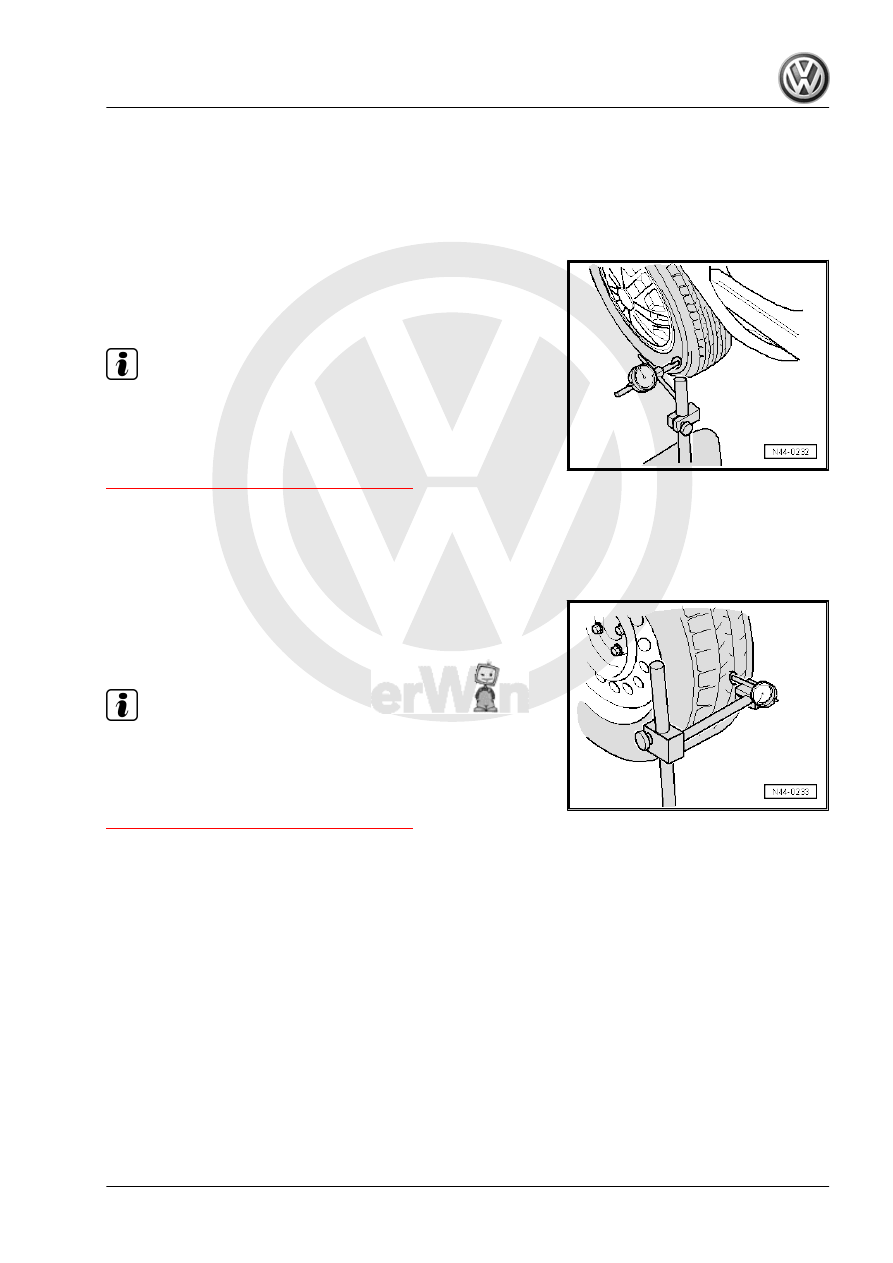
Checking Lateral Run-Out
– Preload the Tire Dial Gauge approximately 2 mm.
– Position the Tire Dial Gauge on the side wall of the tire.
– Rotate the wheel slowly.
– Note the smallest and the largest dial readings.

Note

If the difference is greater than 1.3 mm, the lateral run-out is too

great.

In this case, lateral run-out can be reduced by matched mounting

of the tire. Refer to

⇒ “4.7 Wheels and Tires, Matching”, page 318

 .

Peak values on the Tire Dial Gauge due to small irregularities in

the rubber may be disregarded.
Checking Radial Run-Out
– Preload the Tire Dial Gauge approximately 2 mm.

– Position the Tire Dial Gauge on the tread of the tire.
– Rotate the wheel slowly.
– Note the smallest and the largest dial readings.

Note

If the difference is greater than 1 mm, the radial run-out is too

great.

In this case, radial run-out can be reduced by matched mounting

of the tire. Refer to

⇒ “4.7 Wheels and Tires, Matching”, page 318

 .

4.6

Rim Radial and Lateral Run-Out,

Checking

– Mount the rim on the Balancing Machine .
– Use the Wheel Centering System Adapter - VAS5271- .
– Preload the Tire Dial Gauge approximately 2 mm.
– Turn the rim slowly.

– Note the smallest and the largest dial readings.
S - Lateral Run-Out
H - Radial Run-Out
– Compare determined value with specifications in the table.

Refer to 

⇒ page 318

 .

Note

Peak values on the Tire Dial Gauge due to small irregularities may

be disregarded.

Specified Values for Radial and Lateral Run-Out on the Rim

Rim

Radial Run-Out (mm)

Lateral Run-Out (mm)

Steel wheel

0.5

0.5

Light alloy wheel

0.5

0.8

Note

If the measured value exceeds the specified value, no acceptable

smooth running can be attained.

4.7

Wheels and Tires, Matching

General Information
If radial or lateral run-out from rim or tire meet each other, the

untrue running of the wheel and tire is increased.
For technical reasons, 100% true running is not possible. Refer

to

⇒ “4.5.1 Tire and Wheel Radial and Lateral Run-Out, Checking,

Tolerances”, page 316

 .

Drive the tires until they are warm before matching them to the

tires already on the vehicle. This eliminates flat spots from stand‐

ing which may exist. Refer to

⇒ “4.8 Flat Spots in Tires From Standing, Determining”,

page 319

 .

Work Procedure for Match-Mounting
– Let the air out of the tire.
– Remove the tire bead from the wheel rim flange.
– Coat the tire bead all the way around with Tire Mounting

Paste .

– Turn the tire 180° against the rim.
– Inflate the tire to approximately 4 bar (58 psi).
– Tension the wheel with the tire on the balancing machine.
– Check the run-out or the radial and lateral run-out, as neces‐

sary.

Note

If the radial and lateral run-out value is not exceeded, the

wheel can be balanced to 0 grams. Specifications. Refer to

⇒ page 316

 .

If the radial and lateral run-out lies outside the specified val‐

ues, the tire must be turned again.

– Let the air out and remove the tire beads from the wheel rim

flanges.

– Rotate the tire 90° (one quarter of a turn) relative to the rim.
– Inflate the tire to 4 bar (58 psi) again and check the run-out.

Note

If the radial and lateral run-out value is not exceeded, the

wheel can be balanced to 0 grams.

If the radial and lateral run-out is still outside the specified val‐

ues, the wheel must be turned again.

– Press the tire beads off the rim flanges.
– Rotate the tire 180° (half a turn) relative to the rim.
If the values for radial or lateral run-out are still outside the speci‐

fied values, check the rim for radial and lateral run-out. Refer to

⇒ “4.6 Rim Radial and Lateral Run-Out, Checking”, page 317

 .

If the measured values for radial and lateral run-out of the rim are

within the specified values, then the tire has excessive radial or

lateral run-out. In this case, the tire must be replaced.

Note

Assembly paste from mounting tires is located between tires

and rim flanges.

Avoid strong braking or acceleration maneuvers during the

first 100 to 200 km. Otherwise, the tires can rotate on the rims

and the work done would then be undone!

4.8

Flat Spots in Tires From Standing, De‐

termining

What is a Flat Spot from Standing?
Terms like flat portion, flattening, are also used as a term for flat

spots from standing.
Flat spots from standing cause vibration, like an incorrectly bal‐

anced wheel. It is important to recognize a flat spot in the tread

from standing as such!
Flat spots from standing cannot be corrected by balancing, and

can occur again at any time under various circumstances. Flat

spots from standing can be corrected without complicated special

tools, providing that the flat spot was not caused by wheel lock

during hard braking. Refer to ⇒  Wheel and Tire Guide - General

Information; Rep. Gr.  44 ; Tires, Rolling Noises, Wear Spots .

Note

Wear spots due to wheel lock are irreparable! Tires with such

damage must be replaced.

Causes of Flat Spots from Standing
♦ The vehicle stands for several weeks in a location without be‐

ing moved.

♦ Tire pressure is too low.
♦ The vehicle was placed in a paint system drying cabinet after

painting.

♦ The vehicle was parked with warm tires in a cold garage or

similar for a long time. In this case, a flat spot can develop

overnight.

Flat Spots, Correcting
♦ Flat spots cannot be removed from tires with shop equipment.
♦ Such flat spots can be "driven out" only by driving the car until

the tires are warm.

♦ We do not recommend the following method during cold or

winter weather.

Requirements/Conditions
– Check the tire pressure and correct, if necessary.
– If possible, drive the vehicle on an expressway.
– If the traffic and road conditions permit, drive at a speed of 120

to 150 km/h (75 to 93 mph) for a distance of 20 to 30 km (12.4

to 18.6 miles).

WARNING

♦ Do not endanger yourself or other persons during this road

test.

♦ Follow all traffic regulations and speed limits when per‐

forming the road test.

– Lift the vehicle immediately after the performing the road test.
– Remove the wheels from the vehicle.
– Balance the wheels on the stationary balancing machine. Re‐

fer to

⇒ “4.3.2 Wheel, Balancing on Stationary Balancing Machine”,

page 312

 .


Content   ..  881  882  883  884   ..