Toyota Tundra (2015 year). Manual - part 2884


  Index      Toyota     Toyota Tundra (2015 year) - Service and Repair Manual


Search            copyright infringement  


Content   ..  2882  2883  2884  2885   ..


Toyota Tundra (2015 year). Manual - part 2884


(b) Disconnect the connector.

5. REMOVE REAR POWER WINDOW REGULATOR SWITCH ASSEMBLY 

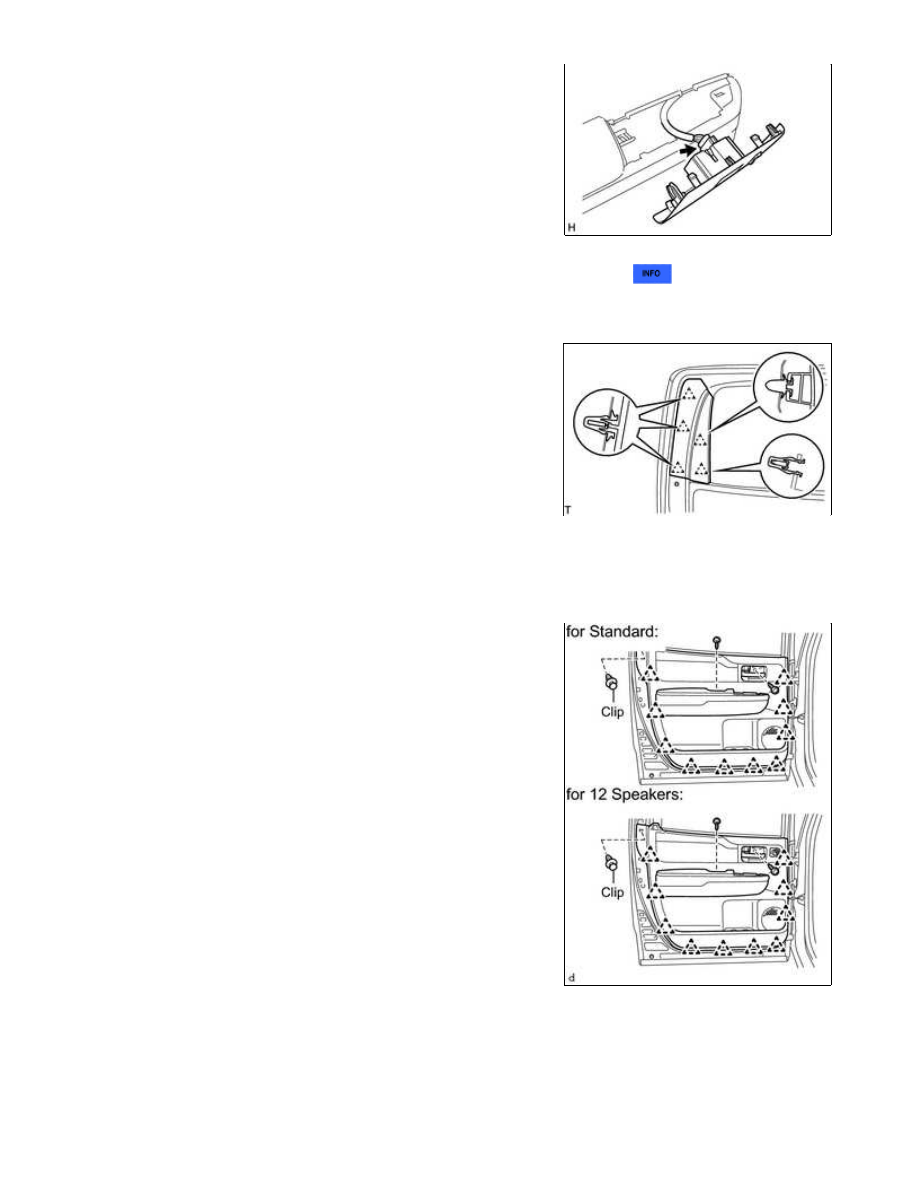
6. REMOVE REAR DOOR FRAME GARNISH LH

(a) Detach the 5 clips and remove the rear door frame garnish.

7. REMOVE REAR DOOR ARMREST COVER LH

8. REMOVE REAR DOOR TRIM BOARD SUB-ASSEMBLY LH

(a) Remove the 2 screws.

(b) Using a clip remover, remove the clip.

(c) for Standard:

(1) Detach the 10 clips and remove the trim board.

(d) for 12 Speakers:

ENGINE HOOD / DOOR: REAR DOOR (for CrewMax): DISASSEM...

(1) Detach the 10 clips and remove the trim board. Then disconnect the connector.

(e) Disconnect the 2 cables from the inside handle.

(f) Remove the inside handle.

9. REMOVE REAR NO. 2 SPEAKER ASSEMBLY (for 12 Speakers) 

10. REMOVE REAR INNER DOOR GLASS WEATHERSTRIP LH

11. REMOVE REAR NO. 2 DOOR TRIM BRACKET

(a) Remove the 2 screws and bracket.

12. REMOVE REAR SPEAKER ASSEMBLY 

13. REMOVE REAR DOOR SERVICE HOLE COVER LH

(a) Disconnect the connector and 5 clamps.

(b) Remove the rear door service hole cover.

HINT:

Remove the remaining tape on the door.

14. REMOVE REAR DOOR GLASS RUN LH

ENGINE HOOD / DOOR: REAR DOOR (for CrewMax): DISASSEM...

(a) Remove the rear door glass run.

15. REMOVE REAR DOOR REAR LOWER WINDOW FRAME SUB-ASSEMBLY LH

(a) Remove the 2 bolts and rear door rear lower window frame.

HINT:

Remove the frame through the service hole.

NOTICE:

Be careful when removing the bolts as the frame may fall and

become damaged.

16. REMOVE REAR DOOR GLASS SUB-ASSEMBLY LH

(a) Temporarily install the power window regulator switch.

(b) Move the door glass until the bolts appear in the service holes.

(c) Remove the 2 bolts.

NOTICE:

Be careful when removing the bolts as the glass may fall and

become damaged.

(d) Remove the rear door glass from the rear door window regulator

as shown in the illustration.

NOTICE:

Do not damage the door glass.

(e) Remove the power window regulator switch.

17. REMOVE REAR DOOR FRONT WINDOW GUIDE SUB-ASSEMBLY LH

ENGINE HOOD / DOOR: REAR DOOR (for CrewMax): DISASSEM...

(a) Remove the 2 bolts and rear lower front door window guide.

HINT:

Remove the frame through the service hole.

NOTICE:

Be careful when removing the bolts as the frame may fall and

become damaged.

18. REMOVE REAR NO. 2 DOOR GLASS RUN LH

(a) Remove the rear door glass run from the rear front lower door window guide.

19. REMOVE REAR OUTER DOOR GLASS WEATHERSTRIP 

20. REMOVE REAR DOOR WINDOW REGULATOR SUB-ASSEMBLY LH

(a) Disconnect the connector.

(b) Loosen the temporary bolt.

NOTICE:

Do not remove the temporary bolt. If the temporary bolt is removed, the front door window regulator may

fall and become damaged.

(c) Remove the 5 bolts and window regulator.

(d) Remove the window regulator through the service hole.

(e) Remove the temporary bolt from the door window regulator.

21. REMOVE POWER WINDOW REGULATOR MOTOR ASSEMBLY LH

(a) Using a T25 "TORX" driver, remove the 3 screws and motor.

NOTICE:

Be careful when removing the screws as the motor may fall and

become damaged.

22. REMOVE REAR DOOR LOCK ASSEMBLY LH

ENGINE HOOD / DOOR: REAR DOOR (for CrewMax): DISASSEM...


Content   ..  2882  2883  2884  2885   ..