Toyota Tundra. Manual - part 2928


  Index      Toyota     Toyota Tundra (2007-2010 year) - Service and Repair Manual


Search            copyright infringement  


Content   ..  2926  2927  2928  2929   ..


Toyota Tundra. Manual - part 2928


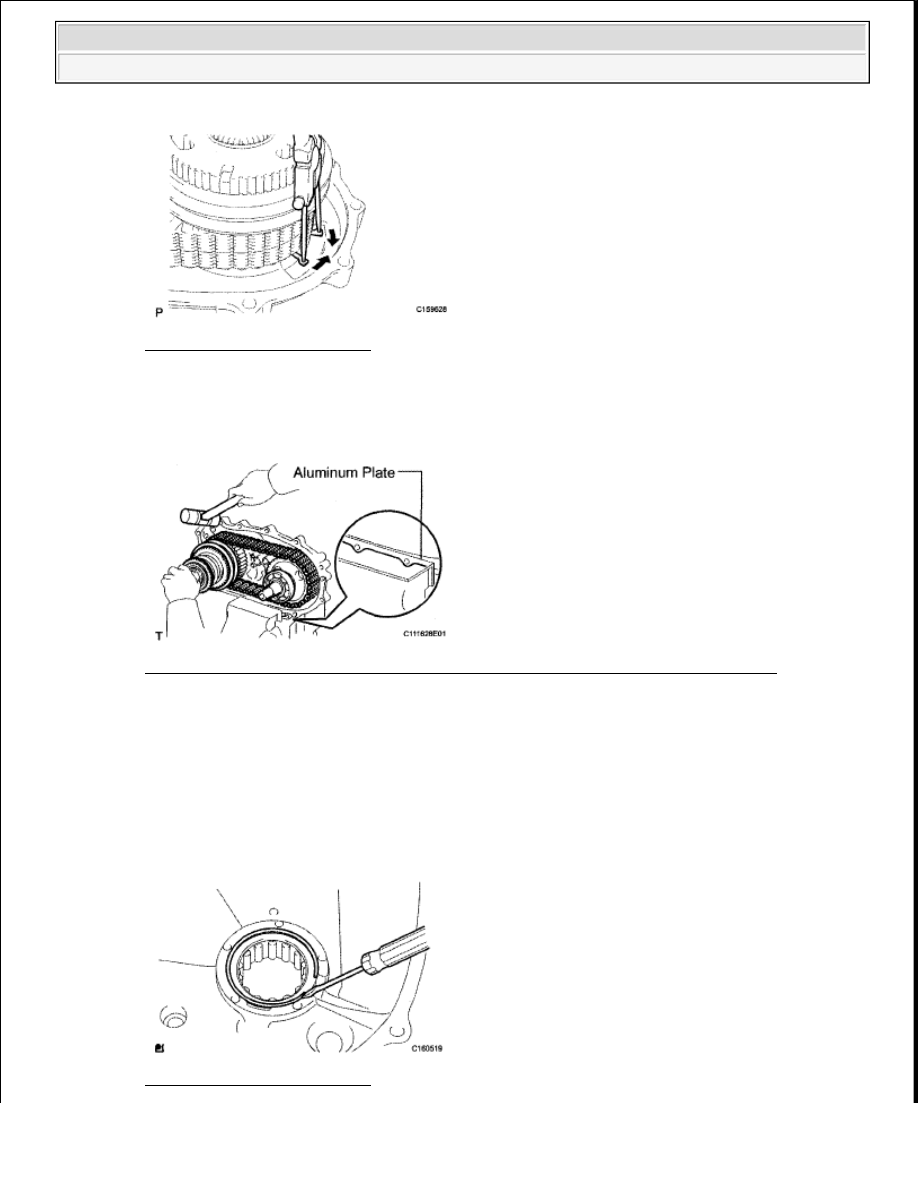
Fig. 37: Removing Snap Ring 
Courtesy of TOYOTA MOTOR SALES, U.S.A., INC. 

b. Using a plastic-faced hammer, carefully tap the case rear, and remove the output shaft together with 

the drive chain and driven sprocket. 

Fig. 38: Removing Output Shaft Together With Drive Chain And Driven Sprocket 
Courtesy of TOYOTA MOTOR SALES, U.S.A., INC. 

c. Remove the output shaft and driven sprocket from the drive chain. 

16. REMOVE SIDE GEAR SHAFT HOLDER BEARING 

a. Using a screwdriver, remove the snap ring. 

Fig. 39: Removing Snap Ring 

NOTE:

Do not drop the transfer output washer.


2009 Toyota Tundra 

2009 TRANSMISSION JF1A Transfer - Tundra


Courtesy of TOYOTA MOTOR SALES, U.S.A., INC. 

b. Using a screwdriver, remove the bearing. 

Fig. 40: Removing Bearing 
Courtesy of TOYOTA MOTOR SALES, U.S.A., INC. 

17. REMOVE TRANSFER OIL SEPARATOR SUB-ASSEMBLY 

a. Remove the 3 bolts and oil separator.  

Fig. 41: Identifying Oil Separator Bolts 
Courtesy of TOYOTA MOTOR SALES, U.S.A., INC. 

18. REMOVE TRANSFER CASE MAGNET  

19. REMOVE INPUT SHAFT ASSEMBLY 

a. Using a 10 mm hexagon wrench, remove the 2 case plugs from the front case. 


2009 Toyota Tundra 

2009 TRANSMISSION JF1A Transfer - Tundra


Fig. 42: Identifying Case Plugs 
Courtesy of TOYOTA MOTOR SALES, U.S.A., INC. 

b. Using a snap ring expander, remove the snap ring. Then remove the input shaft from the front case. 

Fig. 43: Identifying Snap Ring 
Courtesy of TOYOTA MOTOR SALES, U.S.A., INC. 

20. REMOVE TRANSFER LOW PLANETARY RING GEAR 

a. Using a screwdriver, remove the snap ring. Then remove the low planetary ring gear from the front 

case. 

Fig. 44: Removing Snap Ring 
Courtesy of TOYOTA MOTOR SALES, U.S.A., INC. 

21. REMOVE TRANSFER DRIVEN SPROCKET BEARING 

a. Using a screwdriver, remove the snap ring. Then remove the driven sprocket bearing from the front 

case. 


2009 Toyota Tundra 

2009 TRANSMISSION JF1A Transfer - Tundra


Fig. 45: Removing Transfer Driven Sprocket Bearing 
Courtesy of TOYOTA MOTOR SALES, U.S.A., INC. 

22. REMOVE TRANSFER OIL SEAL RING 

a. Remove the oil seal ring from the input shaft. 

Fig. 46: Identifying Transfer Oil Seal Ring 
Courtesy of TOYOTA MOTOR SALES, U.S.A., INC. 

23. REMOVE NO. 1 TRANSFER INPUT SHAFT SEAL RING 

a. Remove the oil seal ring from the input shaft. 

Fig. 47: Identifying No. 1 Transfer Input Shaft Seal Ring 
Courtesy of TOYOTA MOTOR SALES, U.S.A., INC. 

24. REMOVE TRANSFER INPUT SHAFT BEARING 

a. Using a snap ring expander, remove the snap ring. 


2009 Toyota Tundra 

2009 TRANSMISSION JF1A Transfer - Tundra


Content   ..  2926  2927  2928  2929   ..