Suzuki Grand Vitara JB416 / JB420. Manual - part 300


  Index      Suzuki     Suzuki Grand Vitara JB416 / JB420- service repair manual


Search            


Content   ..  298  299  300  301   ..


Suzuki Grand Vitara JB416 / JB420. Manual - part 300


8A-3 Seat Belts: 

Diagnostic Information and Procedures

Repair and Inspection Required after Accident

S5JB0A8104001

After an accident, whether the seat belt pretensioner has been activated or not, be sure to perform checks and repairs 
described on “Repair and Inspection Required after Accident in Section 8B”.

Repair Instructions

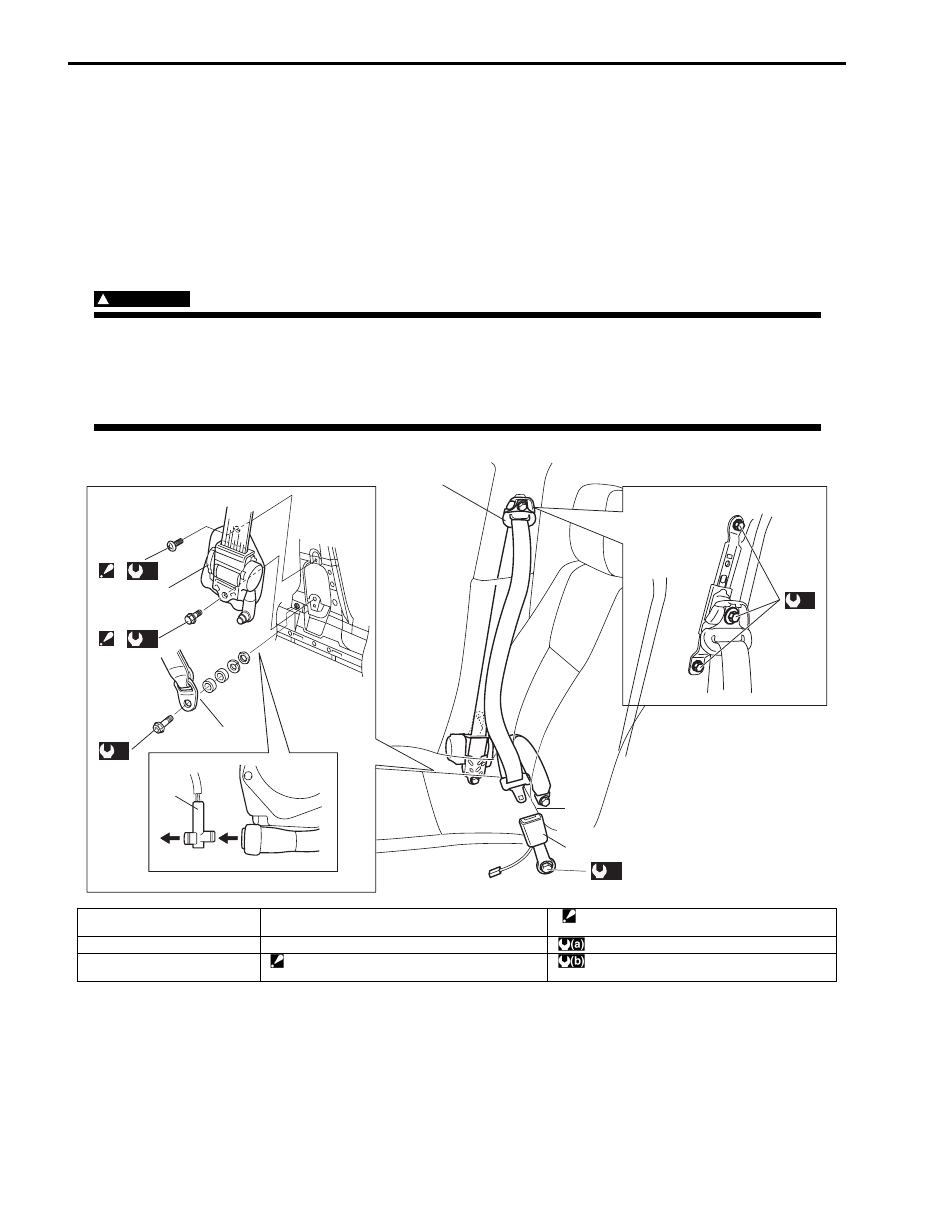
Front Seat Belt Components

S5JB0A8106001

WARNING

!


• Never attempt to disassemble or repair the seat belt pretensioner (retractor assembly). If any 

abnormality is found, be sure to replace it with new one as an assembly.

• Be sure to read “Precautions on Service and Diagnosis of Seat Belt” before starting to work and 

observe every precaution during work. Neglecting them may result in personal injury or 
unactivation of the seat belt pretensioner when necessary.


1

(a)

(a)

3

2

7

(b)

6

5

4

a)

b)

(a)

(a)

I5JB0A810002-01

1. Upper anchor

4. Buckle

 7. Retractor assembly lower mounting bolt

: After tightening lower bolt, tighten upper bolt.

2. Lower anchor

5. Yellow connector (for seat belt pretensioner)

: 35 N

⋅m (3.5 kgf-m, 25.5 lb-ft)

3. Retractor assembly

 6. Retractor assembly upper mounting bolt

: After tightening lower bolt, tighten upper bolt.

: 5.5  N

⋅m (0.55 kgf-m, 4.0 lb-ft)

Seat Belts:  8A-4

Front Seat Belt Removal and Installation

S5JB0A8106002

WARNING

!


• Never attempt to disassemble or repair the 

seat belt pretensioner (retractor 
assembly). If any abnormality is found, be 
sure to replace it with new one as an 
assembly.

• Be sure to read “Precautions on Service 

and Diagnosis of Seat Belt” before starting 
to work and observe every precaution 
during work. Neglecting them may result in 
personal injury or unactivation of the seat 
belt pretensioner when necessary.


Removal

1) Disconnect negative (–) cable at battery.
2) Disable air bag system. Refer to “Disabling Air Bag 

System in Section 8B”.

3) Remove center pillar lower trim.
4) Disconnect Yellow connector (1) from seat belt 

pretensioner (2).
a) Release locking of lock button (3).
b) After unlocked, disconnect connector.

5) Remove front seat belts from the vehicle.

Installation
Install in reverse order of removal, noting the following.
• Seat belt anchor bolts should have an unified fine 

thread (7/16-20 UNF). Under no circumstances 
should any different sized or metric screw threads be 
used.

• Connect Yellow connector (1) to seat belt 

pretensioner securely.
a. Connect connector.
b. Lock connector with lock button (2).

• Enable air bag system. Refer to “Enabling Air Bag 

System in Section 8B”.

Front Seat Belt Inspection

S5JB0A8106003

WARNING

!


• Never attempt to disassemble or repair the 

seat belt pretensioner (retractor 
assembly). If any abnormality is found, be 
sure to replace it with new one as an 
assembly.

• Be sure to read “Precautions on Service 

and Diagnosis of Seat Belt”, before 
starting to work and observe every 
precaution during work. Neglecting them 
may result in personal injury or 
unactivation of the seat belt pretensioner 
when necessary.

• Never measure resistance of pretensioner 

or disassemble it. Otherwise, personal 
injury may result.


CAUTION

!


If seat belt pretensioner (retractor assembly) 
was dropped from a height of 30 cm (1 ft) or 
more, it should be replaced.


Seat belts and attaching parts can affect the vital 
components and systems of a vehicle.
Therefore, they should be inspected carefully and 
replaced with genuine parts only.

a

3

1

2

b

I5JB0A810003-01

a

3

1

2

b

I5JB0A810004-01

I5JB0A810005-02

8A-5 Seat Belts: 

Seat Belt
• The seat belt webbing or strap should be free from 

damage.

Retractor Assembly (with Seat Belt Pretensioner)

1) Let the seat belt retract fully to confirm its easy 

retraction.
• The retractor assembly should lock webbing when 

pulled quickly.

• The front seat belt retractor assembly (1) should 

pass the inspection and should lock webbing even 
when tilted (approx. 15

°) toward the fore and aft or 

right and left directions.

2) Check retractor assembly (1) with seat belt 

pretensioner appearance visually for following 
symptoms and if any one of them is applicable, 
replace it with a new one as an assembly.
• Pretensioner has activated.
• There is a crack in seat belt pretensioner 

(retractor assembly).

• Seat belt pretensioner (retractor assembly) is 

damaged or a strong impact (e.g., dropping) was 
applied to it.

Anchor Bolt
• Anchor bolts should be torqued to specification.

Belt Latch
• It should be secure when latched.

Seat Belt Switch
Check driver side seat belt switch for continuity by using 
ohmmeter.

Seat belt switch specification
Without inserted buckle tongue to buckle catch:
Terminal “A” and “B”: Continuity
With inserted buckle tongue to buckle catch:
Terminal “A” and “B”: No continuity

I2RH01810005-01

1. Buckle tongue
2. Buckle catch

I4RS0B810001-01

Seat Belts:  8A-6

Rear Seat Belt Components

S5JB0A8106004

WARNING

!


Be sure to read “Precautions on Service and Diagnosis of Seat Belt” before starting to work and 
observe every precaution during work.


Rear Seat Belt Removal and Installation

S5JB0A8106005

WARNING

!


Be sure to read “Precautions on Service and 
Diagnosis of Seat Belt” bef
ore starting to 
work and observe every precaution during 
work.


Removal

1) Remove rear side sill scuff, rear side lower trim and 

rear pillar trim referring to “Head Lining Removal and 
Installation in Section 9H”.

2) Remove rear seat belt referring to “Rear Seat Belt 

Components”.

Installation
Reverse removal procedure for installation noting the 
following.
• Seat belt anchor bolts should have an unified fine 

thread (7/16-20 UNF). Under no circumstances 
should any different sized or metric screw threads be 
used.

Rear Seat Belt Inspection

S5JB0A8106006

WARNING

!


Be sure to read “Precautions on Service and 
Diagnosis of Seat Belt” bef
ore starting to 
work and observe every precaution during 
work.


• Check the rear seat belt in the same way as “Front 

Seat Belt Inspection”.

• As to seat belts with A-ELR, check them as follows.

– With vehicle at stop, pull seat belt all the way out, 

let it retract a little and try to pull it. It should not be 
pulled out, that is, it should be locked where 
retracted.

– Let seat belt retract to its original state. Next, pull it 

half way out, let it retract a little and try to pull it 
again. It should be pulled out smoothly, that is it 
should not be locked at this time.

(a)

(a)

(a)

(a)

(a)

3

1

4

6

5

2

I5JB0A810006-01

1. Upper anchor

4. Rear center retractor assembly

7. Rear seat belt

2. Lower anchor

5. Buckle for rear seat belt

: 35 N

⋅m (3.5 kgf-m, 25.5 lb-ft)

3. Retractor assembly

6. Buckle for rear center seat belt


Content   ..  298  299  300  301   ..