Opel Frontera UE. Manual - part 574


  Index      Opel     Opel Frontera UE - service repair manual 1999-2001 year


Search            


Content   ..  572  573  574  575   ..


Opel Frontera UE. Manual - part 574


SEAT BELT SYSTEM

9A–7

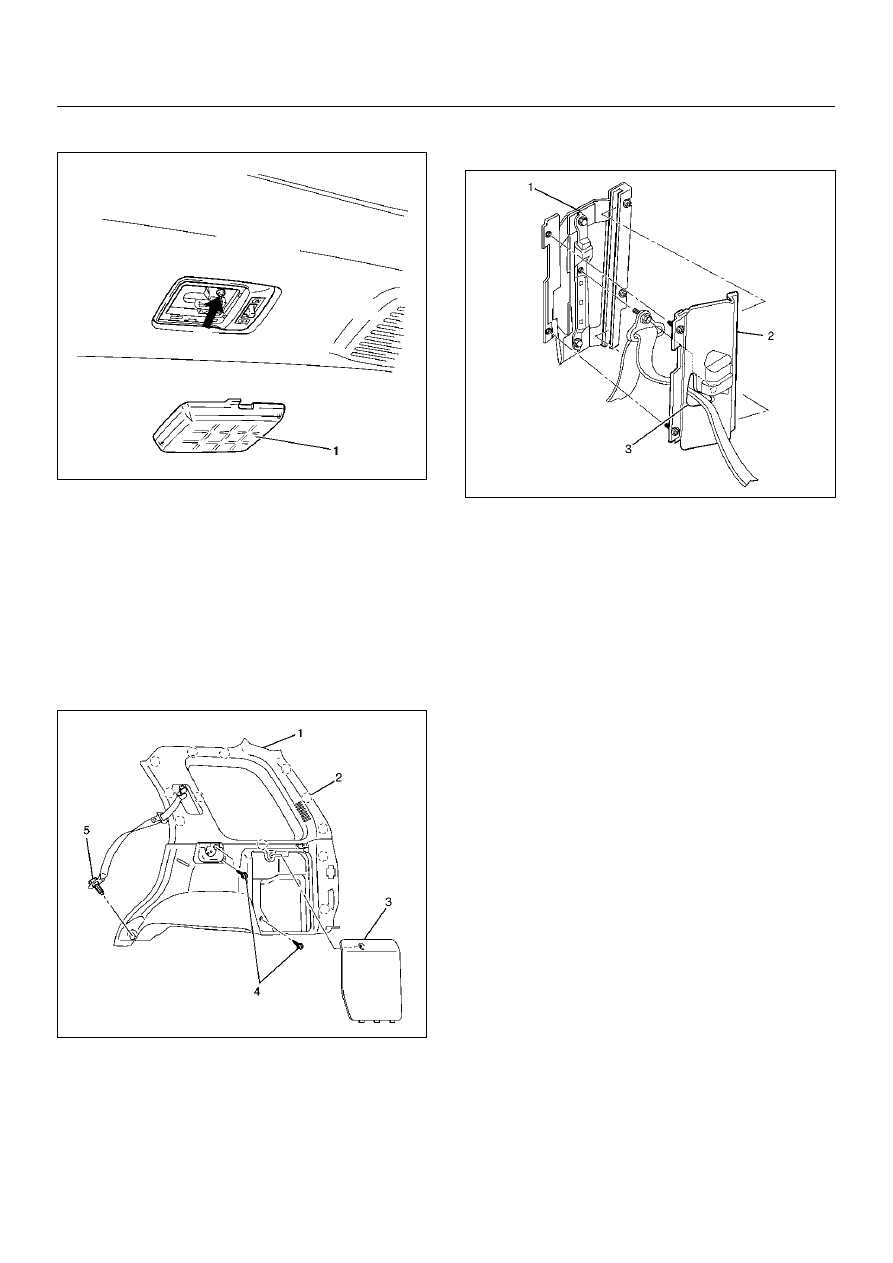
• Disconnect the luggage room light connector.

825RW100

5. Remove the rear roof trim cover.

• Pry the trim cover clips free from the body panel.

6. Remove the rear sill plate.

7. Remove the rear seat belt lower anchor bolt cover 

and the lower anchor bolt (5).

8. Remove the quarter trim cover (1).

• Remove the tool box lid (3) and 3 fixing screws 

(4).
Pry the quarter trim cover retainers (2) free from 
the body panel.

643RW011

9. Remove the slider plate trim assembly (2).

• Remove the two fixing screws from the adjustable 

shoulder anchor (1).

• Pull out the seat belt through the hole (3) on the 

slider plate trim.

755RW069

10. Remove the seat belt upper anchor bolt.

11. Remove the retractor.

12. Remove the rear seat belt assembly.

13. Remove the adjustable shoulder anchor assembly.

• Remove the two fixing bolts.

Inspection

If any of the following abnormalities is found, replace on 
an assembly basis.

• Deform and malfunction of adjustable shoulder 

anchor.

• No smooth move of upper/lower anchors in the 

circumferential direction.

• Damaged and/or deformed through ring.

• Damaged and/or deformed tongue.

• Damaged and/or frayed of webbing.

• Deformed retractor bracket.

• Seat belt not rewound up.

• Resistance or abnormal sound when seat belt is 

wound out and rewound.

• Retractor abnormality.

9A–8

SEAT BELT SYSTEM

Inspection of retractor

1. ELR (Emergency Locking Retractor) lock inclining 

angle check.

• When the retractor is moved gently from its 

installing position, make sure it is not locked 
within 15

°

 in any directions, and it remains locked 

at 45

°

 or larger.

2. ELR lock check.

• When the seat belt is drawn slowly with the 

retractor installed, make sure it is not locked. And 
when it is drawn quickly, make sure it is locked.

CAUTION:  Do not disassemble the retractor.

Installation

To install, follow the removal steps in the reverse order, 
noting the following point.

1. Tighten the adjustable shoulder anchor assembly 

fixing bolts to the specified torque.

Torque: 39N·m (4.0kg·m/29lbft)

2. Tighten the seat belt anchor bolts (Upper & Lower) 

and the retractor fixing bolts to the specified torque.

Torque: 39N·m (4.0kg·m/29lbft)

SEAT BELT SYSTEM

9A–9

Rear Seat Belt (SWB)

Rear Seat Belt and Associated Parts

755RW071

Legend

EndOFCallout

Removal

1. Disconnect the battery ground cable.

2. Remove the canopy cover (1).

• Remove two fixing clips.

3. Remove the luggage side lid (2).

4. Remove the luggage side front cover (4).

5. Remove the luggage side upper cover (3).

686RX001

(1) Seat Belt Cross Bar Assembly
(2) Seat Belt Upper Anchor Bolt
(3) Shoulder Anchor Cover
(4) Rear Seat Belt Assembly

(5) Retractor
(6) Seat Belt Lower Anchor Bolt
(7) Quarter Lower Trim Cover

9A–10

SEAT BELT SYSTEM

6. Remove the tailgate weather strip.

7. Remove the rear end floor trim cover.

8. Remove the luggage side trim cover (RH).

• Remove the jack & tool lid and remove the tool.

• Remove fixing screw and pry the trim cover 

retainers free from the body panel.

687RW005

9. Remove the luggage side trim cover (LH).

• Remove fixing screw and pry the trim cover 

retainers free from the body panel.

• Disconnect the accessory socket connectors.

10. Remove the seat belt lower anchor bolt.

11. Remove the shoulder anchor cover (2).

• Release the hooked portion of cover from the 

shoulder anchor (1).

755RW070

12. Remove the seat belt upper anchor bolt.

13. Remove the retractor.

14. Remove the rear seat belt assembly.

Inspection

If any of the following abnormalities is found, replace on 
an assembly basis.

• No smooth move of upper/lower anchors in the 

circumferential direction.

• Damaged and/or deformed through ring.

• Damaged and/or deformed tongue.

• Damaged and/or frayed of webbing.

• Deformed retractor bracket.

• Seat belt not rewound up.

• Resistance or abnormal sound when seat belt is 

wound out and rewound.

• Retractor abnormality.

Inspection of retractor

1. ELR (Emergency Locking Retractor) lock inclining 

angle check.

• When the retractor is moved gently from its 

installing position, make sure it is not locked 
within 15

°

 in any directions, and it remains locked 

at 45

°

 or larger.

2. ELR lock check.

• When the seat belt is drawn slowly with the 

retractor installed, make sure it is not locked. And 
when it is drawn quickly, make sure it is locked.

CAUTION:  Do not disassemble the retractor.

Installation

To install, follow the removal steps in the reverse order, 
noting the following points.

1. Align the projection of the retractor to the square 

hole of the seat belt cross bar assembly bracket.

2. Tighten the retractor fixing bolts to the specified 

torque.

Torque: 39N·m (4.0 kg·m/29lbft)

3. Tighten the seat belt anchor bolt to the specified 

torque.

Torque: 39N·m (4.0 kg·m/29lbft)


Content   ..  572  573  574  575   ..