Nissan Rogue. Manual - part 407


  Index      Nissan     Nissan Rogue (2015 year) - Service and Repair Manual


Search            


Content   ..  405  406  407  408   ..


Nissan Rogue. Manual - part 407


DLN-72

< UNIT REMOVAL AND INSTALLATION >

[TRANSFER: TY21C]

TRANSFER ASSEMBLY

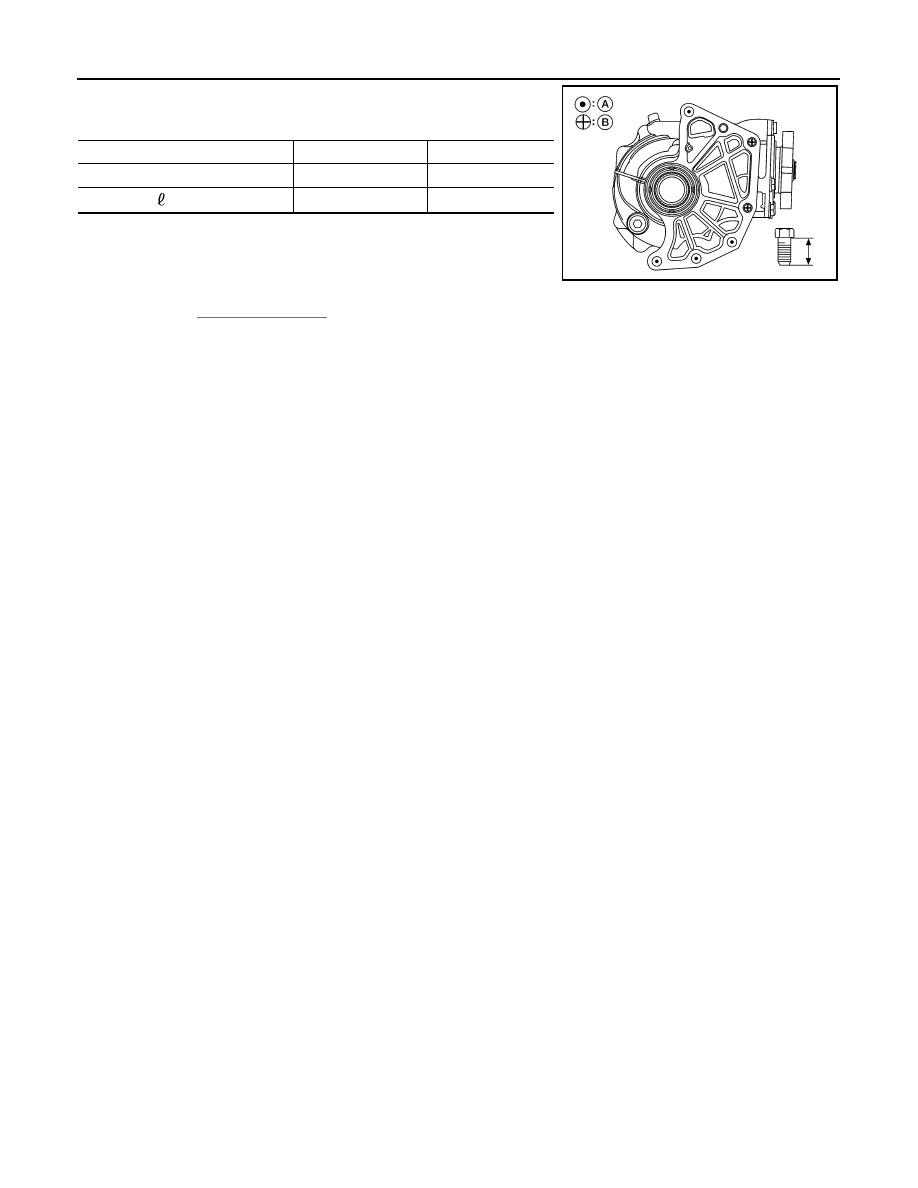
• When installing the transfer to the transaxle, install the bolts follow-

ing the standard below.

CAUTION:

• When installing transfer to transaxle, be careful not to dam-

age oil seal of transaxle.

• Do not reuse differential side oil seal.

• Check transfer oil level and check for transfer oil leaks after instal-

lation. Refer to 

DLN-66, "Refilling"

.

Bolt No.

(A)

(B)

Quantity

4

2

Bolt length “ ” mm (in)

44 (1.73)

42 (1.65)

ALDIA0389ZZ

TRANSFER COVER

DLN-73

< UNIT DISASSEMBLY AND ASSEMBLY >

[TRANSFER: TY21C]

C

E

F

G

H

I

J

K

L

M

A

B

DLN

N

O

P

UNIT DISASSEMBLY AND ASSEMBLY

TRANSFER COVER

Exploded View

INFOID:0000000011278365

AWDIA1138ZZ

DLN-74

< UNIT DISASSEMBLY AND ASSEMBLY >

[TRANSFER: TY21C]

TRANSFER COVER

Disassembly

INFOID:0000000011278366

1. Remove transfer cover mounting bolts (

).

2. Lightly tap transfer cover (1) with a plastic hammer to remove

transfer cover.

3. Remove O-ring from transfer cover.

CAUTION:

• Do not use a suitable tool.

• Do not damage transfer cover.

1.

Filler plug

2.

Gasket

3.

Drain plug

4.

Oil seal

5.

Transfer cover

6.

Oil seal

7.

O-ring

8.

Ring gear bearing adjusting shim 
(transfer cover side)

9.

Ring gear bearing (transfer cover 
side)

10. Ring gear shaft oil seal

11. Ring gear shaft

12. Ring gear bearing (transfer case 

side)

13. Ring gear bearing adjusting shim 

(transfer case side)

14. Ring gear

15. Baffle plate

16. Transfer case

17. Plug

18. O-ring

19. Oil seal

20. Dowel pin

21. Drive pinion

22. Drive pinion adjusting shim

23. O-ring

24. Pinion bearing assembly

25. Oil seal

26. Dust cover

27. Companion flange

28. Pinion lock nut
A.  Oil seal lip

B.  Comply with the assembly proce-

dure when tightening. Refer to 

DLN-

84, "Assembly"

.

: N·m (kg-m, in-lb)

: N·m (kg-m, ft-lb)

: Always replace after every disassembly.

: Apply gear oil.

*

: Apply anti-corrosive oil.

: Apply multi-purpose grease.

: Select with proper thickness.

AWDIA1139ZZ

ALDIA0446ZZ

TRANSFER COVER

DLN-75

< UNIT DISASSEMBLY AND ASSEMBLY >

[TRANSFER: TY21C]

C

E

F

G

H

I

J

K

L

M

A

B

DLN

N

O

P

4. Lightly tap the metal part of oil seals (1) with punch from back

side of transfer cover to remove oil seals.

CAUTION:

When removing, Do not damage the transfer cover by

scooping it out with a suitable tool.

5. Remove the ring gear bearing adjusting shim (transfer cover

side) (1) and ring gear bearing outer race (transfer cover side)

(2) using suitable tool.

6. Remove drain plug and gasket.
7. Remove filler plug and gasket.
8. Perform inspection after disassembly. Refer to 

DLN-76, "Inspec-

tion"

.

Assembly

INFOID:0000000011278367

1. Select the ring gear bearing adjusting shim (transfer cover side). Refer to 

DLN-85, "Adjustment"

.

2. Install the selected ring gear bearing adjusting shim (transfer

cover side) (1) and ring gear bearing outer race (transfer cover

side) (2) using suitable tool.

CAUTION:

• Do not reuse ring gear bearing.

• Apply gear oil to the ring gear bearing.

3. Install gasket onto drain plug and install them to transfer cover.

CAUTION:

Do not reuse gasket.

4. Install the transfer cover to the transfer case, and apply anti-cor-

rosive oil onto thread and seats on the mounting bolts. Then

tighten mounting bolts to the specified torque.

NOTE:

At this timing, O-ring installing to transfer cover is not necessary.

Install O-ring after tooth contact is checked.

5. Check backlash, tooth contact, total preload and companion

flange runout. Refer to 

DLN-85, "Adjustment"

.

CAUTION:

Measure the total preload without oil seals of transfer cover and transfer case.

6. Remove transfer cover to install O-ring.
7. Apply multi-purpose grease lightly and evenly onto an O-ring, and install it to the transfer cover.

CAUTION:

• Do not reuse O-ring.

• When installing O-ring, do not use a suitable tool.

• Do not damage O-ring.

JSDIA3990ZZ

JSDIA3992ZZ

JSDIA3992ZZ

(A)

: M10 bolt

(B)

: M8 bolt

AWDIA1140ZZ


Content   ..  405  406  407  408   ..