Nissan Sentra. Manual - part 911


  Index      Nissan     Nissan Sentra (2014 year) - Service and Repair Manual


Search            


Content   ..  909  910  911  912   ..


Nissan Sentra. Manual - part 911


TM-280

< REMOVAL AND INSTALLATION >

[CVT: RE0F11A]

CVT FLUID FILTER

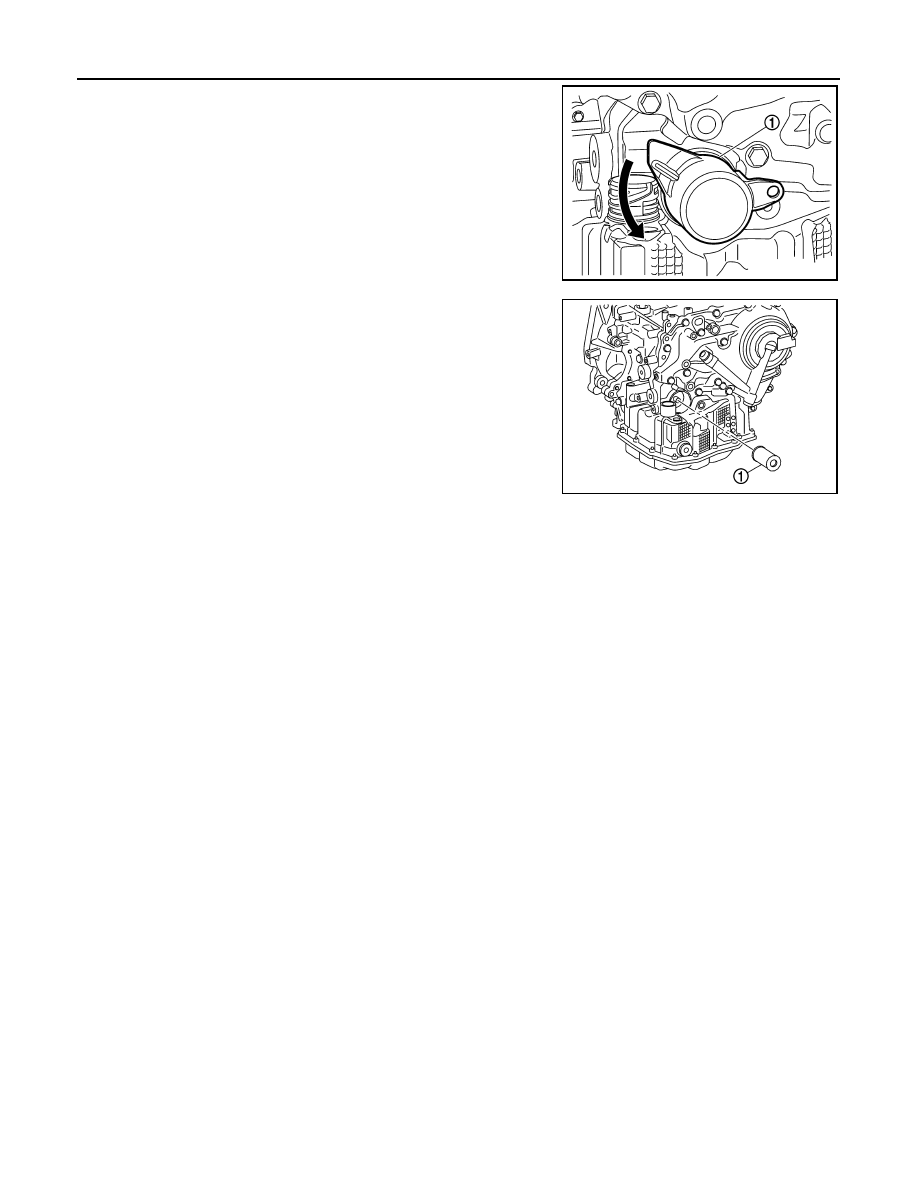
3. Remove fluid filter cover (1) from transaxle by rotating leftward.

4. Remove CVT fluid filter (1) from transaxle.

INSTALLATION

Note the followings and install in the reverse order of removal.

CAUTION:

• Do not reuse fluid filter and fluid filter cover.

• Apply CVT fluid to fluid filter cover.

Inspection

INFOID:0000000010346192

INSPECTION AFTER INSTALLATION

• Start the engine and check visually that there is no leakage of engine coolant and CVT fluid.

• Check CVT fluid level.

JSDIA5048ZZ

JSDIA5049ZZ

ELECTRIC OIL PUMP

TM-281

< REMOVAL AND INSTALLATION >

[CVT: RE0F11A]

C

E

F

G

H

I

J

K

L

M

A

B

TM

N

O

P

ELECTRIC OIL PUMP

Exploded View

INFOID:0000000010346193

Removal and Installation

INFOID:0000000010346194

REMOVAL

1. Remove neighboring parts of electric oil pump.
2. Remove electric oil pump sub harness.
3. Remove electric oil pump and motor assembly mounting bolts

(

).

4. Remove electric oil pump and motor assembly.

1.

Transaxle assembly

2.

Electric oil pump sub harness

3.

O-ring

4.

Electric oil pump and motor assembly

CVT fluid

JSDIA5053GB

JSDIA5051ZZ

TM-282

< REMOVAL AND INSTALLATION >

[CVT: RE0F11A]

ELECTRIC OIL PUMP

5. Remove O-ring (1).

INSTALLATION

Note the followings and install in the reverse order of removal.

CAUTION:

• Do not reuse O-ring.

• Apply CVT fluid to O-ring.

Inspection

INFOID:0000000010346195

INSPECTION BEFORE INSTALLATION

• Start the engine and check visually that there is no leakage of engine coolant and CVT fluid.

• Check CVT fluid level.

INSPECTION AFTER INSTALLATION

Perform bleeding of electric oil pump with CONSULT.

JSDIA5052ZZ

TRANSMISSION ASSEMBLY

TM-283

< UNIT REMOVAL AND INSTALLATION >

[CVT: RE0F11A]

C

E

F

G

H

I

J

K

L

M

A

B

TM

N

O

P

UNIT REMOVAL AND INSTALLATION

TRANSMISSION ASSEMBLY

Exploded View

INFOID:0000000009759538

Removal and Installation

INFOID:0000000009759539

REMOVAL

WARNING:

Do not remove the radiator cap when the engine is hot. Serious burns could occur from high-pressure

coolant escaping from the radiator. Wrap a thick cloth around the cap. Slowly push down and turn it a

quarter turn to allow built-up pressure to escape. Carefully remove the cap by pushing it down and

turning it all the way.

CAUTION:

• Perform these steps after the coolant temperature has cooled sufficiently.

• Before replacing TCM and transaxle assembly as a set, perform "ADDITIONALSERVICE WHEN

REPLACING TCM AND TRANSAXLE ASSEMBLY". Refer to 

TM-144, "Work Procedure"

.

Transaxle assembly

O-ring

CVT fluid charging pipe

CVT fluid charging pipe cap

Tightening must be done following the installation procedure. Refer to 

TM-283, "Removal and Installation"

.

: Always replace after every disassembly.

: N·m (kg-m, ft-lb)

: N·m (kg-m, in-lb)

: Apply petroleum jelly

JSDIA3665GB


Content   ..  909  910  911  912   ..