Nissan Sentra. Manual - part 845


  Index      Nissan     Nissan Sentra (2014 year) - Service and Repair Manual


Search            


Content   ..  843  844  845  846   ..


Nissan Sentra. Manual - part 845


TM-16

< SYSTEM DESCRIPTION >

[6MT: RS6F94R]

STRUCTURE AND OPERATION

Triple-cone synchronizers are adopted for the 1st and the 2nd gears

to reduce operating force of the shifter lever.

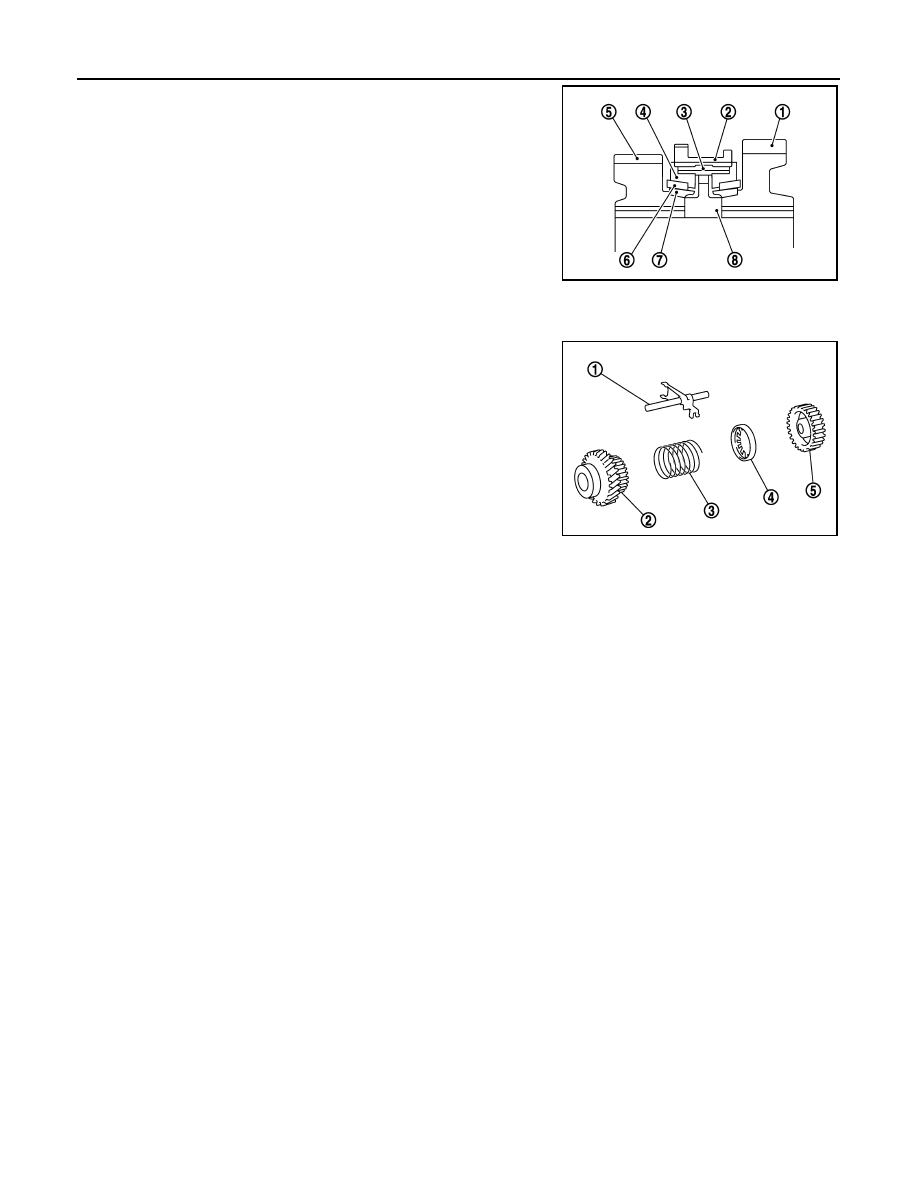
REVERSE GEAR NOISE PREVENTION FUNCTION (SYNCHRONIZING METHOD)

Reverse gear assembly consists of reverse input gear, return spring,

reverse baulk ring, and reverse output gear. When the shifter lever is

moved to the reverse position, the construction allows smooth shift

operation by stopping the reverse idler shaft rotation by frictional

force of synchronizer.

1.

: 1st main gear

2.

: 1st-2nd coupling sleeve

3.

: Insert key

4.

: Outer baulk ring

5.

: 2nd main gear

6.

: Synchronizer cone

7.

: Inner baulk ring

8.

: 1st-2nd synchronizer hub

SCIA7636E

1.

: Reverse fork rod

2.

: Reverse output gear

3.

: Return spring

4.

: Reverse baulk ring

5.

: Reverse input gear

SCIA7621E

POSITION SWITCH

TM-17

< DTC/CIRCUIT DIAGNOSIS >

[6MT: RS6F94R]

C

E

F

G

H

I

J

K

L

M

A

B

TM

N

O

P

DTC/CIRCUIT DIAGNOSIS

POSITION SWITCH

BACK-UP LAMP SWITCH
BACK-UP LAMP SWITCH : Component Inspection

INFOID:0000000009759269

1.

CHECK BACK-UP LAMP SWITCH

1. Disconnect position switch harness connector. Refer to 

TM-21, "Removal and Installation"

.

2. Check continuity between position switch terminals.

Is the inspection result normal?

YES

>> INSPECTION END

NO

>> Replace position switch. Refer to 

TM-21, "Removal and

Installation"

PARK/NEUTRAL POSITION (PNP) SWITCH
PARK/NEUTRAL POSITION (PNP) SWITCH : Component Inspection

INFOID:0000000009759270

1.

CHECK PARK/NEUTRAL POSITION (PNP) SWITCH

1. Disconnect position switch harness connector. Refer to 

TM-21, "Removal and Installation"

.

2. Check continuity between position switch terminals.

Is the inspection result normal?

YES

>> INSPECTION END

NO

>> Replace position switch. Refer to 

TM-21, "Removal and

Installation"

.

Terminals

Condition

Continuity

1

2

Reverse gear position

Existed

Except reverse gear position

Not existed

PCIB1781E

Terminals

Condition

Continuity

2

3

Neutral gear position

Existed

Except neutral gear position

Not existed

JPDIC0091ZZ

TM-18

< SYMPTOM DIAGNOSIS >

[6MT: RS6F94R]

NOISE, VIBRATION AND HARSHNESS (NVH) TROUBLESHOOTING

SYMPTOM DIAGNOSIS

NOISE, VIBRATION AND HARSHNESS (NVH) TROUBLESHOOTING

NVH Troubleshooting Chart

INFOID:0000000009759271

Use the chart below to find the cause of the symptom. The numbers indicate the order of the inspection. If nec-

essary, repair or replace these parts.

SUSPECTED PARTS
(Possible cause)

OIL

 (Oil 

lev

el

 is

 lo

w)

OI

L (W

ro

ng

 oi

l)

OIL

 (Oil 

lev

el

 is

 h

igh

)

GASKE

T (Damaged)

OIL SEAL (W

orn or 

damaged)

O

-RING

 (W

orn

 or 

da

ma

ge

d)

SHIF

T CONTROL L

INKAGE 

(W

o

rn)  


SHIF

T FORK (W

orn)

G

EAR (W

o

rn o

r da

m

age

d)

BEAR

ING

 (W

orn

 o

da

ma

ge

d)

BAUL

K

 RING

 (W

orn

 o

r da

ma

ge

d)

INSE

R

T S

P

RING

 (Dam

ag

ed

)

Reference

T

M

-1

9, "Ins

p

ec

tio

n"

T

M

-3

0, "Exp

lo

de

V

ie

w

"

T

M

-2

6, "Ins

p

ec

tio

n"

T

M

-3

0, "Exp

lo

de

V

ie

w

"

T

M

-3

0, "Exp

lo

de

V

ie

w

"

Symptoms

Noise

1

2

3

3

Oil  leaks

3

1

2

2

2

Hard to shift or will not shift

1

1

2

3

3

Jumps out of gear

1

2

2

M/T OIL

TM-19

< PERIODIC MAINTENANCE >

[6MT: RS6F94R]

C

E

F

G

H

I

J

K

L

M

A

B

TM

N

O

P

PERIODIC MAINTENANCE

M/T OIL

Inspection

INFOID:0000000009759272

OIL LEAKAGE

Make sure that gear oil is not leaking from transaxle or around it.

OIL LEVEL

1. Remove filler plug (1) and gasket from transaxle case.
2. Check the oil level from filler plug mounting hole as shown.

CAUTION:

Do not start engine while checking oil level.

3. Set a gasket on filler plug and then install it to transaxle case.

CAUTION:

Do not reuse gasket.

4. Tighten filler plug to the specified torque. Refer to 

TM-30,

"Exploded View"

.

CAUTION:

Do not overtighten the filler plug as this could cause the

transaxle case to crack.

Draining

INFOID:0000000009759273

1. Start engine and let it run to warm up transaxle.
2. Stop engine. Remove drain plug (1) and gasket, using a suitable

tool and then drain gear oil.

3. Set a gasket on drain plug and install it to clutch housing, using

a suitable tool.

CAUTION:

Do not reuse gasket.

4. Tighten drain plug to the specified torque. Refer to 

TM-30,

"Exploded View"

.

CAUTION:

Do not overtighten the filler plug as this could cause the

transaxle case to crack.

Refilling

INFOID:0000000009759274

1. Remove filler plug (1) and gasket from transaxle case. 
2. Fill with new gear oil until oil level reaches the specified limit at

filler plug mounting hole as shown.

3. After refilling gear oil, check the oil level. Refer to 

TM-19,

"Inspection"

.

4. Set a gasket on filler plug and then install it to transaxle case.

CAUTION:

Do not reuse gasket.

5. Tighten filler plug to the specified torque. Refer to 

TM-30, "Exploded View"

.

CAUTION:

Do not overtighten the filler plug as this could cause the transaxle case to crack.

SCIA7623E

SCIA7622E

Oil grade and 
viscosity

: Refer to 

MA-11, "Fluids and Lubricants"

.

Oil capacity

: Refer to 

MA-11, "Fluids and Lubricants"

.

SCIA7623E


Content   ..  843  844  845  846   ..