Nissan March K13. Manual - part 323


  Index      Nissan     Nissan March K13 - Service and Repair Manual)


Search            


Content   ..  321  322  323  324   ..


Nissan March K13. Manual - part 323


EXT-14

< REMOVAL AND INSTALLATION >

REAR BUMPER

6.

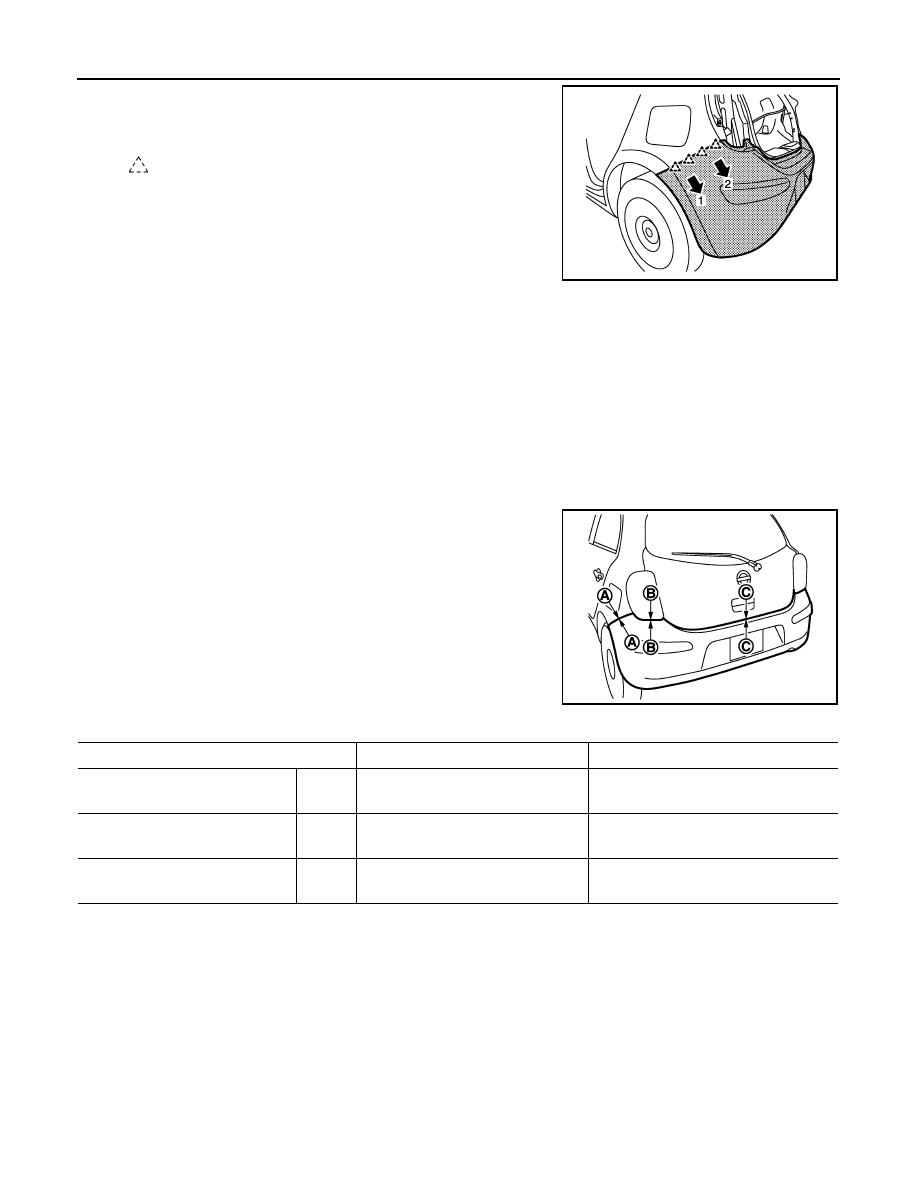
Pull bumper fascia assembly toward the vehicle out side as
shown by the arrows in the figure, and then disengage the
bumper fascia assembly from bumper side brackets (LH/RH).

7.

Remove bumper fascia assembly.

CAUTION:

When removing bumper fascia, 2 workers are required so as to prevent it from dropping.

8.

Remove the following parts after removing bumper fascia.
• Bumper side brackets (LH/RH)
• Rear panel lower

9.

Remove bumper energy absorber.

10. Remove mounting nuts, and then remove bumper stay.

INSTALLATION

Note the following item, and then Install in the reverse order of removal.
NOTE:
After installing, perform fitting adjustment.

: Pawl

JMKIA5400ZZ

JMKIA5404ZZ

Portion

Clearance

Surface height difference

Rear bumper – Rear fender

A – A

(

1.7) – (+0.3) mm

[(

0.067) – (+0.012) in]

0.0 – 1.0 mm 

(0.000 – 0.039 in)

Rear bumper – Rear combi-
nation lamp

B – B

(

0.5) – (+3.5) mm

[(

0.020) – (+0.138) in]

Rear bumper – Back door

C – C

5.0 – 7.0 mm

(0.197 – 0.276 in)

COWL TOP

EXT-15

< REMOVAL AND INSTALLATION >

C

D

E

F

G

H

I

J

L

M

A

B

EXT

N

O

P

COWL TOP

Exploded View

INFOID:0000000006052869

Removal and Installation

INFOID:0000000006052870

REMOVAL

1.

Remove front wiper arm, and blades (LH,RH). Refer to 

XX-XX, "*****"

.

2.

Remove front fender cover.

3.

Remove cowl top cover fixing clips.

4.

Pull forward to release cowl top cover from windshield glass.

CAUTION:

When performing the procedure after removing cowl top
cover, protect the lower of windshield glass with urethane
etc.

5.

Disconnect wind washer tube connector.

6.

Remove cowl top cover.

1.

Cowl top cover

2.

Cowl top cover seal

3.

Cowl cover oneway valve

4.

EPT sealer [3.0 mm (0.118 in)]

: Clip

: Vehicle front

Refer to 

GI-4, "Components"

 for symbols in the figure.

JMKIA5385ZZ

JMKIA3819ZZ

EXT-16

< REMOVAL AND INSTALLATION >

COWL TOP

7.

Remove the following parts after removing cowl top cover.
• EPT sealer
• Cowl top cover seal
• Washer tube
• Washer nozzles. Refer to 

XX-XX, "*****"

.

INSTALLATION

Note the following item, and then install in the reverse order of removal.

CAUTION:

• Always replace cowl top cover EPT sealer on rear of vehicle with a new one when installing old cowl

top cover.

• After installing, perform adjustment of wiper arm. Refer to 

XX-XX, "*****"

.

FENDER PROTECTOR

EXT-17

< REMOVAL AND INSTALLATION >

C

D

E

F

G

H

I

J

L

M

A

B

EXT

N

O

P

FENDER PROTECTOR

FENDER PROTECTOR

FENDER PROTECTOR : Exploded View

INFOID:0000000006052871

FENDER PROTECTOR : Removal and Installation

INFOID:0000000006052872

REMOVAL

1.

Remove front fender protector fixing screws and clips.

2.

Disengage fender clips and fender protector, and then remove fender protector.

INSTALLATION

Install in the reverse order of removal.

1.

Fender protector

2.

J nut

JMKIA5395ZZ


Content   ..  321  322  323  324   ..