Nissan Teana J32. Manual - part 613
 

  Index      Nissan     Nissan Teana J32 (2008 year) - Service and Repair Manual


Search            


Content   ..  611  612  613  614   ..


Nissan Teana J32. Manual - part 613


FRONT DRIVE SHAFT

FAX-23

< ON-VEHICLE REPAIR >

C

E

F

G

H

I

J

K

L

M

A

B

FAX

N

O

P

4.

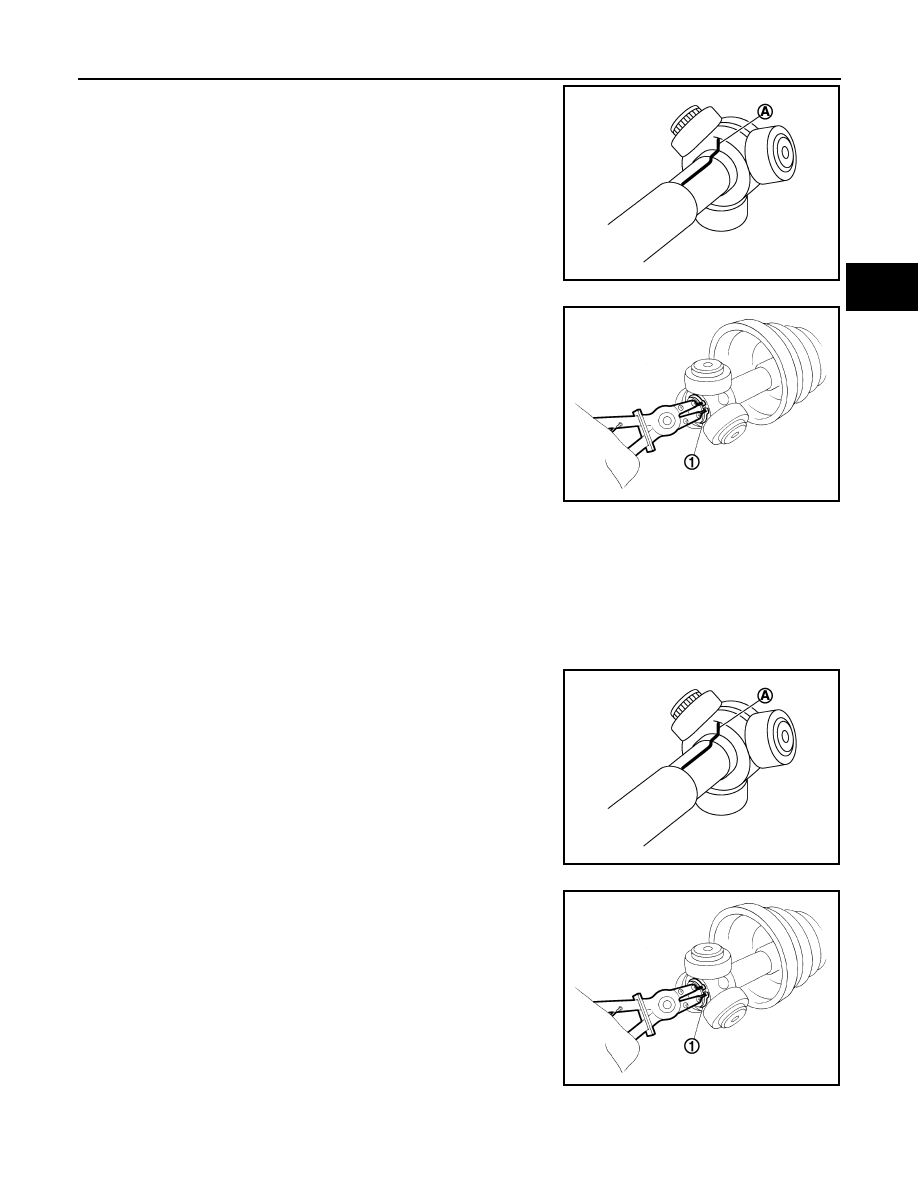
Put matching marks (A) on the spider assembly and shaft.

CAUTION:

Use paint or an equivalent for matching marks. Never
scratch the surfaces.

5.

Remove snap ring (1), and then remove spider assembly from
shaft.

6.

Remove boot from shaft.

7.

Remove circular clip from housing.

8.

Remove dust shield from housing.

9.

Remove dynamic damper, follow the procedure described
below.

a.

Remove damper bands.

b.

Remove dynamic damper from shaft.

Right Side

1.

Fix drive shaft with a vise.

CAUTION:

Protect shaft using aluminum or copper plates when fixing with a vise.

2.

Remove boot bands, and then remove boot from housing.

3.

Put matching marks on housing and shaft, and then pull out housing from shaft.

CAUTION:

Use paint or an equivalent for matching marks. Never scratch the surfaces.

4.

Put matching marks (A) on the spider assembly and shaft.

CAUTION:

Use paint or an equivalent for matching marks. Never
scratch the surfaces.

5.

Remove snap ring (1), and then remove spider assembly from
shaft.

6.

Remove boot from shaft.

7.

Remove dynamic damper, follow the procedure described
below.

a.

Remove damper bands.

b.

Remove dynamic damper from shaft.

8.

Remove support bearing, follow the procedure described below. 

JPDIF0006ZZ

JPDIF0014ZZ

JPDIF0006ZZ

JPDIF0014ZZ

FAX-24

< ON-VEHICLE REPAIR >

FRONT DRIVE SHAFT

a.

Remove dust shield from housing.

b.

Remove snap ring (1).

c.

Press out support bearing from housing.

d.

Remove dust shield.

DISASSEMBLY (VQ35DE)

Left Side

1.

Fix drive shaft with a vise.

CAUTION:

Protect shaft using aluminum or copper plates when fixing with a vise.

2.

Disassemble boot (wheel side). Refer to 

FAX-20, "WHEEL SIDE : Disassembly and Assembly"

.

3.

Remove boot bands and boot (transaxle side).

4.

Remove dust shield and circular clip.

Right Side

1.

Fix drive shaft with a vise.

CAUTION:

Protect shaft using aluminum or copper plates when fixing with a vise.

2.

Disassemble boot (wheel side). Refer to 

FAX-20, "WHEEL SIDE : Disassembly and Assembly"

.

3.

Remove dynamic damper, follow the procedure described below.

a.

Remove damper band.

b.

Remove dynamic damper from housing assembly.

4.

Remove boot bands and boot (transaxle side).

5.

Remove support bearing, follow the procedure described below. 

JPDIF0121ZZ

JPDIF0106ZZ

YAX004

FRONT DRIVE SHAFT

FAX-25

< ON-VEHICLE REPAIR >

C

E

F

G

H

I

J

K

L

M

A

B

FAX

N

O

P

a.

Remove dust shield.

b.

Remove snap ring (1).

c.

Press out bearing housing and support bearing from housing
assembly.

d.

Remove dust shield.

e.

Remove snap ring (1).

f.

Press out support bearing from bearing housing (1) with suitable
drift (A).

JPDIF0121ZZ

JPDIF0073ZZ

SFA693

JPDIF0177ZZ

JPDIF0192ZZ

FAX-26

< ON-VEHICLE REPAIR >

FRONT DRIVE SHAFT

ASSEMBLY (VQ25DE)

Left side

1.

Clean old grease on housing with paper waste.

2.

Install dust shield.

CAUTION:

Never reuse dust shield.

3.

Install circular clip.

CAUTION:

Never reuse circular clip.

4.

Install dynamic damper, follow the procedure described below.

a.

Install dynamic damper to shaft.

b.

Secure dynamic damper with bands in the following specified
position (A).

c.

Install damper bands securely as shown in the figure.

CAUTION:

Never reuse damper band.

5.

Wrap serration on shaft with tape (A) to protect boot from dam-
age. Install boot and boot bands to shaft.

CAUTION:

Never reuse boot and boot band.

Standard

A

: Refer to 

FAX-35, "Drive Shaft"

.

JPDIF0178ZZ

PDIA1188J

JPDIF0009ZZ


Content   ..  611  612  613  614   ..