Nissan Teana J32. Manual - part 355
 

  Index      Nissan     Nissan Teana J32 (2008 year) - Service and Repair Manual


Search            


Content   ..  353  354  355  356   ..


Nissan Teana J32. Manual - part 355


FRONT DOOR

DLK-203

< ON-VEHICLE REPAIR >

[WITH INTELLIGENT KEY SYSTEM]

C

D

E

F

G

H

I

J

L

M

A

B

DLK

N

O

P

• Check door hinge rotating part for poor lubrication. If necessary, apply body grease.
• After installation, perform the fitting adjustment. Refer to 

DLK-203, "DOOR ASSEMBLY : Adjust-

ment"

.

• After installation, apply touch-up paint (the body color) onto the head of door hinge mounting nuts.

DOOR ASSEMBLY : Adjustment

INFOID:0000000003813396

Check the clearance and surface height between front door and each part by visually and touching. 
If the clearance and the surface height are out of specification, adjust them according to the procedures
shown below.

Unit: mm (in)

1.

Remove front fender. Refer to  

DLK-199, "Removal and Installation"

.

2.

Loosen door hinge mounting nuts on door side.

3.

Adjust the surface height of front door according to the fitting standard dimension.

4.

Temporarily tighten door hinge mounting nuts on door side.

5.

Loosen door hinge mounting bolts on body side. 

6.

Raise front door at rear end to adjust clearance of the front door according to the fitting standard dimen-
sion.

7.

After adjustment tighten bolts and nuts to the specified torque.

8.

Install front fender. Refer to 

DLK-199, "Removal and Installation"

.

DOOR STRIKER ADJUSTMENT

Adjust door striker so that it becomes parallel with door lock insertion direction.

DOOR STRIKER

DOOR STRIKER : Exploded View

INFOID:0000000003819380

Portion

Clearance

Surface height

Front fender – Front door

A – A

2.6 – 4.6 (0.102 – 0.181)

1.0 – 1.0 (

0.039 – 0.039)

Front door – Rear door

B – B

3.6 – 5.6 (0.142 – 0.220)

1.0 – 1.0 (

0.039 – 0.039)

JMKIA2384ZZ

DLK-204

< ON-VEHICLE REPAIR >

[WITH INTELLIGENT KEY SYSTEM]

FRONT DOOR

DOOR STRIKER : Removal and Installation

INFOID:0000000003813398

REMOVAL

Remove TORX bolts, and then remove door striker.

INSTALLATION

Install in the reverse order of removal.

CAUTION:

• Check front door open/close, lock/unlock operation after installation.
• After installation, perform the fitting adjustment. Refer to 

DLK-203, "DOOR ASSEMBLY : Adjust-

ment"

.

DOOR HINGE

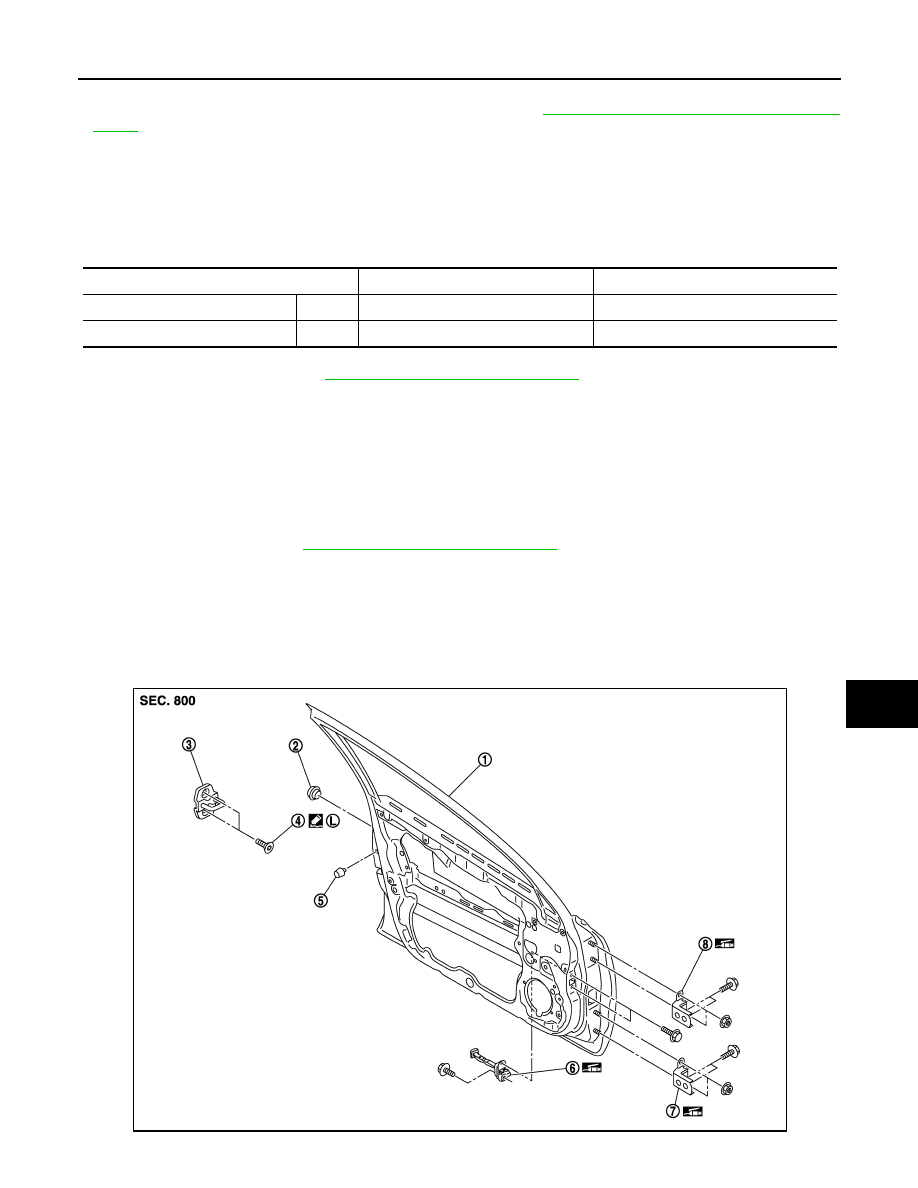
DOOR HINGE : Exploded View

INFOID:0000000003819407

DOOR HINGE : Removal and Installation

INFOID:0000000003813400

REMOVAL

1.

Remove front fender. Refer to 

DLK-199, "Removal and Installation"

2.

Remove front door assembly. Refer to 

DLK-202, "DOOR ASSEMBLY : Removal and Installation"

.

1.

Front door panel

2.

Grommet

3.

Door striker

4.

TORX bolt

5.

Bumper rubber

6.

Door check link

7.

Door hinge (lower)

8.

Door hinge (upper)

Refer to 

GI-4, "Components"

 for symbols in the figure.

1.

Front door panel

2.

Grommet

3.

Door striker

4.

TORX bolt

5.

Bumper rubber

6.

Door check link

7.

Door hinge (lower)

8.

Door hinge (upper)

Refer to 

GI-4, "Components"

 for symbols in the figure.

JMKIA2384ZZ

FRONT DOOR

DLK-205

< ON-VEHICLE REPAIR >

[WITH INTELLIGENT KEY SYSTEM]

C

D

E

F

G

H

I

J

L

M

A

B

DLK

N

O

P

3.

Remove front door hinge mounting bolts, and then remove front door hinge.

INSTALLATION

Install in the reverse order of removal.

CAUTION:

• Check front door open/close, lock/unlock operation after installation.
• Check door hinge rotating part for poor lubrication. If necessary, apply body grease.
• After installation, perform the fitting adjustment. Refer to 

DLK-203, "DOOR ASSEMBLY : Adjust-

ment"

.

• After installation, apply touch-up paint (the body color) onto the head of door hinge mounting nuts

and bolts.

DOOR CHECK LINK

DOOR CHECK LINK : Exploded View

INFOID:0000000003819408

DOOR CHECK LINK : Removal and Installation

INFOID:0000000003813402

REMOVAL

1.

Remove front door finisher. Refer to 

INT-30, "DRIVER SIDE : Removal and Installation"

 (driver side) or

INT-33, "PASSENGER SIDE : Removal and Installation"

 (passenger side).

2.

Fully close the front door window.

3.

Remove front door speaker.

4.

Remove mounting bolts of door check link on the vehicle.

5.

Remove mounting bolts of door check link on door panel.

6.

Take door check link out from the hole of door panel.

INSTALLATION

1.

Front door panel

2.

Grommet

3.

Door striker

4.

TORX bolt

5.

Bumper rubber

6.

Door check link

7.

Door hinge (lower)

8.

Door hinge (upper)

Refer to 

GI-4, "Components"

 for symbols in the figure.

JMKIA2384ZZ

DLK-206

< ON-VEHICLE REPAIR >

[WITH INTELLIGENT KEY SYSTEM]

FRONT DOOR

Install in the reverse order of removal.

CAUTION:

Check front door open/close operation after installation.


Content   ..  353  354  355  356   ..