Nissan Murano. Manual - part 1219


  Главная      Nissan     Nissan Murano (2014 year) - Service Manual


поиск по сайту            


содержание   ..  1217  1218  1219  1220   ..


Nissan Murano. Manual - part 1219


FRONT SEAT

SE-99

< REMOVAL AND INSTALLATION >

C

D

E

F

G

H

I

K

L

M

A

B

SE

N

O

P

If pawl was damaged, the cover is broken by case.

a.

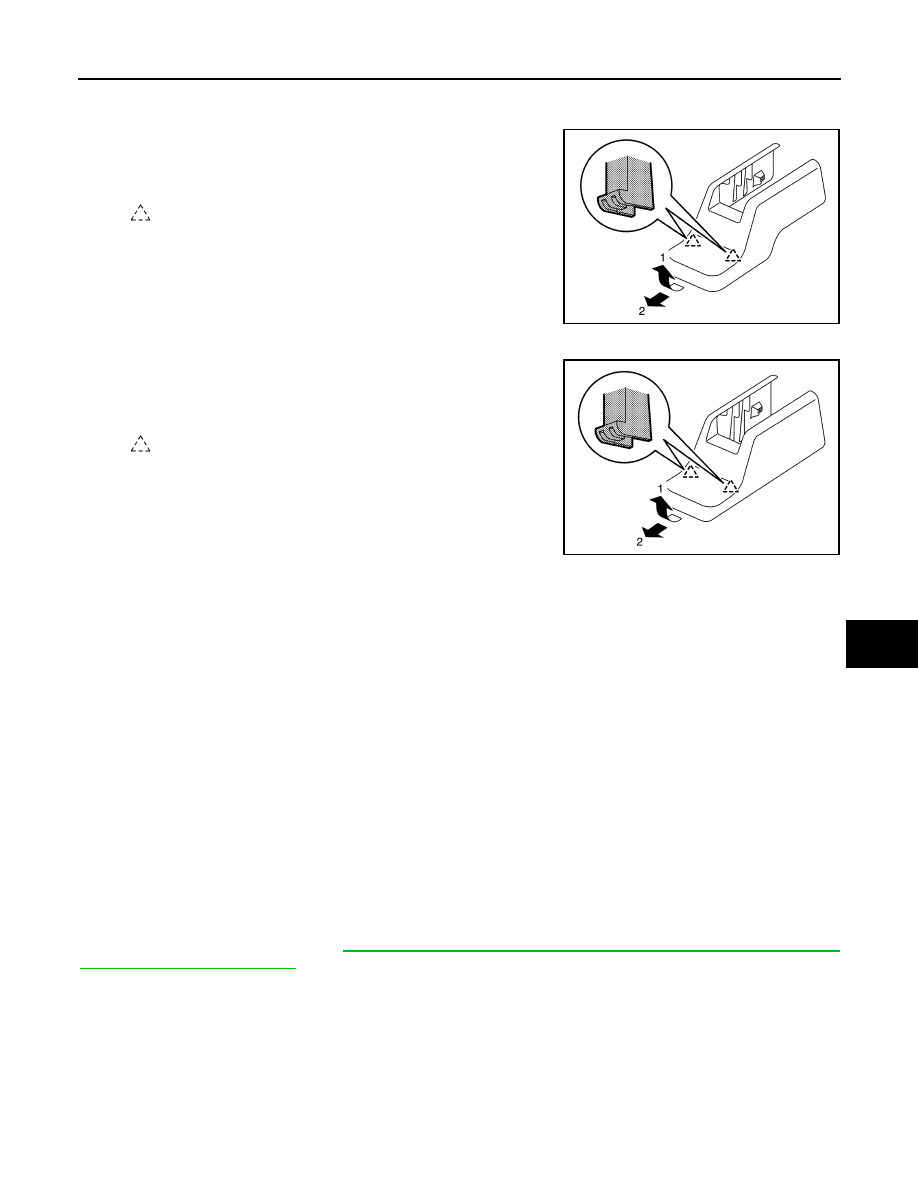
Remove rear outer slide cover.

i.

Pull rear outer slide cover in direction indicated by the arrow as
shown in the figure. Disengage pawls on the rear side.

ii.

Slide rear outer slide cover to the rear side to remove.

b.

Remove rear inner slide cover.

i.

Pull rear inner slide cover in direction indicated by the arrow as
shown in the figure. Disengage pawls on the rear side.

ii.

Slide rear inner slide cover to the rear side to remove.

5.

Remove the mounting bolts on the rear side of the front seat.

6.

Set seatback in a standing position.

7.

Disconnect harness connector under the seat and remove harness securing clips.

CAUTION:

Before removal, turn ignition switch OFF, disconnect battery negative terminal and then wait for at
least 3 minutes.

8.

Remove seat from the vehicle.

CAUTION:

• When removing and installing, use shop cloths to protect parts from damage.
• When removing and installing, 2 workers are required so as to prevent it from dropping.

INSTALLATION

Install in the reverse order of removal.

CAUTION:

• Before installation, turn ignition switch OFF, disconnect battery negative terminal and then wait for

at least 3 minutes.

• Clamp the harness in position.
• Install the pawl more carefully.

If pawl was damaged, the cover is broken by case.

NOTE:
After installing the front seat, perform additional service when removing battery negative terminal.(With auto-
matic drive positioner model) Refer to 

ADP-8, "ADDITIONAL SERVICE WHEN REMOVING BATTERY NEGA-

TIVE TERMINAL : Description"

.

Disassembly and Assembly

INFOID:0000000009718771

SEATBACK

Disassembly

1.

Remove the seatback board.

a.

Remove the seatback board band from seat cushion bottom side.

: Pawl

JMJIA6398ZZ

: Pawl

JMJIA6397ZZ

SE-100

< REMOVAL AND INSTALLATION >

FRONT SEAT

b.

Remove the seatback board mounting screws (A).

c.

Pull down the seatback board to release the pawls.

2.

Remove the seatback trim retainer (1).

3.

Disconnect the harness connectors and remove the harness clamps (power seat only).
Disconnect the seatback heater seat harness connector (A)
(heater seat only), lumbar support harness connector (B) (driver
seat only) and reclining motor harness connector (C).

4.

Remove the side air bag module.

a.

Remove the seatback trim retainer.

b.

Remove the side air bag module harness connector and harness clips from the seatback frame and seat
cushion frame.

JMJIA1420ZZ

: Pawl

JMJIA1421ZZ

JMJIA1422ZZ

JMJIA1423ZZ

FRONT SEAT

SE-101

< REMOVAL AND INSTALLATION >

C

D

E

F

G

H

I

K

L

M

A

B

SE

N

O

P

c.

Remove the side air bag module cover mounting screws (A).

d.

Remove the mounting nuts, and then remove side air bag module from seatback frame.

5.

Remove the lumbar support lever knob. (Manual lumbar support seat only.)
Pull snap ring (1) upward, and remove lumbar support lever
knob (2) from seatback frame with hook and pick tool.

6.

Remove the seatback trim and seatback pad.

a.

Use pincers, etc., to press up pawls as shown by the arrows in
the figure, and remove headrest holder from seatback.

CAUTION:

Before installing headrest holder check its orientation.
(front/rear and right/left)

b.

Remove the seatback trim and seatback pad from the seatback frame.

c.

Remove the hog rings, and separate the seatback trim and seatback pad.

7.

Remove the seatback silencer.

8.

Remove the seatback frame.
Remove the seatback frame mounting bolts (A).

Assembly

Note the following item, and assemble in the reverse order of disassembly.

CAUTION:

JMJIA1424ZZ

JMJIA0252ZZ

PIIB4084J

JMJIA1425ZZ

SE-102

< REMOVAL AND INSTALLATION >

FRONT SEAT

Install the hog rings of seatback trim in position, and then securely connect the trim or trim cord with
the pad side wire. 

SEAT CUSHION

Disassembly

CAUTION:

Never disassemble front passenger seat cushion assembly.
Always replace as an assembly.
For front passenger seat service parts, refer to the service part catalogue.

1.

Remove the seatback board.

a.

Remove the seatback board fixing band on the bottom of seat cushion.

b.

Remove the seatback board mounting screws (A).

c.

Pull down the seatback board to release the pawls.

2.

Remove the seatback trim retainer (1).

3.

Disconnect the harness connectors and remove the harness clamps.

JMJIA1420ZZ

: Pawl

JMJIA1421ZZ

JMJIA1422ZZ


содержание   ..  1217  1218  1219  1220   ..