Nissan Primera P12. Manual - part 463


  Главная      Nissan     Nissan Primera P12 - Service Manual


поиск по сайту            


содержание   ..  461  462  463  464   ..


Nissan Primera P12. Manual - part 463


EM-198

[F9Q]

OVERHAUL

MAIN BEARING

1.

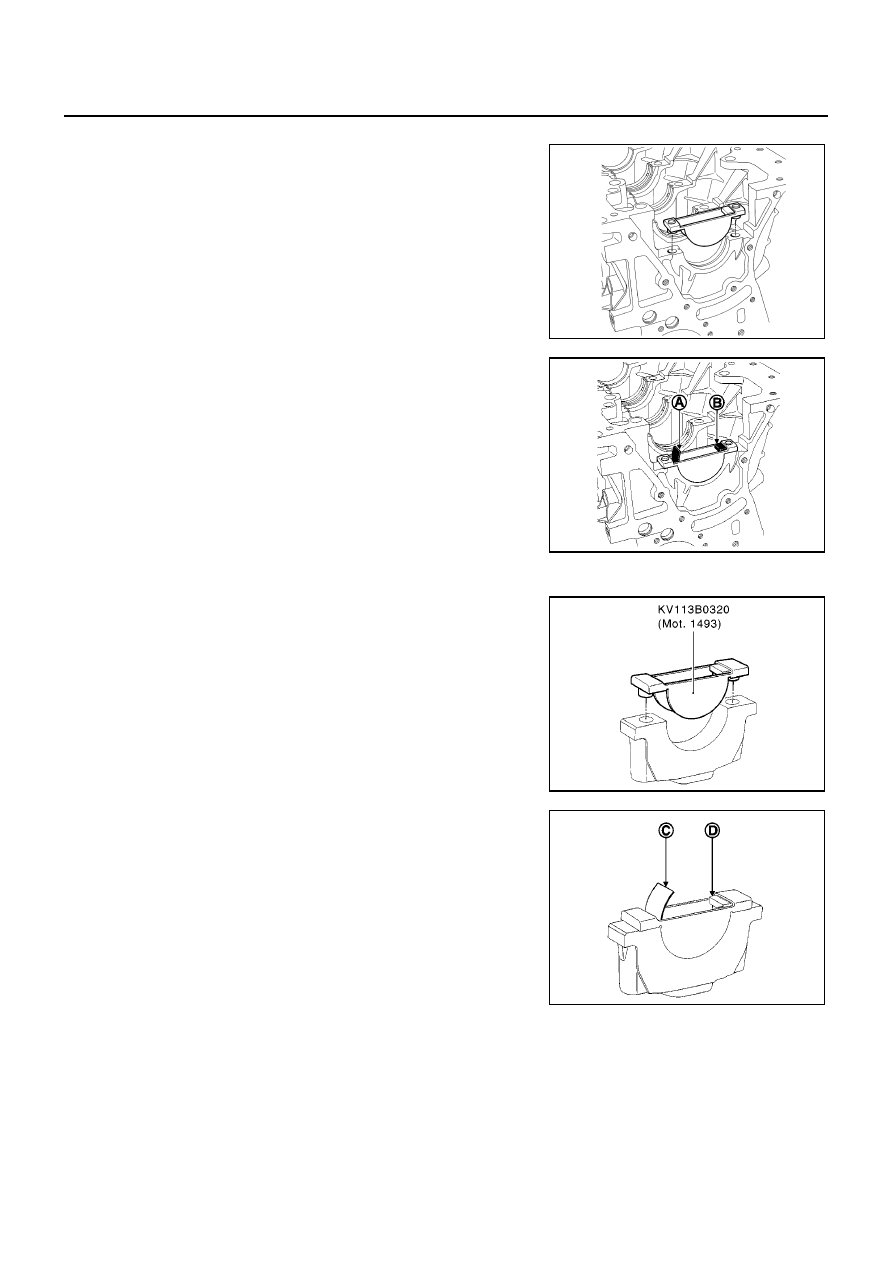
Set Tool KV113B0320 (Mot. 1493) on the cylinder block.

2.

Install the grooved bearing shell in Tool KV113B0320 (Mot.
1493), then press at (A) until the bearing shell is touches Tool
KV113B0320 (Mot. 1493) at (B).

Installation of Bearing Shells in the Bearing

1.

Set Tool KV113B0320 (Mot. 1493) on the bearing.

2.

Install the non-grooved bearing shell in Tool KV113B0320 (Mot.
1493), then press at (C) until the bearing shell touches Tool
KV113B0320 (Mot. 1493) at (D).

MBIB0796E

MBIB0797E

MBIB0798E

MBIB0799E

OVERHAUL

EM-199

[F9Q]

C

D

E

F

G

H

I

J

K

L

M

A

EM

CRANKSHAFT

1.

The crankshaft bearing is extracted using Tool KV113B0030
(Mot. 11).

2.

Install the lateral crankshaft shim.

3.

Install the crankshaft.

4.

Oil the main journal bearing with engine oil.

5.

Install the crankshaft bearing cap except cap No. 1 (the cap
numbered from 1 to 5 and position these number opposite the
oil filter side).

6.

Tighten the bolts to a torque of 20 N·m (2.0 kg-m, 15 ft-lb) plus
an angle of 62

°±

4

°

(tightening order 3-4-2-5-1).

CAUTION:

Use an angle wrench (special service tool) to check tighten-
ing angle. Do not make judgment by visual inspection.

7.

Check the lateral clearance of the crankshaft.

8.

Make sure that the crankshaft rotates freely.

MBIB0800E

MBIB0801E

MBIB0802E

Clearance: 0.067 - 0.233 mm (0.0026 - 0.0092 in)

MBIB0803E

EM-200

[F9Q]

OVERHAUL

Installation of No. 1 Bearing

CAUTION:

The mixture must be injected within approximately 5 minutes to
prevent it from polymerizing in the syringe.

1.

Clean the surface thoroughly at (25) of the cylinder block and
the crankshaft cap, using a cloth soaked in cleaning thinner.

2.

Allow to dry.

3.

Coat the lower surfaces of the cylinder block at (26) with a thin
layer of liquid gasket.

4.

Install the crankshaft bearing cap and tighten it to a torque of 20
N·m (2.0 kg-m, 15 ft-lb) plus an angle of 62

°±

4

°

.

CAUTION:

Use an angle wrench (special service tool) to check tighten-
ing angle. Do not make judgment by visual inspection.

5.

Insert the liquid gasket into the syringe and inject it into the
grooves of the crankshaft bearing cap.

Use Genuine Liquid Gasket or equivalent.

6.

Allow the liquid gasket to flow out slightly on either side of the
grooves of the crankshaft bearing cap, to ensure that the
injected liquid gasket has totally filled the sealing groove.

MBIB0804E

MBIB0805E

MBIB0807E

MBIB0808E

OVERHAUL

EM-201

[F9Q]

C

D

E

F

G

H

I

J

K

L

M

A

EM

7.

Using a cloth, wipe off the excess liquid gasket, both inside and
outside the cylinder block.

8.

Allow to dry for a few moments and cut the excess off the gasket
face.

PISTON

1.

The pistons are installed using Tool KV113B0430 (Mot. 1569).

CAUTION:

Be careful not to damage the piston.

2.

Apply engine oil to pistons.

3.

Install the piston in the cone and allow the piston skirt to pro-
trude from the Tool by approx. 1 to 2 cm (0.39 - 0.79 in).

MBIB0809E

MBIB0810E

MBIB0811E

MBIB0812E


содержание   ..  461  462  463  464   ..