Nissan Tiida C11. Manual - part 771


  Главная      Nissan     Nissan Tiida C11 - Service Manual


поиск по сайту            


содержание   ..  769  770  771  772   ..


Nissan Tiida C11. Manual - part 771


EXL-82

< ON-VEHICLE MAINTENANCE >

HEADLAMP

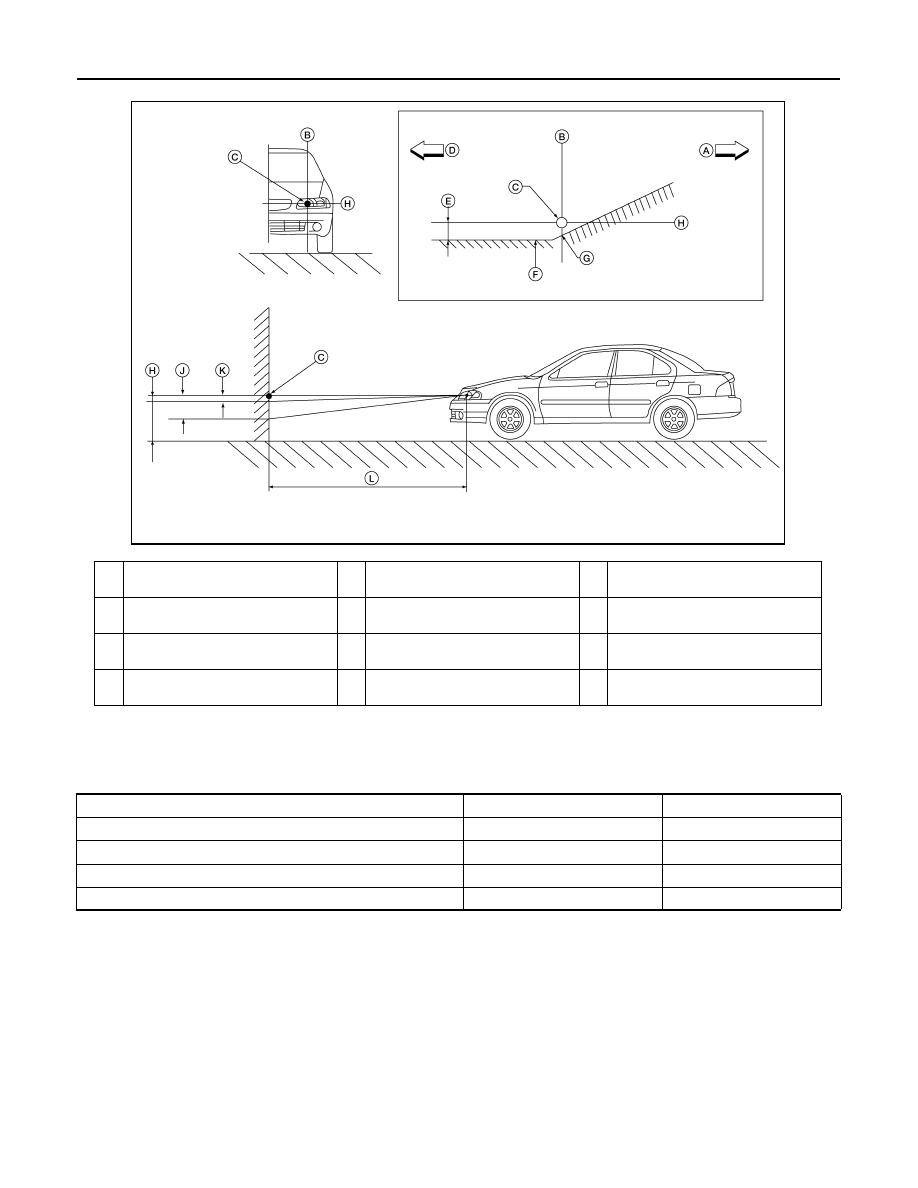
• Aim each headlamp individually and ensure other headlamp beam pattern is blocked from screen.
- For horizontal headlamp aiming, adjust headlamp until beam pattern is at horizontal center point.
- For vertical headlamp aiming, adjust headlamp until beam pattern is positioned per specified dimensions. 

A.

Right

B.

Vertical center line of headlamp

C.

Horizontal aiming center line of 
headlamp

D.

Left

E.

Vertical aiming cutoff point

F.

Cutoff line for vertical aiming evalua-
tion

G.

Acceptable vertical cutoff setting at 
horizontal aiming point

H.

Horizontal center line of headlamp

J.

Maximum acceptable vertical aiming 
point

K.

Minimum acceptable vertical aiming 
point

L.

Aiming distance from center of head-
lamp to aiming screen

WKIA4287E

Description

Halogen Headlamp

Xenon Headlamp

Vertical aiming cutoff point (E)

104.8 mm (4.126 in)

120 mm (4.72 in)

Minimum acceptable vertical aiming point (K)

95.6 mm (3.764 in)

120 mm (4.72 in)

Maximum acceptable vertical aiming point (J)

119.1 mm (4.689 in)

150 mm (5.91 in)

Aiming distance from center of headlamp to aiming screen (L)

7.62 m (25 ft)

10,000 mm (393.70 in)

FRONT FOG LAMP

EXL-83

< ON-VEHICLE MAINTENANCE >

C

D

E

F

G

H

I

J

K

M

A

B

EXL

N

O

P

FRONT FOG LAMP

Aiming Adjustment

INFOID:0000000001529283

The front fog lamp is a semi-sealed beam type which uses a replaceable halogen bulb. Before performing
aiming adjustment, make sure of the following.
• Keep all tires inflated to correct pressure.
• Place vehicle on level surface.
• Set that there is no-load in vehicle other than the driver (or equivalent weight placed in driver’s position).

Coolant, engine oil filled up to correct level and full fuel tank.

Adjust aiming in the vertical direction by turning the adjusting screw (A).

1.

Set the distance (C) between the screen and the center of front
fog lamp lens (E) as shown.

2.

Turn front fog lamps (1) to ON.

3.

Adjust front fog lamps using adjusting screw so that the top edge
of the high intensity zone (A) is as shown.

NOTE:
When performing adjustment, if necessary, cover the headlamps
and opposite front fog lamp.

PKIC1070E

Aiming distance from center of fog lamp to screen (C)

25,000 mm (984.3 in)

Foglamp beam width (D)

870 mm (34.3 in)

Horizontal distance from lamp center line to the top of 
edge of high intensity zone (A)

200 mm (7.9 in)

Horizontal distance from bottom edge to top edge of 
high intensity zone (B)

21.75 mm (0.9 in)

AWLIA0141ZZ

EXL-84

< ON-VEHICLE REPAIR >

HEADLAMP

ON-VEHICLE REPAIR

HEADLAMP

Bulb Replacement

INFOID:0000000001529252

HEADLAMP - HALOGEN (HIGH/LOW)

CAUTION:

After installing the halogen bulb, install the back cover and bulb socket securely to ensure a water
tight seal.

1.

Turn lighting switch OFF.

2.

Disconnect the battery negative terminal.

3.

Remove the back cover.

4.

Unlock the retaining spring and remove the bulb from the combination lamp.

HEADLAMP - XENON (HIGH/LOW)

CAUTION:

After installing the xenon bulb, install the plastic cap and bulb socket securely to ensure a water tight
seal.
1.

Turn lighting switch OFF.

2.

Disconnect the battery negative terminal.

3.

Turn the plastic cap counterclockwise to unlock and remove it

4.

Turn the bulb socket (1) counterclockwise to unlock it.

5.

Unlock the retaining spring and remove the xenon bulb from the
combination lamp.

PARKING (CLEARANCE) LAMP

1.

Turn lighting switch OFF.

2.

Remove the headlamp. Refer to 

EXL-84, "Removal and Installation"

.

3.

Turn bulb socket counterclockwise and unlock it.

4.

Remove bulb from its socket.

FRONT TURN SIGNAL LAMP

1.

Turn lighting switch OFF.

2.

Remove the headlamp. Refer to 

EXL-84, "Removal and Installation"

.

3.

Turn bulb socket counterclockwise and unlock it.

4.

Remove bulb from its socket.

Removal and Installation

INFOID:0000000001529253

REMOVAL

1.

Disconnect the battery negative terminal.

2.

Remove the front bumper fascia. Refer to 

EXT-13, "Removal and Installation"

.

PKIC0941E

HEADLAMP

EXL-85

< ON-VEHICLE REPAIR >

C

D

E

F

G

H

I

J

K

M

A

B

EXL

N

O

P

3.

Remove the headlamp bolts (A).

4.

Pull the headlamp (1) toward the vehicle front, disconnect the
headlamp connector, and remove the headlamp.

INSTALLATION

Installation is in the reverse order of removal.
• After installation, perform aiming adjustment. Refer to 

EXL-81, "Aiming Adjustment"

.

Disassembly and Assembly - Halogen

INFOID:0000000001529254

DISASSEMBLY

1.

Remove the back cover.

2.

Unlock the retaining spring and remove the halogen bulb.

3.

Turn parking (clearance) lamp bulb socket counterclockwise to unlock it.

4.

Remove the parking (clearance) lamp bulb from the socket.

5.

Turn front turn signal lamp bulb socket counterclockwise to unlock it.

6.

Remove the front turn signal lamp bulb from the socket.

7.

Remove the bumper stay.

ASSEMBLY

Assembly is in the reverse order of disassembly.

CAUTION:

After installing the halogen bulb, install the plastic cap securely to insure a water tight seal.

PKIC1223E

1.

Retaining spring

2.

Parking (clearance) lamp bulb

3.

Parking (clearance) lamp bulb socket

4.

Halogen bulb (High/Low)

5.

Back cover

6.

Front turn signal lamp bulb socket

7.

Front turn signal lamp bulb

8.

Headlamp housing assembly

PKIC4642E


содержание   ..  769  770  771  772   ..