Mitsubishi Montero (1991+). Manual - part 18


  Index      Mitsubishi     Mitsubishi Montero - service repair manual 1991 year


Search            


Content   ..  16  17  18  19   ..


Mitsubishi Montero (1991+). Manual - part 18


NOTE:    Check compressor refrigerant oil level when replacing seals.

         Removal

         1) Secure 2 box-end wrenches, to hold armature plate, using

two 6 mm bolts 1 in. (25 mm) or longer. Holding box-end wrenches, use

a socket and ratchet to remove clutch hub nut.

         2) Remove armature plate. See Fig. 17. Remove snap ring with

internal snap ring pliers. Remove clutch hub. Remove snap ring and

clutch coil.

         3) Remove bolts retaining front housing. Remove front housing

and "O" ring from compressor. Remove shaft seal from shaft. Remove

snap ring from back side of front housing. Remove seal plate.

         4) Use brass drift and hammer to lightly tap shaft bearing

from front housing. Remove felt seal.

NOTE:    Do not touch the sealing surfaces of the shaft seal carbon

         ring and shaft seal plate.

         Installation

         1) Lubricate shaft seal with compressor oil. Align notches on

shaft seal with notches on crank shaft. Install shaft seal plate on

the front housing. Install front seal housing to compressor.

         2) Use Press Tool (MB991301) to install felt into front

housing. Make sure felt metal section faces up. Use Press Tool

(MB991301) to press bearing into front housing.

         3) Align and install clutch coil. Install snap ring so that

the tapered surface is facing outward. Install clutch hub. Install

snap ring. Install armature plate, aligning raised area to notch.

         4) Secure 2 box-end wrenches, to hold armature plate, using

two 6 mm bolts 1 in. (25 mm) or longer. Holding box-end wrenches, use

a socket and ratchet to tighten clutch hub nut to 12 ft. lbs. (16 N.

m).

         5) Use feeler gauge to measure distance between armature and

clutch hub. If gap is not .01-.02" (.25-.51 mm), remove clutch

assembly and add or remove shims accordingly.

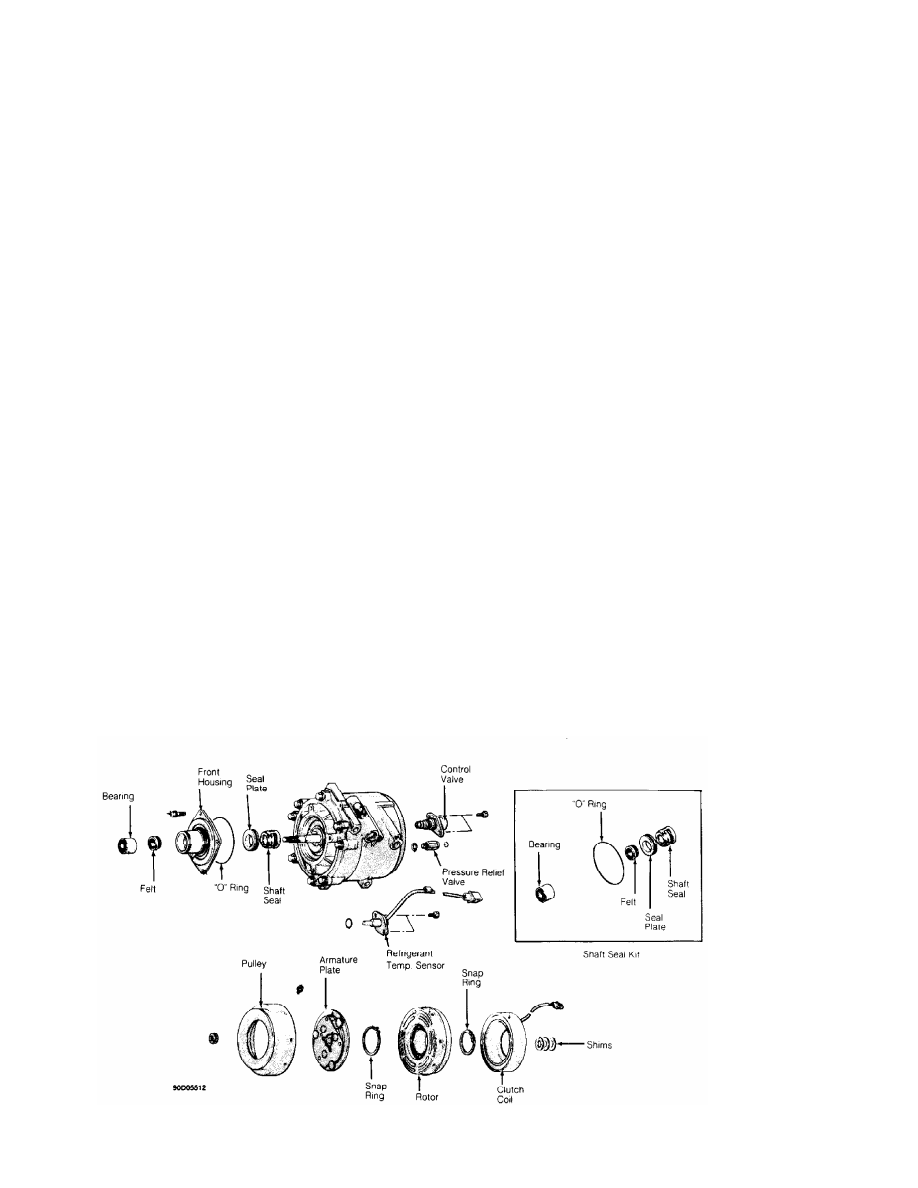
Fig. 17:  Sanden Scroll Compressor

Courtesy of Chrysler Motors.

         SANDEN 5-CYL CLUTCH R & I

         Removal

         1) Hold clutch hub stationary and remove shaft nut. Remove

clutch plate using puller. Remove external front housing snap ring and

internal bearing snap ring. See Fig. 16.

         2) Install puller and pull rotor assembly off. remove 3

screws and clutch coil. Use driver and hammer to drive bearing out

from hub.

         Installation

         1) Install new bearing; ensure installer contacts outer race

of bearing. Install snap ring and ensure bearing turns freely. Install

clutch coil on compressor.

         2) Support compressor on rear mounting ears. Align rotor on

front housing hub. Use adapter and press to install rotor (or drive

into place with soft mallet). After rotor is seated, install front

snap ring.

         SANDEN 5-CYL SHAFT SEAL R & I

NOTE:    Check compressor refrigerant oil level when replacing seals.

         Removal

         1) Hold clutch hub stationary and remove shaft nut with thin

wall socket. Use clutch plate puller to remove clutch plate. Tap key

out of slot in crankshaft.

         2) Remove seal retainer with seal remover and 3/4" socket

wrench. Use seal seat remover tongs to pull seal seat off compressor

shaft. Insert seal remover into front housing and turn to engage tangs

on seal. Lift seal out. Remove seal "O" ring from front housing, being

careful not to scratch shaft.

         Installation

         1) Coat "O" ring with refrigerant oil and install into

groove. Load a new seal onto installer, being careful not to touch

carbon sealing surface with fingers. Install shaft protector. Dip seal

in refrigerant oil and install on shaft. Rotate seal clockwise until

seal fits into flats on shaft. Remove seal installer by turning

counterclockwise.

         2) Coat seal seat with refrigerant oil and install with

tongs. Reinstall seal seat retainer (with flat side down). Install

shims and shaft key. Rotate shaft several times to help break in seal.

         3) Use a press to install clutch plate. Make sure that air

gap is .016-.031" (.41-.79 mm). Hold plate stationary and install

shaft nut.

Fig. 18:  Sanden 5-Cylinder Compressor

Courtesy of Chrysler Motors.

         SANDEN 7-CYL CLUTCH COIL & BEARING R & I

         Removal

         1) Hold clutch hub stationary and remove shaft nut. Remove

clutch plate using Clutch Plate Puller (09977-21110). Remove clutch

shims and bearing dust cover. Remove external front housing snap ring.

         2) Install puller, and pull drive pulley assembly off. Detach

clutch coil lead from compressor housing. Remove clutch coil snap ring

and clutch coil. If necessary, invert drive pulley assembly and remove

snap ring and bearing.

         Installation

         1) Ensure clutch coil protrusion aligns with hole in

compressor housing, and install clutch coil snap ring. Install drive

pulley assembly using Drive Pulley Installer (09977-21811).

         2) install external bearing snap ring. Using Seal Installer

(09977-21800), install bearing dust cover. After dust cover

installation, ensure there is no contact between cover and front

housing.

         3) Install clutch shims and clutch plate. Tighten shaft nut

to 12-14 ft. lbs. (17-19 N.m). Using a dial indicator, apply voltage

to clutch coil to check air gap between clutch plate and drive pulley

assembly. Ensure air gap is .016-.032" (.41-.80 mm).

         SANDEN 7-CYL SHAFT SEAL R & I

NOTE:    Check compressor refrigerant oil level when replacing seals.

         Removal

         1) Hold clutch hub stationary and remove shaft nut. Remove

clutch plate using Clutch Plate Puller (09977-21110). Tap shaft key

out of slot in compressor shaft. Remove clutch shims.

         2) Remove seal retainer felt ring. Remove shaft seal seat

snap ring with snap ring pliers. Insert Seal Seat Remover/Installer

(09977-21400) into front housing and turn to engage tangs on seat.

Lift seal seat out.

         3) Insert seal Remover/Installer (09977-21510) into front

housing and turn to engage tangs on seal. carefully lift seal seat out

without scratching compressor shaft.

         Installation

         1) Install Shaft Seal Guide Sleeve (09977-21700) over

compressor shaft. Dip seal in refrigerant oil and install seal on

sleeve. Using seal remover/installer, rotate seal clockwise until seal

is engaged. Remove seal remover/installer by turning it

counterclockwise.

         2) Coat seal seat with refrigerant oil and install seal with

seal seat remover/installer. Remove shaft seal guide sleeve. Install

snap ring. Install seal retainer felt ring using seal seat

remover/installer. Install clutch shims and shaft key.

         3) Install clutch plate. Tighten shaft nut to 12-14 ft. lbs.

(17-19 N.m). Using dial indicator, apply voltage to clutch coil to

check air gap between clutch plate and drive pulley assembly. Ensure

air gap is .016-.032" (.41-.80 mm).


Content   ..  16  17  18  19   ..