Mazda CX-9 Grand Touring. Manual - part 479


  Index      Mazda     Mazda CX-9 Grand Touring - service repair manual 2008 year


Search            


Content   ..  477  478  479  480   ..


Mazda CX-9 Grand Touring. Manual - part 479


1. Disconnect the negative battery cable.  

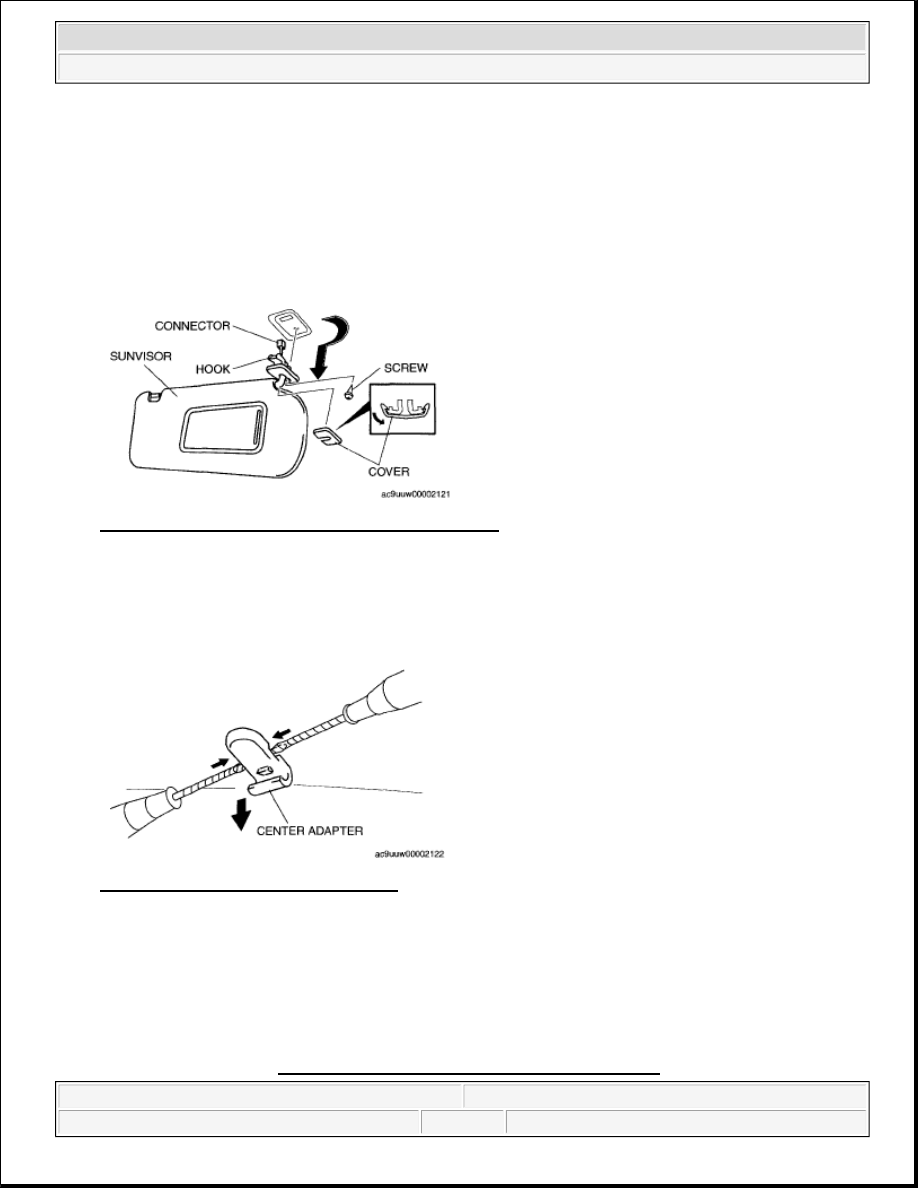
2. Remove the cover.  

3. Remove the screw.  

4. Rotate the sunvisor in the direction of the arrow.  

5. Unhook and remove the sunvisor.  

6. Disconnect the vanity mirror illumination connector. 

Fig. 80: Identifying Sunvisor, Cover, Hook & Screw 
Courtesy of MAZDA MOTORS CORP. 

7. Press the center adaptor tabs as shown in the figure using two tape-wrapped flathead screwdrivers, and 

remove the center adaptor.  

8. Install in the reverse order of removal. 

Fig. 81: Pressing Center Adaptor Tabs 
Courtesy of MAZDA MOTORS CORP. 

HEADLINER REMOVAL/INSTALLATION 

1. Disconnect the negative battery cable.  

2. Partially peel back the seaming welt.  

3. Remove the following parts: 

1. A-pillar trim (See A-PILLAR TRIM REMOVAL/INSTALLATION.)  


2008 Mazda CX-9 Grand Touring 

2008 BODY & ACCESSORIES Interior Trim - Mazda CX-9


Microsoft 


Sunday, November 15, 2009 10:43:26 AM

Page 49 

© 2005 Mitchell Repair Information Company, LLC. 

2. Front scuff plate inner (See FRONT SCUFF PLATE REMOVAL/INSTALLATION.)  

3. Rear scuff plate inner (See REAR SCUFF PLATE REMOVAL/INSTALLATION.)  

4. Front seat belt lower anchor installation bolt (Driver side) (See FRONT SEAT BELT 

REMOVAL/INSTALLATION .)  

5. B-pillar lower trim (See B-PILLAR LOWER TRIM REMOVAL/INSTALLATION.)  

6. Front seat belt upper anchor installation bolt (See FRONT SEAT BELT 

REMOVAL/INSTALLATION .)  

7. B-pillar upper trim (See B-PILLAR UPPER TRIM REMOVAL/INSTALLATION.)  

8. Trunk box (See TRUNK BOX REMOVAL/INSTALLATION.)  

9. Seat side box (See SEAT SIDE BOX REMOVAL/INSTALLATION.)  

10. Trunk end trim (See TRUNK END TRIM REMOVAL/INSTALLATION.)  

11. Third-row seat (See THIRD-ROW SEAT REMOVAL/INSTALLATION .)  

12. Third-row seat belt lower anchor installation bolt (See THIRD-ROW SEAT BELT 

REMOVAL/INSTALLATION .)  

13. Trunk side trim (See TRUNK SIDE TRIM REMOVAL/INSTALLATION)  

14. Roof side trim (See ROOF SIDE TRIM REMOVAL/INSTALLATION.)  

15. Second-row seat belt upper anchor installation bolt (See SECOND-ROW SEAT BELT 

REMOVAL/INSTALLATION .)  

16. C-pillar trim (See C-PILLAR TRIM REMOVAL/INSTALLATION.)  

17. Third-row seat belt upper anchor installation bolt (See THIRD-ROW SEAT BELT 

REMOVAL/INSTALLATION .)  

18. D-pillar trim (See D-PILLAR TRIM REMOVAL/INSTALLATION.)  

19. Front map light (See FRONT MAP LIGHT REMOVAL/INSTALLATION .)  

20. Sunvisor (See SUNVISOR REMOVAL/INSTALLATION.)  

21. Assist handle (See ASSIST HANDLE REMOVAL/INSTALLATION.)  

22. RES unit cover (Vehicles with RES) (See RES UNIT REMOVAL/INSTALLATION .)  

4. Disconnect the roof harness connector.  

5. Disconnect the rear washer hose.  

6. Remove the sunroof seaming welt. (Vehicles with sunroof)  

7. Remove the fasteners. 


2008 Mazda CX-9 Grand Touring 

2008 BODY & ACCESSORIES Interior Trim - Mazda CX-9


Microsoft 


Sunday, November 15, 2009 10:43:26 AM

Page 50 

© 2005 Mitchell Repair Information Company, LLC. 

Fig. 82: Identifying Headliner, Roof Harness & Fasteners 
Courtesy of MAZDA MOTORS CORP. 

8. Take the headliner out from the opened liftgate.  

9. Install in the reverse order of removal. 

Fig. 83: Identifying Headliner 
Courtesy of MAZDA MOTORS CORP. 

FLOOR COVERING REMOVAL/INSTALLATION 

1. Disconnect the negative battery cable.  

2. Remove the following parts: 

1. Front seat (See FRONT SEAT REMOVAL/INSTALLATION .)  

2. Second-row seat (See SECOND-ROW SEAT REMOVAL/INSTALLATION .)  

3. Edge cover (See LONG SLIDER REMOVAL/INSTALLATION .)  

4. long slider cover (See LONG SLIDER REMOVAL/INSTALLATION .)  

5. Trunk box (See TRUNK BOX REMOVAL/INSTALLATION.)  

6. Seat side box (See SEAT SIDE BOX REMOVAL/INSTALLATION.)  

7. Trunk end trim (See TRUNK END TRIM REMOVAL/INSTALLATION.)  

8. Third-row seat (See THIRD-ROW SEAT REMOVAL/INSTALLATION .)  

9. Dashboard under cover (See DASHBOARD UNDER COVER REMOVAL/INSTALLATION.) 


2008 Mazda CX-9 Grand Touring 

2008 BODY & ACCESSORIES Interior Trim - Mazda CX-9


Microsoft 


Sunday, November 15, 2009 10:43:26 AM

Page 51 

© 2005 Mitchell Repair Information Company, LLC. 

10. Front scuff plate inner (See FRONT SCUFF PLATE REMOVAL/INSTALLATION.)  

11. Front side trim (See FRONT SIDE TRIM REMOVAL/INSTALLATION.)  

12. Dust cover (See STEERING WHEEL AND COLUMN REMOVAL/INSTALLATION .)  

13. Side wall (See SIDE WALL REMOVAL/INSTALLATION.)  

14. Console panel (See CONSOLE PANEL REMOVAL/INSTALLATION.)  

15. Console cover (See CONSOLE COVER REMOVAL/INSTALLATION.)  

16. Decoration panel (See DECORATION PANEL REMOVAL/INSTALLATION.)  

17. Front console box mat (See FRONT CONSOLE BOX MAT REMOVAL/INSTALLATION.)  

18. Indicator panel (See INDICATOR PANEL REMOVAL/INSTALLATION.)  

19. Front console box (See FRONT CONSOLE BOX REMOVAL/INSTALLATION.)  

20. Console (See CONSOLE REMOVAL/INSTALLATION.)  

21. Rear scuff plate inner (See REAR SCUFF PLATE REMOVAL/INSTALLATION.)  

22. Front seat belt lower anchor installation bolt (Driver side) (See FRONT SEAT BELT 

REMOVAL/INSTALLATION .)  

23. B-pillar lower trim (See B-PILLAR LOWER TRIM REMOVAL/INSTALLATION.)  

24. Third-row seat belt lower anchor installation bolt (See THIRD-ROW SEAT BELT 

REMOVAL/INSTALLATION .)  

25. Trunk side trim (See TRUNK SIDE TRIM REMOVAL/INSTALLATION.)  

26. Fuel-filler lid release cover (See FUEL-FILLER LID OPENER 

REMOVAL/INSTALLATION .)  

3. Remove the fasteners A and B.  

4. Remove the nut.  

5. Take the floor covering out from the opened liftgate.  

6. Install in the reverse order of removal. 

Fig. 84: Identifying Floor Covering With Fasteners 
Courtesy of MAZDA MOTORS CORP.


2008 Mazda CX-9 Grand Touring 

2008 BODY & ACCESSORIES Interior Trim - Mazda CX-9


Microsoft 


Sunday, November 15, 2009 10:43:26 AM

Page 52 

© 2005 Mitchell Repair Information Company, LLC. 


Content   ..  477  478  479  480   ..