Land Rover Discovery. Manual - part 66


  Index      Land Rover     Land Rover Discovery - service 1995-1996 year


Search            


Content   ..  64  65  66  67   ..


Land Rover Discovery. Manual - part 66


MFI

17

REPAIR

FUEL FILTER

Service repair no - 19.25.02

Remove

WARNING: Spilling of fuel is unavoidable
during this operation. Ensure all
necessary precautions are taken to

prevent fire and explosion.

WARNING: Ensure fuel handling
precautions given in Section 01 -
Introduction are strictly adhered to when

carrying out following instructions.

1. Depressurise fuel system.

See Depressurising

Fuel System

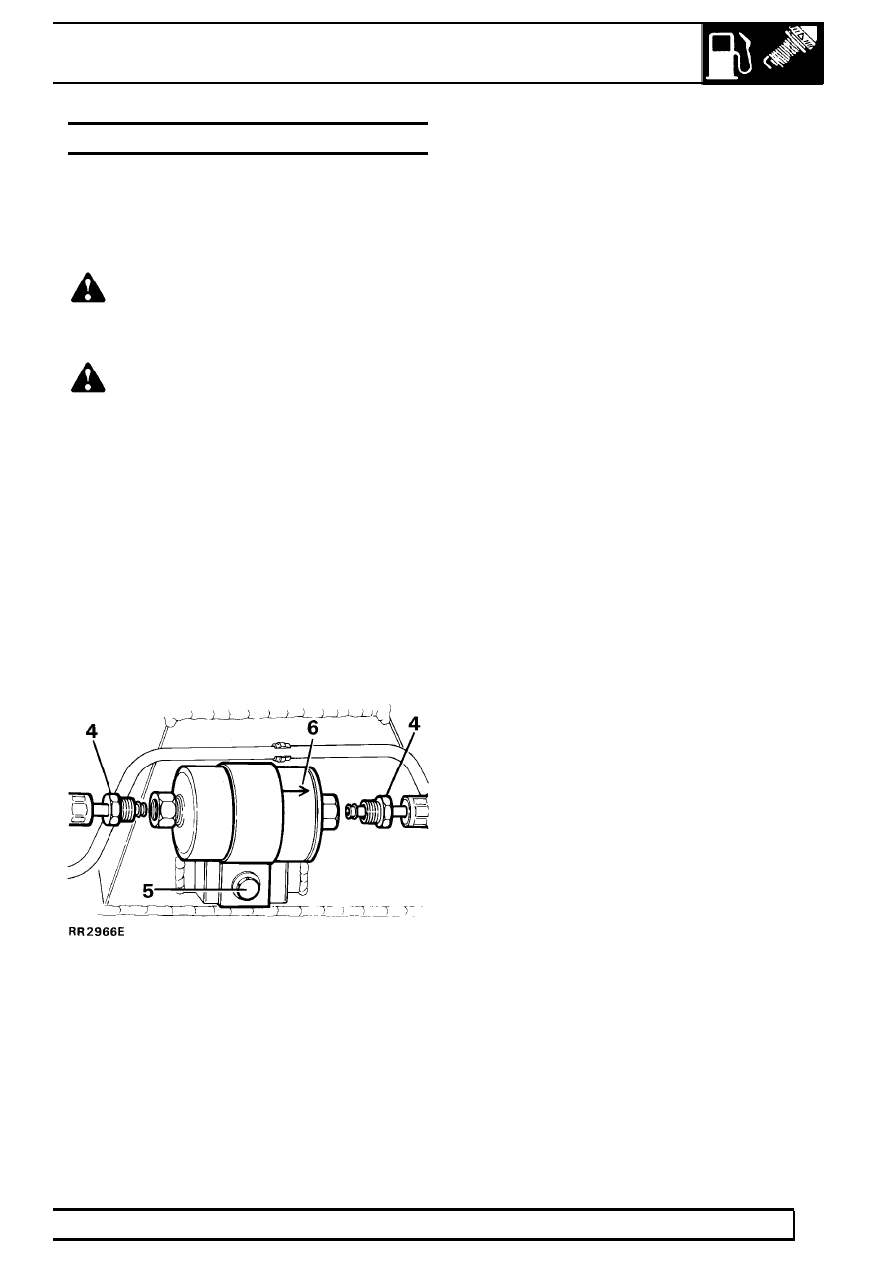
2. Access to filter is gained through right hand rear

wheel arch.

3. Clean area around hose connections to prevent

ingress of foreign matter into fuel system. Clamp
inlet and outlet hoses to prevent fuel spillage
when disconnecting hoses.

4. Loosen two fuel line unions and remove hoses.

Plug ends of hoses to prevent ingress of dirt.

5. Release securing bolt and bracket and remove

filter from chassis side member.

Refit

6. Fit a new filter observing direction of flow arrows

stamped on canister.

7. Tighten securing nut and bolt.
8. Fit inlet and outlet hoses. Tighten to

30Nm.

9. Refit fuel pump relay module, reconnect battery.

10. Start engine and inspect for fuel leaks around

hose connections.

19

FUEL SYSTEM

18

REPAIR

FUEL PIPES

Service repair no - 19.40.92

WARNING: Depressurise fuel system.

See

Depressurise Fuel System before

disconnecting any fuel pipes ensure that

all necessary precautions are taken against fuel
spillage

WARNING: Ensure fuel handling
precautions given in Section 01 -
introduction are strictly adhered to when

carrying out following instructions.

KEY

1. Fuel feed hose to fuel rail.
2. Fuel return hose to fuel tank.
3. Rigid fuel feed pipe.
4. Rigid fuel return pipe.
5. Fuel filter.

6. Rigid fuel feed pipe to filter.
7. Breather hose.
8. In-tank fuel pump.
9. Fuel filler neck.

10. Fuel tank.

MFI

19

REPAIR

THROTTLE CABLE

Service repair no - 19.20.06

Remove

1. Remove clevis pin securing cable to lever.
2. Carefully pry throttle cable adjustment nut out of

mounting bracket.

3. Remove cable from mounting bracket.

4. Release outer cable from retaining clips in

engine compartment.

5. Remove lower dash panel.
6. Disconnect cable from accelerator pedal and

release cable locknut.

7. Feed cable through bulkhead grommet into

engine compartment.

Refit

8. Feed new cable from engine compartment

through bulkhead grommet.

9. Connect cable to accelerator pedal.

10. Connect cable to throttle linkage, using a new

cotter pin.

11. Clip outer cable adjustment nut into mounting

bracket.

12. Adjust outer cable to give 1.57 mm free play in

inner cable. Check throttle operation.

19

FUEL SYSTEM

20

REPAIR

ACCELERATOR PEDAL

Service repair no - 18.30.35

Remove

1. Remove lower dash panel.
2. Remove clevis pin securing throttle cable to

accelerator pedal.

3. Release tension from pedal return spring.
4. Remove circlip from pedal pivot pin.
5. Withdraw pivot pin.

NOTE: It may be necessary to lower
steering column to gain access to pivot
pin circlip.

6. Remove accelerator pedal.

Refit

7. Lightly grease pivot and clevis pins.
8. Fit clevis pin using a NEW cotter pin.
9. Reverse removal procedure.

FUEL PUMP AND SENDER UNIT

Service repair no - 19.45.03

A plastic fuel tank with a combined fuel pump/sender
unit is fitted. The fuel pump/sender unit is accessed
through a panel in the load space floor.

Fuel pump/sender unit

WARNING: Ensure that fuel handling
precautions given in Section 01 -
Introduction are strictly adhered to when

carrying out following instructions.

CAUTION: Before disconnecting any part
of fuel system, it is imperative that all dust,
dirt and debris is removed from around

components to prevent ingress of foreign matter
into fuel system.

Service Tools:
LRT-19-001 wrench - pump retaining ring
LRT-19-002 ’Speedfit’ disconnector

Remove

1. Depressurise fuel system.

See Depressurising

Fuel System

2. Disconnect battery negative lead.
3. Syphon at least 9 litres (2 gallons) of fuel from

fuel tank into a suitable container that can be
sealed.

4. Remove carpet from loadspace floor and

tailgate.

5. Fold back loadspace sound insulation to reveal

access panel.


Content   ..  64  65  66  67   ..