Jaguar X-Type Sedan and Estate (Wagon). Manual - part 381


  Index      Jaguar     Jaguar X-Type Sedan and Estate (Wagon) (2.0 L, 2.5 L and 3.0 L Gasoline; 2.0 L and 2.2 L, Diesel) - manual 2001-2009 year


Search            


Content   ..  379  380  381  382   ..


Jaguar X-Type Sedan and Estate (Wagon). Manual - part 381


5. 

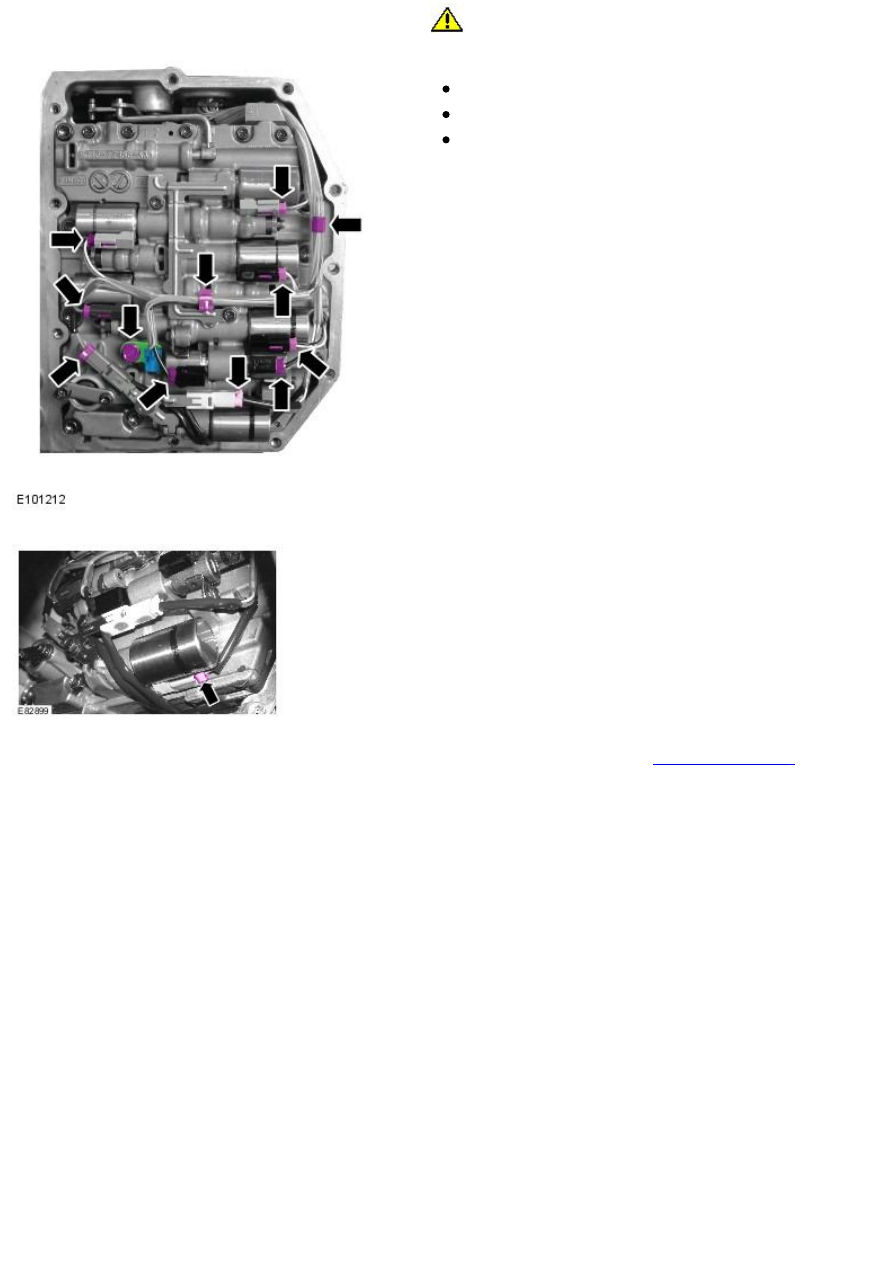
CAUTION: Make sure that these components are installed to the

noted removal position.

Secure the transmission internal wiring harness.

Secure in the clips.

Connect the electrical connectors.

Tighten the bolt to 10 Nm.

6. Connect the electrical connector.

7. Install the transmission fluid pan.

For additional information, refer to: 

Transmission Fluid Pan

 (307-01B

Automatic Transmission/Transaxle - Vehicles W ith: 6-Speed Automatic
Transaxle - AW F21, In-vehicle Repair).

Published: 11-May-2011

Automatic Transmission/Transaxle - Vehicles With: 6-Speed Automatic Transaxle -
AWF21 - Selector Shaft Seal

In-vehicle Repair

Removal

• NOTE: Removal steps in this procedure may contain installation details.

1. Disconnect the battery ground cable.

For additional information, refer to: 

Battery Disconnect and Connect

(414-01 Battery, Mounting and Cables, General Procedures).

2. Remove the transmission control module (TCM).

For additional information, refer to: 

Transmission Control Module (TCM)

(307-01B Automatic Transmission/Transaxle - Vehicles W ith: 6-Speed
Automatic Transaxle - AWF21, In-vehicle Repair).

3. CAUTIONS:

 Take extra care not to damage the mating faces.

 Make sure that a new component is installed.

Remove the transmission selector shaft seal.

Installation

1. CAUTIONS:

 Make sure that the mating faces are clean and free of foreign

material.

 Install the seal, flush with the transmission case.

Install the transmission selector shaft seal.

2. Install the transmission control module (TCM).

For additional information, refer to: 

Transmission Control Module (TCM)

(307-01B Automatic Transmission/Transaxle - Vehicles W ith: 6-Speed
Automatic Transaxle - AWF21, In-vehicle Repair).

3. Connect the battery ground cable.

For additional information, refer to: 

Battery Disconnect and Connect

(414-01 Battery, Mounting and Cables, General Procedures).

Published: 11-May-2011

Automatic Transmission/Transaxle - Vehicles With: 6-Speed Automatic Transaxle -
AWF21 - Transmission Control Module (TCM)

In-vehicle Repair

Removal

1. Remove the cover and disconnect the battery ground cable.

For additional information, refer to: 

Battery Disconnect and Connect

(414-01 Battery, Mounting and Cables, General Procedures).

2. Remove the battery tray.

For additional information, refer to: 

Battery Tray

 (414-01 Battery,

Mounting and Cables, Removal and Installation).

3. Release and disconnect the selector lever cable.

4. Remove the transmission selector lever and disconnect the electrical

connector.

Remove the nut.

5. Remove the transmission control module (TCM).

Remove the 3 bolts.

Installation

1. CAUTIONS:

 Make sure that the terminals or pins/sockets of the transmission

control module (TCM) and the TCM connector are not bent or damaged.

 The component must be aligned with the installation markings.

• NOTE: The new transmission control module (TCM) is set in the N
position at the factory.

Install the transmission control module (TCM).

Tighten the bolts to 24 Nm.

2. Install the transmission selector lever and connect the electrical

connector.

Tighten the nut to 13 Nm.

3. Secure and connect the selector lever cable.

4. Install the battery tray.

For additional information, refer to: 

Battery Tray

 (414-01 Battery,

Mounting and Cables, Removal and Installation).

5. Connect the battery ground cable and install the cover.

For additional information, refer to: 

Battery Disconnect and Connect

(414-01 Battery, Mounting and Cables, General Procedures).

6. If a new component has been installed, configure using Jaguar approved

diagnostic equipment.


Content   ..  379  380  381  382   ..