Honda Element. Manual - part 602


  Index      Honda     Honda Element - service repair manual 2007-2008 year


Search            


Content   ..  600  601  602  603   ..


Honda Element. Manual - part 602


10. Reinstall the door inner seal.  

TRIM REMOVAL/INSTALLATION - CARGO AREA 

Special Tools Required  

KTC trim tool set SOJATP2014 * 

* Available through the American Honda Tool and Equipment Program; call 888-424-6857 

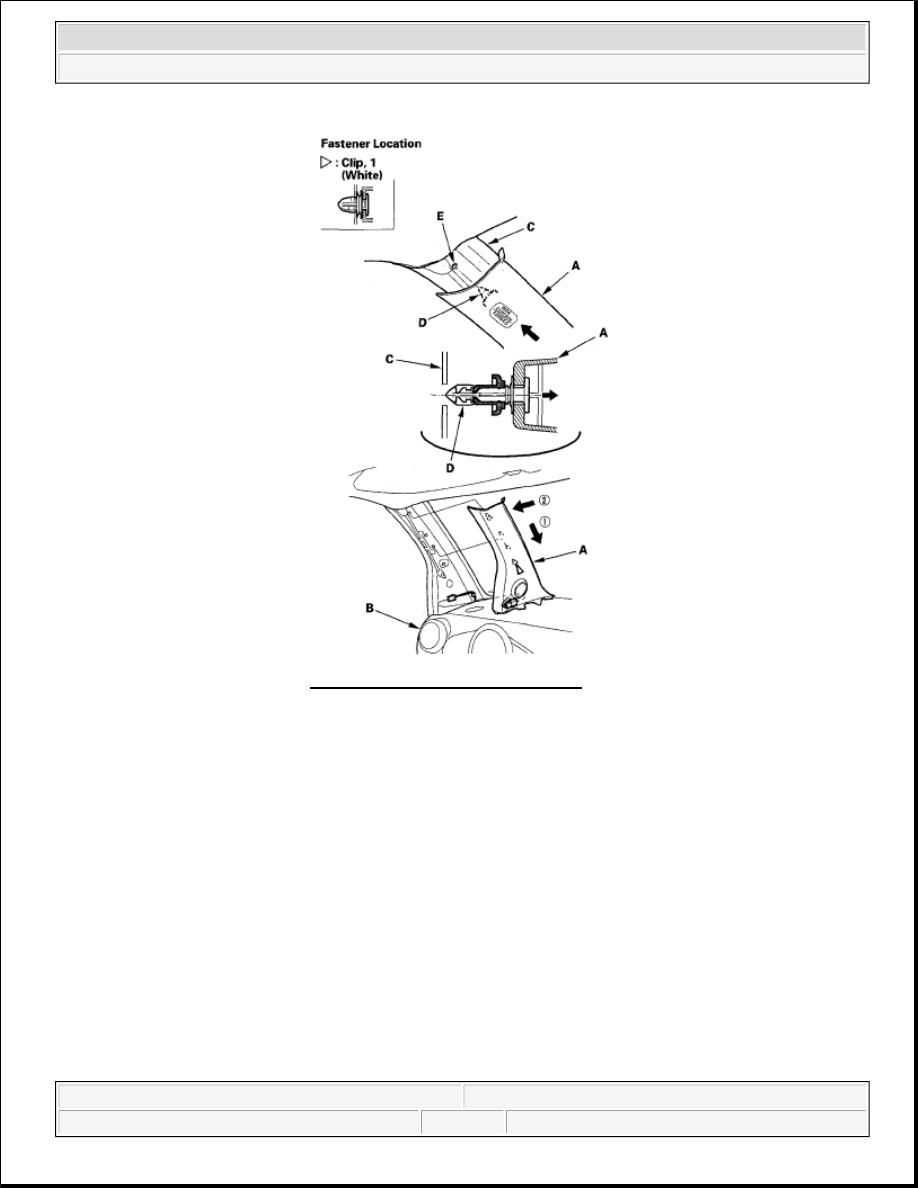
Fig. 14: Identifying A-Pillar Trim 
Courtesy of AMERICAN HONDA MOTOR CO., INC. 

NOTE:

Put on gloves to protect your hands.  

Use the appropriate tool from the KTC trim tool set to avoid damage when 
prying components.  

Take care not to bend or scratch the trim and panels.  


2007 Honda Element EX 

2007-08 ACCESSORIES AND EQUIPMENT Interior Trim - Element


1. Remove the cargo area trim as shown. To remove the rear trim panel, lift up on the hinged section and 

hold it, then remove the screws and release the clips.  

2. Install the trim in the reverse order of removal, and note these items: 

Check if the clips are damaged or stress-whitened, and if necessary, replace them with new ones.  

Push the clips into place securely. 

Fig. 15: Identifying Trim Removal/Installation - Cargo Area 
Courtesy of AMERICAN HONDA MOTOR CO., INC. 

TRIM REMOVAL/INSTALLATION - REAR SIDE AREA 

Special Tools Required  

KTC trim tool set SOJATP2014 * 

* Available through the American Honda Tool and Equipment Program; call 888-424-6857 

REAR SIDE TRIM PANEL 


2007 Honda Element EX 

2007-08 ACCESSORIES AND EQUIPMENT Interior Trim - Element


1. Remove these items: 

Door sill trim (see TRIM REMOVAL/INSTALLATION - DOOR AREAS )  

Rear seat (see REAR SEAT DISASSEMBLY/REASSEMBLY )  

Hatch weatherstrip, as needed (see HATCH WEATHERSTRIP REPLACEMENT )  

Cargo area floor (see TRIM REMOVAL/INSTALLATION - CARGO AREA )  

2. Remove the lower anchor bolt (A) and tie down hooks (B). 

Fig. 16: Identifying Lower Anchor Bolt And Tie Down Hooks With Torque Specification 
Courtesy of AMERICAN HONDA MOTOR CO., INC. 

3. Remove the rear side trim panel (A). 

-1 Remove the screws (B, C) and release the clips (D).  

-2 Remove the seat belt lid (E) from the rear side trim panel.  

-3 Pull the upper edge of the panel back to release the upper hooks (F) from the quarter pillar trim 
(G).  

-4 Detach the clips (H, I) and pull the panel back to remove it.  

-5 Passenger's side: Disconnect the accessory power socket connector (J). 

NOTE:

Put on gloves to protect your hands.  

Use the appropriate tool from the KTC trim tool set to avoid damage when 
prying components.  

Take care not to bend or scratch the trim and panels.  


2007 Honda Element EX 

2007-08 ACCESSORIES AND EQUIPMENT Interior Trim - Element


Fig. 17: Identifying Rear Side Trim Panel 
Courtesy of AMERICAN HONDA MOTOR CO., INC. 

4. Install the panel in the reverse order of removal, and note these items: 

Check if the clips are damaged or stress-whitened, and if necessary, replace them with new ones.  

When installing the panel, make sure there are no pinches in the seat belt.  

Push the clips into place securely.  

Before installing the anchor bolt, make sure there are no twists or kinks in the seat belt.  

Make sure the each connector is plugged in properly.  

TRIM REMOVAL/INSTALLATION - REAR SIDE PILLAR AREA 

Special Tools Required  

KTC trim tool set SOJATP2014 * 

* Available through the American Honda Tool and Equipment Program; call 888-424-6857 

C-PILLAR TRIM/UPPER QUARTER WINDOW TRIM 

SRS components are located in this area. Review the SRS component locations (see COMPONENT 
LOCATION INDEX
 ) and the precautions and procedures (see PRECAUTIONS AND PROCEDURES ) 
before doing repairs or service. 


2007 Honda Element EX 

2007-08 ACCESSORIES AND EQUIPMENT Interior Trim - Element


Content   ..  600  601  602  603   ..