Freightliner Cascadia. Manual - part 19


  Index      Freightliner     Freightliner Cascadia - service manual


Search            


Content   ..  17  18  19  20   ..


Freightliner Cascadia. Manual - part 19


WARNING

Always wear eye protection when using com-
pressed air to clean parts, as flying debris could
cause permanent damage to unprotected eyes. Do
not point the air stream in the direction of other
persons.

4.2

Wash the strainer in solvent, and blow it
dry with compressed air to remove oil and
metal particles.

4.3

Install and tighten the magnetic strainer
40 to 60 lbf·ft (54 to 81 N·m).

5.

Clean the fill and drain plugs. Change them if
necessary.

5.1

For magnetic plugs, use a piece of key
stock or any other convenient steel slug
to short the two magnetic poles and divert
the magnetic field.

5.2

Clean away the collected material depos-
ited on each pole. Magnets will rapidly
lose their effectiveness as collected mate-
rial bridges the gap between the two
poles.

5.3

After the first oil is changed, inspect the
drain plug each time for large quantities
of metal particles.

5.4

After cleaning, install the drain plug(s)
and tighten to 40 to 60 lbf·ft (54 to 81
N·m).

6.

Fill the axle with the recommended lubricant.
See

Table 5

for recommended drive axle lubri-

cants, and

Table 6

for drive axle lubricant ca-

pacities.

Dana Spicer Drive Axle Recommended Lubricant

Lubricant Type

Condition

Lubricant SAE

Viscosity

Grade

Dana Spicer
Roadranger®
Synthetic Drive Axle
Lubricants, or
Equivalent with
Military Specification
MIL–L–2105D

Over-the-Road
Service

75W–90

Off-Highway
Equipment, or
Under Extra
Heavy Loads

80W–140

Table 5, Dana Spicer Drive Axle Recommended

Lubricant

Dana Spicer Drive Axle Lubricant Capacities

Axle Type

Axle Model

Capacity:

*

Pints (liters)

Single Drive Axle Installation

f350018a

05/27/93

1

2

1.

Oil Fill Plug

2.

Oil Drain Plug

Fig. 4, Axle Housing Drain and Fill Plugs
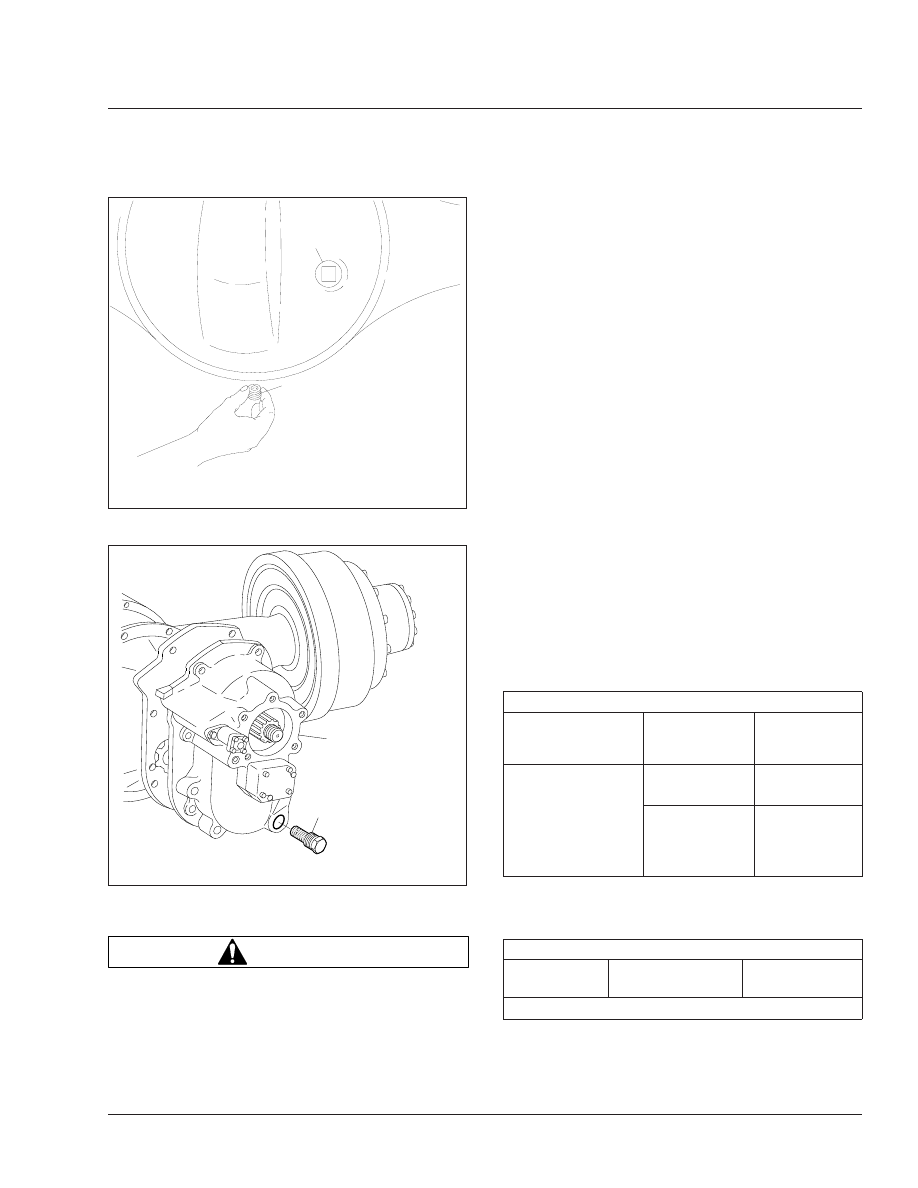
f350017a

1

2

05/27/93

1.

Magnetic Strainer

2.

Power Divider

Fig. 5, Dana Spicer Tandem Drive Axle Magnetic

Strainer

Rear Axle

35

35/5

Dana Spicer Drive Axle Lubricant Capacities

Axle Type

Axle Model

Capacity:

*

Pints (liters)

Single
Reduction

23080S, 23080D

40 (18.9)

23105S, 23105D

48 (22.7)

Tandem Drive Axle Installation

Single
Reduction

DD404, DD404–P

31 (14.7)

DS404, DS404–P

39 (18.5)

DS461–P

43 (20.3)

2-Speed (dual-
range)

DT402, 402–P

34 (16.1)

DT451–P

39 (18.5)

DT461–P

43 (20.3)

Double
Reduction

DP451–P

34 (16.1)

DP461–P

43 (20.3)

*

Quantities listed are approximate. Fill axle until lubricant is level with bot-

tom of fill hole with vehicle on level ground.

Add 2 pints (1 L) of additional lubricant to the power divider.

Table 6, Dana Spicer Drive Axle Lubricant Capacities

NOTE: Some Dana Spicer axles have a
small tapped and plugged hole near and
below the housing oil fill hole. This smaller
hole is for a lubricant temperature indicator
only, and should not be used as a fill or level
hole.

6.1

Fill the axle through the oil fill hole or
standpipe opening. Lubricant should be
level with the bottom of the oil fill hole, or
the top of the standpipe opening. To
check fluid level, see

Fig. 2

.

6.2

Install and tighten the fill plug 40 to 60
lbf·ft (54 to 81 N·m).

Two-Speed Axles With Shift Unit

Dana Spicer and Meritor

1.

Remove the shift unit housing cover. See

Fig. 6

.

Drain and discard the old lubricant. Discard the
housing cover gasket.

2.

Thoroughly wash the axle shift parts and housing
cover, and allow them to air dry.

3.

Install the housing cover and a new cover gas-
ket. Tighten the housing cover capscrews 90 to

110 lbf·in (1020 to 1240 N·cm), then remove the
oil fill plug from the cover.

IMPORTANT: When the ambient temperature is
above 0°F (–18°C), use SAE 10 heavy-duty en-
gine oil, API service classification SD (sulfated
ash content must not exceed 1.85%). When the
ambient temperature is below 0°F (–18°C), use
one part kerosene to three parts SAE 10 heavy-
duty engine oil, API service classification SD
(sulfated ash content must not exceed 1.85%).
This cold-weather mixture can be safely used
up to 32°F (0°C).

Commercially available automatic transmission
fluid may be used in place of SAE 10 engine oil.
Automatic transmission fluid can be used for all
temperatures; do not mix it with kerosene. To
prevent component damage, do not mix engine
oil and automatic transmission fluid.

4.

Using the recommended lubricant, fill the shift
unit housing through the oil fill hole until the lubri-
cant is level with the bottom of the opening.

5.

Coat the threads of the fill plug with a small
amount of Loctite® 242, or equivalent sealant.
Install the fill plug finger-tight in the rear axle shift
unit housing. Using a wrench, tighten it an addi-
tional 1-1/2 turns.

f350021a  

08/06/93  

1  

2  

3  

1.

Housing Cover Gasket

2.

Oil Fill Plug

3.

Shift Unit Housing Cover

Fig. 6, Two-Speed-Axle Shift Unit

Rear Axle

35

35/6

35–02 Axle Breather and Axle

Lubricant Level
Inspection

For all axles, including tandem drive axles and two-
speed axles, perform the applicable procedures
under the heading, "All Axle Models." For a two-
speed axle with a shift unit, also check the shift unit
lubricant; see under the heading, "Two-Speed Axles
With Shift Unit."

All Axle Models

Detroit

NOTICE

Failure to keep the rear axle filled to the proper
level with the recommended lubricant can result in
rear axle damage.

1.

Park the vehicle on a level surface, shut down
the engine, and set the parking brake. Chock the
tires.

2.

If the vehicle has just been driven, allow a few
minutes for the lubricant to settle.

IMPORTANT: On Detroit axles, the oil change
interval for long haul vehicles can be extended
to 500,000 miles (800 000 km) for axles with
weight ratings of 34,000 to 40,000 lb (15 000 to
18 000 kg) using synthetic lubricant if a lubricant
analysis shows adequate quality. Oil must be
changed at least every four years, and more
often if the axle is exposed to high temperatures
and steep grades.

3.

Clean the fill plug and the area surrounding the
fill plug on the side of the axle carrier. Remove
the plug. Check lubricant level when the axle is
cold, or near room temperature.

NOTE: Some Detroit axles have a small tapped
and plugged hole near and below the housing
oil fill hole. This smaller hole is for a lubricant
temperature indicator only, and should not be
used as a fill or level hole.

4.

Check that the lubricant is level with the bottom
of the fill hole. See

Fig. 2

If low, check for oil

leaks, and correct as needed. Add oil to the level

of the fill plug, using the lubricant recommended
in

Table 2

.

IMPORTANT: A lubricant level close enough to
be seen or touched is not sufficient. It must be
level with the bottom of the fill hole.

5.

Install and tighten the fill plug 30 lbf·ft (41 N·m).

IMPORTANT: Always check the axle breather
whenever checking the lubricant level. Check
the breather more frequently under adverse op-
erating conditions.

6.

Check the axle housing breather (see

Fig. 1

).

Make sure that it is open and unclogged. If the
breather is plugged or damaged, clean or re-
place it as needed.

Meritor®

NOTICE

Failure to keep the rear axle filled to the proper
level with the recommended lubricant can result in
rear axle damage.

NOTICE

When operating under adverse conditions, it may
be necessary to change the axle lubricant at more
frequent intervals than listed in the scheduled
maintenance tables. Failure to do so could result
in axle damage.

1.

Park the vehicle on a level surface, shut down
the engine, and set the parking brake. Chock the
tires.

IMPORTANT: Oil level must be checked at each
M1 interval on Meritor axles.

2.

Clean the fill plug and the area surrounding the
fill plug on the side of the axle carrier. Remove
the plug. Check the lubricant level when the axle
is cold, or near room temperature.

NOTE: Some Meritor axles have a small tapped
and plugged hole near and below the housing
oil fill hole. This smaller hole is for a lubricant
temperature indicator only, and should not be
used as a fill or level hole.

3.

Check that the lubricant is level with the bottom
of the fill hole. See

Fig. 2

If low, check for oil

Rear Axle

35

35/7

leaks, and correct as needed. Add oil to the level
of the fill plug, using the lubricant recommended
in

Table 3

.

4.

Install and tighten the fill plug 35 lbf·ft (47 N·m).

IMPORTANT: Always check the axle breather
whenever checking the lubricant level. Check
the breather more frequently under adverse op-
erating conditions.

5.

Check the axle housing breather. Make sure that
it is open and unclogged. See

Fig. 7

If the

breather is plugged or damaged, clean or re-
place it as needed.

6.

On non-drive axles using oil-lubricated wheel
bearings, check the oil level at the wheels, and
add oil if low. Use the same lubricant recom-
mended for the drive axle.

NOTE: When adding to or checking the oil level,
make certain the hub cap and plug are clean
before removing the plug; this will minimize the
possibility of dirt and road grime entering the
assembly.

Dana® Spicer®

NOTICE

Failure to keep the rear axle filled to the proper
level with the recommended lubricant can result in
rear axle damage.

1.

Park the vehicle on a level surface, shut down
the engine, and set the parking brake. Chock the
tires.

2.

If the vehicle has just been driven, allow a few
minutes for the lubricant to settle.

3.

Clean the oil fill plug and the area surrounding it;
see

Fig. 8

Remove the plug from the fill hole (or

standpipe, if installed in the oil fill hole).

IMPORTANT: A lubricant level close enough to
be seen or touched is not sufficient. It must be
level with the bottom of the fill hole, or the top of
the standpipe opening.

4.

Check that the lubricant is level with the bottom
of the fill hole, or with the top of the standpipe
opening. See

Fig. 2

If low, check for oil leaks,

and correct as needed. Add oil to the level of the
fill plug, using the lubricant recommended in

Table 5

.

06/07/94

f350062a

1

2

3

1.

Axle Housing Breathers

2.

Carrier Oil Fill Plugs

3.

Interaxle Differential

Fig. 7, Meritor Axle Housing Breathers

f350002a 

06/07/94 

1.

Axle Housing Breather

2.

Fill Plug

3.

Temperature Indicator Plug

Fig. 8, Dana Spicer Axle Housing Breather

Rear Axle

35

35/8


Content   ..  17  18  19  20   ..