Freightliner Business Class. Manual - part 30


  Index      Freightliner     Freightliner Business Class Trucks - service manual


Search            


Content   ..  28  29  30  31   ..


Freightliner Business Class. Manual - part 30


DANGER

Read and follow all applicable warnings and in-
structions in the applicable brake chamber section
in Group 42 of the

Business Class

®

Trucks Ser-

vice Manual

for repairs to the service/parking

brake chambers. These chambers contain a power
spring, which if released, could cause serious in-
jury or death.

4.2

If leakage is detected at either the clamp
ring or the drain slots, replace the parking
brake section. Slight leakage is permitted
at the service port. Any other leakage is
not acceptable. Using the instructions in
the applicable brake chamber section in
Group 42 of the

Business Class

®

Trucks

Service Manual

, replace the parking

brake section (

do not attempt to service

the parking brake section

).

5.

Connect the air hose to the brake chamber, mak-
ing sure that the fittings are clean and free of
debris. Tighten the nut finger-tight. Using a
wrench, further tighten the nut until you feel re-
sistance. Then, tighten the nut one-sixth turn
more.

6.

Repeat the above steps for each parking brake
chamber.

7.

Apply the parking brakes. Remove the chocks
from the tires.

42–08 Air Dryer Desiccant

Replacing, Meritor
WABCO System Saver
1000

Replace the desiccant cartridge. For instructions, see
Group 42 of the

Business Class

®

Trucks Service

Manual

.

NOTE: Desiccant change intervals may vary
from vehicle to vehicle. Typical desiccant car-
tridge life is three years. However, if experience
has shown that extended or shortened life has
resulted on a particular installation, then the in-
terval can be increased or decreased accord-
ingly.

42–09 Meritor Brake Adjusting,

Manual Slack Adjusters

Meritor

1.

Check the adjustment on Meritor brakes when-
ever the brake chamber piston rod applied stroke
exceeds the maximum allowable stroke.

1.1

With the brakes released, measure the
distance from the face of the brake cham-
ber to the centerline of the clevis pin
(

Fig. 4

Ref. A). Record the exact dis-

tance as measurement A.

1.2

Apply the service brakes and hold them
on full line pressure of at least 80 psi
(550 kPa). Measure the distance from the
face of the brake chamber to the center-
line of the clevis pin (

Fig. 4

Ref. B).

Record the exact distance measured as
measurement B.

1.3

Subtract measurement A from measure-
ment B to determine the applied stroke.

2.

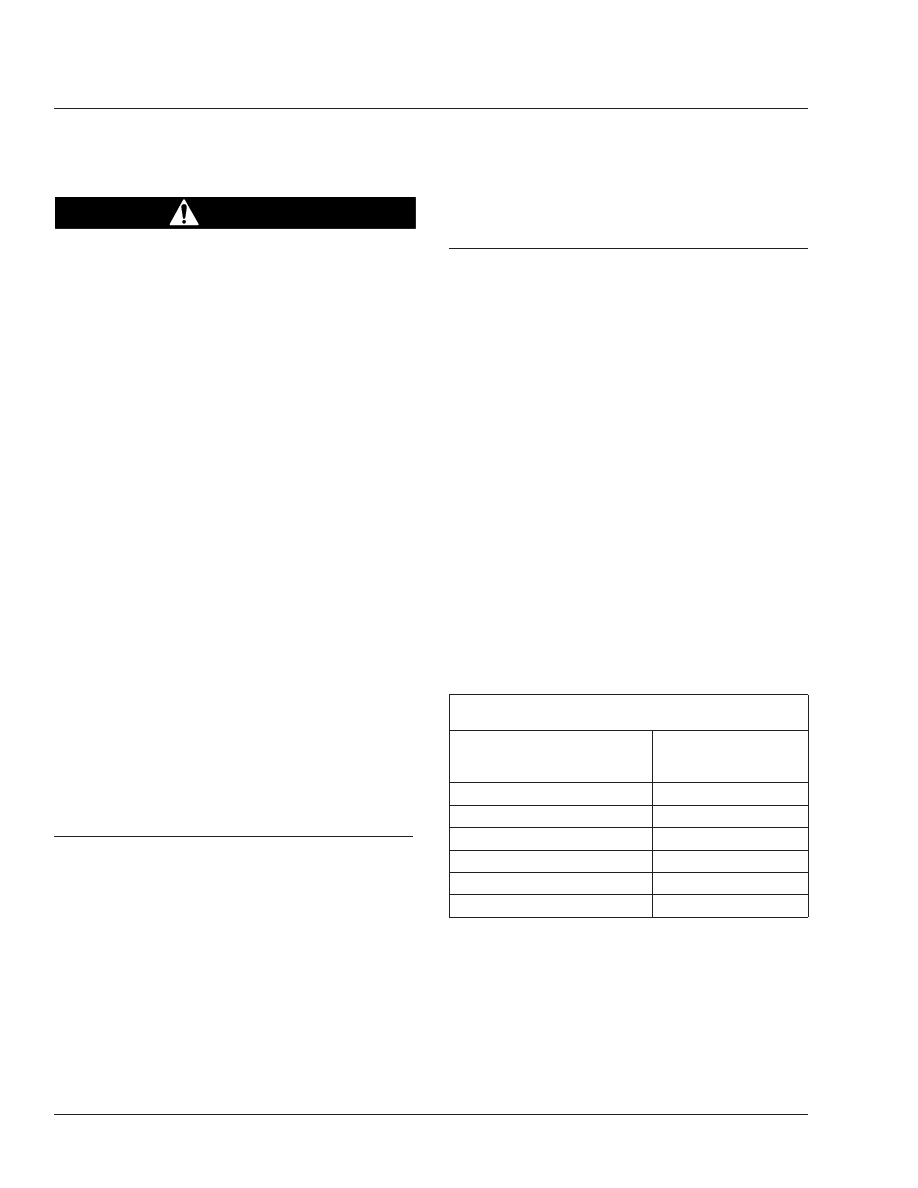
If the applied stroke equals or exceeds the maxi-
mum allowable stroke, adjust the brakes. See

Table 3

.

Maximum Allowable Brake Chamber Stroke, with

Meritor Manual Slack Adjusters

Chamber Size Effective Area:

square inches

Maximum Allowable

Stroke:

*

inches (mm)

(B minus A)

12

1-1/2 (38)

16

1-3/4 (44)

20

1-3/4 (44)

24

1-3/4 (44)

24 (long stroke)

2 (51)

30

2 (51)

*

Adjust the brakes whenever the applied stroke exceeds the maximum.

Table 3, Maximum Allowable Brake Chamber Stroke,

with Meritor Manual Slack Adjusters

2.1

Wipe clean the adjusting screw hexhead.
See

Fig. 4

Position a wrench or socket

over the adjusting screw hexhead.

Brakes

42

Business Class Trucks Maintenance Manual, October 1998

42/6

IMPORTANT: On slack adjusters equipped
with an adjusting screw locking sleeve, wipe
clean the locking sleeve area, and depress
the locking sleeve when positioning the
wrench or socket over the adjusting screw.
Do not try to turn the adjusting screw without
fully depressing the locking sleeve.

2.2

Turn the adjusting screw until it is tight;
then, back off the adjustment until the
drum is free. Normally, the adjusting
screw will need to be backed off 2 or 3
clicks.

2.3

To see if the drum is free, strike the brake
drum with a steel tool and listen for a
clear ringing sound. If a dull thud is
heard, the brake is dragging and further
adjustment is needed.

NOTE: Checking the brake adjustment when
the wheel is off the ground may be unreli-
able. Looseness or wear anywhere in the
wheel bearings will cause the drum to be
misaligned while the wheel is off the ground.
Check the brake adjustment with the wheel
on the ground.

IMPORTANT: On slack adjusters equipped with
an adjusting screw locking sleeve, make sure
that the locking sleeve is engaged around the
adjusting screw hexhead after adjustment, thus
locking the adjusting screw in place.

42–10 Camshaft Bracket

Bushing Lubricating

Pump multipurpose chassis grease (NLGI grade 1 or
2) into the chamber bracket until it appears at the
slack adjuster end of the bracket. See

Fig. 5.

Use

care that no grease enters the drum cavity. If grease
leaks out under the camhead, the camshaft grease
seal is worn or damaged, or is installed backwards.

NOTE: The use of meter-type fittings, having a
maximum 40 psi (275 kPa) pressure relief at
shutoff, is recommended.

42–11 Manual Slack Adjuster

Lubricating

Bendix Manual Slack Adjusters

Lubricate the slack adjuster with chassis grease
(NLGI grade 1 or 2). Apply enough grease to com-
pletely fill the body cavity.

f420008a

B

A

08/20/93

1

2

3

A. With the brakes released, measure this distance.
B. With the brakes applied, measure this distance.
1.

Brake Chamber

2.

Slack Adjuster

3.

Adjusting Screw

Fig. 4, Brake Adjusting, Typical Manual Slack Adjuster

f420011a

05/28/93

1

2

3

A

A. Grease exit.
1.

Brake Chamber

2.

Slack Adjuster

3.

Grease Fitting

Fig. 5, Camshaft Bracket Bushing Lubrication

Brakes

42

Business Class Trucks Maintenance Manual, October 1998

42/7

Midland Manual Slack Adjusters

Midland slack adjusters are greased for life at as-
sembly. However, a grease fitting is furnished to per-
mit optional lubricating.

42–12 Automatic Slack

Adjuster Checking,
Meritor

1.

Check the boot for cuts, tears, etc., and replace
it if necessary. See

Fig. 6

.

2.

Check the brake shoe lining wear to determine
the proper reline time. For instructions, see

Brake Lining Wear Checking, Hydraulic Disc
Brakes

.

3.

Check the free-stroke. If the vehicle has new
brakes or brakes with new linings, you must
check the free-stroke. If the vehicle is in for rou-
tine maintenance and the brakes or linings are
not new, go to the next step and check the brake
chamber stroke.

IMPORTANT: Do not use installation tem-
plates to check the slack adjuster angles.
Installation templates are used only when
installing a new slack adjuster or reinstalling
the existing slack adjuster.

3.1

With the brakes fully released, measure
the distance from the bottom of the brake
chamber to the center of the large clevis
pin. See

Fig. 7

Ref. A.

3.2

Use a pry bar to move the slack adjuster,
applying the brakes. Again, measure the
distance from the bottom of the brake
chamber to the center of the large clevis
pin. See

Fig. 7

Ref. B.

The difference between the two measure-
ments is the initial free-stroke, and sets
the clearance between the linings and the
drum. The free-stroke must be:

drum brakes—5/8 to 3/4 inch (16 to
19 mm);

disc brakes—7/8 to 1-1/8 inch (22
to 29 mm).

f420012a

10/20/93

1

2

3

4

5

6

7

1.

Brake Chamber

2.

Clevis

3.

Actuator Rod

4.

Boot

5.

Pressure-Relief Capscrew, Gasket, Pawl Spring,
and Pawl

6.

Manual Adjusting Nut

7.

Grease Fitting (or Lube Plug)

Fig. 6, Meritor Automatic Slack Adjuster

09/27/94 

f420180a

NOTE: For a drum brake, A minus B must equal 5/8" to
3/4" (16 to 19 mm). For a disc brake, A minus B must
equal 7/8" to 1-1/8" (22 to 29 mm).

A. With the brakes applied, measure this distance.
B. With the brakes released, measure this distance.

Fig. 7, Measuring Free-Stroke

Brakes

42

Business Class Trucks Maintenance Manual, October 1998

42/8

3.3

If the free-stroke is incorrect, remove the
pressure-relief capscrew, gasket, pawl
spring, and pawl (

Fig. 6

Ref. 5) from the

slack adjuster housing. If equipped with a
pull-pawl assembly (

Fig. 8

), carefully in-

sert a screwdriver and raise the relief cap
about 1/8 inch (3.2 mm).

CAUTION

Before turning the adjusting nut, remove the
pressure-relief capscrew, gasket, pawl spring, and
pawl. If equipped with a pull-pawl assembly, raise
the relief cap as instructed. Failure to do so could
strip the teeth on the pawl.

3.4

Turn the adjusting nut one-eighth turn, as
shown in

Fig. 9

Measure the stroke

again, and adjust until correct.

CAUTION

Do not make the adjusted chamber stroke too
short. The free-stroke must not be less than the
measurements given previously. If the chamber
stroke is too short, the linings can drag, which
could damage the brake.

3.5

If removed, install the pawl, pawl spring,
gasket, and pressure-relief capscrew.
Tighten the capscrew 15 to 20 lbf·ft (20 to
27 N·m). Or, remove the screwdriver from
the pull-pawl assembly (if equipped).

4.

Check for correct brake chamber stroke.

4.1

With the brakes fully released, measure
the distance from the bottom of the brake
chamber to the center of the large clevis
pin. See

Fig. 7

Ref. A.

4.2

Build air pressure to 100 psi (690 kPa).
Shut down the engine. Fully apply the
brakes, then measure the distance from
the bottom of the brake chamber to the
center of the large clevis pin. See

Fig. 7

,

Ref. B. The difference between the mea-
surements is the brake chamber stroke.

4.3

The brake chamber stroke must be less
than the measurements shown in

Table 4

If the brake chamber stroke is

incorrect, remove the pressure-relief cap-
screw, gasket, pawl spring, and pawl
(

Fig. 6

Ref. 5) from the slack adjuster

housing. If equipped with a pull-pawl as-
sembly (

Fig. 8

), carefully insert a screw-

driver and raise the relief cap about 1/8
inch (3.2 mm).

Maximum Allowable Brake Chamber Stroke, with

Meritor Automatic Slack Adjusters

Chamber Size Effective Area:

square inches

Maximum Allowable

Stroke:

*

inches (mm)

(B minus A)

12

Less than 1-3/8 (35)

16

Less than 1-3/4 (44)

20

Less than 1-3/4 (44)

f420693a

09/27/94

A

A. Insert screwdriver here.

Fig. 8, Pull-Pawl Assembly (sectional view)

A

B

f420181a

07/05/95

A. Shorten stroke.

B. Lengthen stroke.

Fig. 9, Brake Stroke Adjusting

Brakes

42

Business Class Trucks Maintenance Manual, October 1998

42/9


Content   ..  28  29  30  31   ..