Freightliner Business Class. Manual - part 25
 

  Index      Freightliner     Freightliner Business Class Trucks - service manual


Search            


Content   ..  23  24  25  26   ..


Freightliner Business Class. Manual - part 25


33–06 All-Wheel-Drive Front

Axle Oil Changing

1.

Drive the vehicle until the axle oil is warmed,
then park it, and chock the rear tires.

2.

Jack up the front axle until the wheels are off the
ground, then secure the axle on jack stands.

3.

On vehicles equipped with an MT-11 front axle,

drain the oil from the differential.

On vehicles equipped with an MT-17 front axle,

drain the oil from the differential and the hubs.

3.1

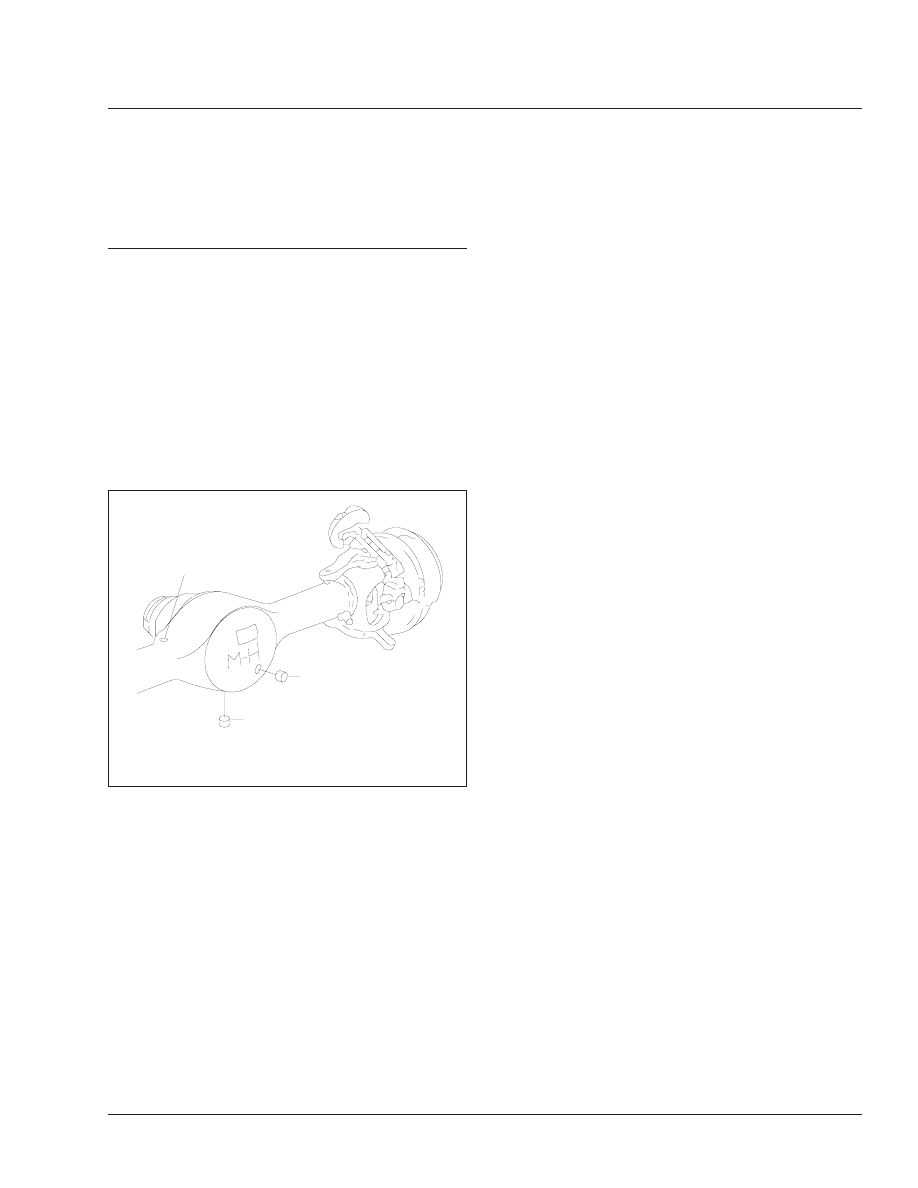
Remove the oil-drain plug from the differ-
ential, and allow the oil to drain. See

Fig. 5

.

3.2

If applicable, rotate each wheel until the
oil drain bore is at the bottom, then re-
move the drain bore plugs and allow the
oil to drain into a suitable container. If
needed use a bent piece of sheet metal
to direct the draining oil so it doesn’t
splash on the tires.

4.

Fill the differential and hubs (if applicable) with
new oil.

4.1

Install the drain bore plugs in each hub
and the differential, then tighten the plugs
firmly.

4.2

Remove the plug from the oil level check
bore in each hub and from the fill-and-
check bore in the differential.

4.3

Fill the hubs and differential until the oil
level within each is even with the bottom
of the fill-and-check bore.

4.4

Install the check bore plug in each hub
and install the fill-and-check plug in the
differential. Tighten all the plugs firmly.

5.

Lift the front axle off the jack stands, remove the
stands and lower the vehicle to the ground. Then
remove the chocks from the rear tires.

04/15/96

f350149

1

2

3

1.

Vent Valve

2.

Oil Level Check-and-Fill Plug

3.

Oil Drain Plug

Fig. 5, All-Wheel-Drive Front Axle Differential

Front Axle

33

Business Class Trucks Maintenance Manual, June 2001

33/3

Title of Maintenance Operation (MOP)

MOP Number

Axle Breather Checking . . . . . . . . . . . . . . . . . . . . . . . . . . . . . . . . . . . . . . . . . . . . . . . . . . . . . . . . . . . . . 35–02

Axle Lubricant Changing and Magnetic Plug Cleaning . . . . . . . . . . . . . . . . . . . . . . . . . . . . . . . . . . . . . . . 35–03

Axle Lubricant Level Checking . . . . . . . . . . . . . . . . . . . . . . . . . . . . . . . . . . . . . . . . . . . . . . . . . . . . . . . . 35–01

Two-Speed-Axle Shift Unit Oil Changing . . . . . . . . . . . . . . . . . . . . . . . . . . . . . . . . . . . . . . . . . . . . . . . . . 35–05

Two-Speed-Axle Shift Unit Oil Level Checking . . . . . . . . . . . . . . . . . . . . . . . . . . . . . . . . . . . . . . . . . . . . 35–04

Rear Axle

35

Index, Alphabetical

Business Class Trucks Maintenance Manual, January 1998

35–01 Axle Lubricant Level

Checking

CAUTION

Failure to keep the rear axle filled to the proper
level, with the recommended lubricant, can result
in rear axle damage.

1.

Clean the oil fill hole plug, located in the carrier
or the side of the axle housing, and the area sur-
rounding it (

Fig. 1

). Remove the plug.

NOTE: Some Meritor axles have a small tapped
and plugged hole located near and below the
housing oil fill hole. This smaller hole is for the
lubricant temperature sensor only, and must not
be used as a fill or level hole.

2.

With the vehicle on level ground, lubricant must
be level with the bottom of the oil fill hole.

If low, add lubricant. See

Table 1

for approved

axle lubricants and see

Table 2

or

Table 3

for

axle capacities.

3.

Install the fill hole plug, and tighten it 35 lbf·ft (47
N·m).

Rockwell Drive Axle Recommended Lubricant

Recommended
Lubricant Type

Ambient Temperature

Lubricant SAE

Viscosity Grade

Rockwell

Specification

Hypoid Gear Oil

API Service

Classification GL–5

+10°F (–12.2°C) and up

*

85W–140

0–76–A

–15°F (–26.1°C) and up

*

80W–140

0–76–B

–15°F (–26.1°C) and up

*

80W–90

0–76–D

–40°F (–40°C) and up

*

75W–90

0–76–E

–40°F (–40°C) to +35°F (+2°C)

75W

0–76–J

–40°F (–40°C) and up

*

75W–140

0–76–L

Synthetic Gear Oil

–40°F (–40°C) and up

*

75W–90

0–76–N

–40°F (–40°C) and up

*

75W–140

0–76–M

*

There is no upper limit on these ambient temperatures, but axle sump temperature must never exceed 250°F (121°C).

Table 1, Rockwell Drive Axle Recommended Lubricant

06/07/94

f350062a

1

2

3

1.

Axle Housing
Breathers

2.

Carrier Oil Fill Plugs

3.

Interaxle Differential

Fig. 1, Fill Hole Plug and Axle Housing Breather

Locations

Rear Axle

35

Business Class Trucks Maintenance Manual, January 1998

35/1

Rockwell Drive Axle Lubricant Capacities, Single Axles

Axle Type

Axle Model

Capacity

*

pints (liters)

Axle Type

Axle Model

Capacity

*

pints (liters)

Single

RS–13–120

16 (7.6)

Single

RS–19–220

31 (14.7)

RS–15–120

16 (7.6)

RS–21–145

32 (15.1)

RS–15–210

16 (7.6)

RS–21–160

39.5 (18.7)

RS–17–140

31 (14.7)

RS–21–230

39 (18.5)

RS–17–145

33.6 (15.9)

RS–23–160

42 (19.9)

RS–17–220

31 (14.7)

RS–23–240

45 (21.3)

RS–19–145

34.4 (16.3)

*

Quantities listed are approximate and include 1 pint (0.5 liter) for each wheel end and with the drive pinion at 3 degrees.

Single drive axles equipped with traction equalizers may require a "friction modifier" to correct a slip-stick condition, as described in the vehicle driver’s

manual. Rockwell’s experience shows that the following additives perform adequately: Add Elco No. 2 Friction Modifier (1 ounce [30 ml] of additive for each 1
pint [0.5 liter] of lube capacity) or Lubrizol No. 797 or 762 (1 ounce [30 mL] of additive for each 1 pint [0.5 liter] of lube capacity).

Table 2, Rockwell Drive Axle Lubricant Capacities, Single Axles

Rockwell Drive Axle Lubricant

Capacities, Tandem Axles

Axle Model

Capacity

*

pints (liters)

RT–34–135

Forward 29.8 (14.1)
Rear 34 (16.1)

RT–40–145

Forward 30.4 (14.4)
Rear 34.4 (16.3)

*

Quantities listed are approximate and include 1 pint (0.5 liter) for each

wheel end and with the drive pinion at 3 degrees.

Table 3, Rockwell Drive Axle Lubricant Capacities,

Tandem Axles

35–02 Axle Breather Checking

The axle housing breather (

Fig. 1

must remain

clean. Whenever the axle lubricant level is checked,
check that the axle breather is open. Check more
often under poor operating conditions. If the breather
is plugged, clean or replace it as needed.

35–03 Axle Lubricant Changing

and Magnetic Plug
Cleaning

A regular schedule for changing the axle lubricant in
a particular vehicle and operation can be accurately
determined by analyzing oil samples taken from the
axle at specified intervals or mileages. Lubricant sup-
pliers frequently make their laboratory facilities avail-

able for determining the useful life of their product
under actual service conditions. The final schedule
that is recommended may, for economic reasons, be
correlated with lubricant changes that are governed
by climatic conditions and magnetic plug mainte-
nance. Change lubricant type and viscosity as cli-
matic temperatures demand, regardless of vehicle
mileage or established change schedule.

The normal operating temperature of compounded
lubricants during the summer season is about 160°
to 220°F (71° to 104°C). The chemicals and addi-
tives that give these lubricants increased load-
carrying capacity, oxidize faster at temperatures
above 220°F (104°C), contributing to more rapid lu-
bricant deterioration. For this reason, lubricants of
this type, that operate continuously at high tempera-
tures, must be changed more frequently.

CAUTION

Failure to change the axle lubricant at more fre-
quent intervals, when adverse operating condi-
tions require, could result in axle damage.

Axle Draining and Flushing

1.

Remove the plug at the bottom of the housing
and drain the lubricant while the unit is warm.
Allow enough time for all the old lubricant to
drain completely.

Rear Axle

35

Business Class Trucks Maintenance Manual, January 1998

35/2


Content   ..  23  24  25  26   ..