Ford Fiesta (1989-1995). Instruction - part 57
 

  Index      Ford     Ford Fiesta - service and repair instruction 1989-1995 year


Search            copyright infringement  


Content   ..  55  56  57  58   ..


Ford Fiesta (1989-1995). Instruction - part 57


windows (early models) and the tailgate
remote release mechanism, where fitted.
19 Disconnect the battery negative (earth)
lead (refer to Chapter 5A, Section 1).
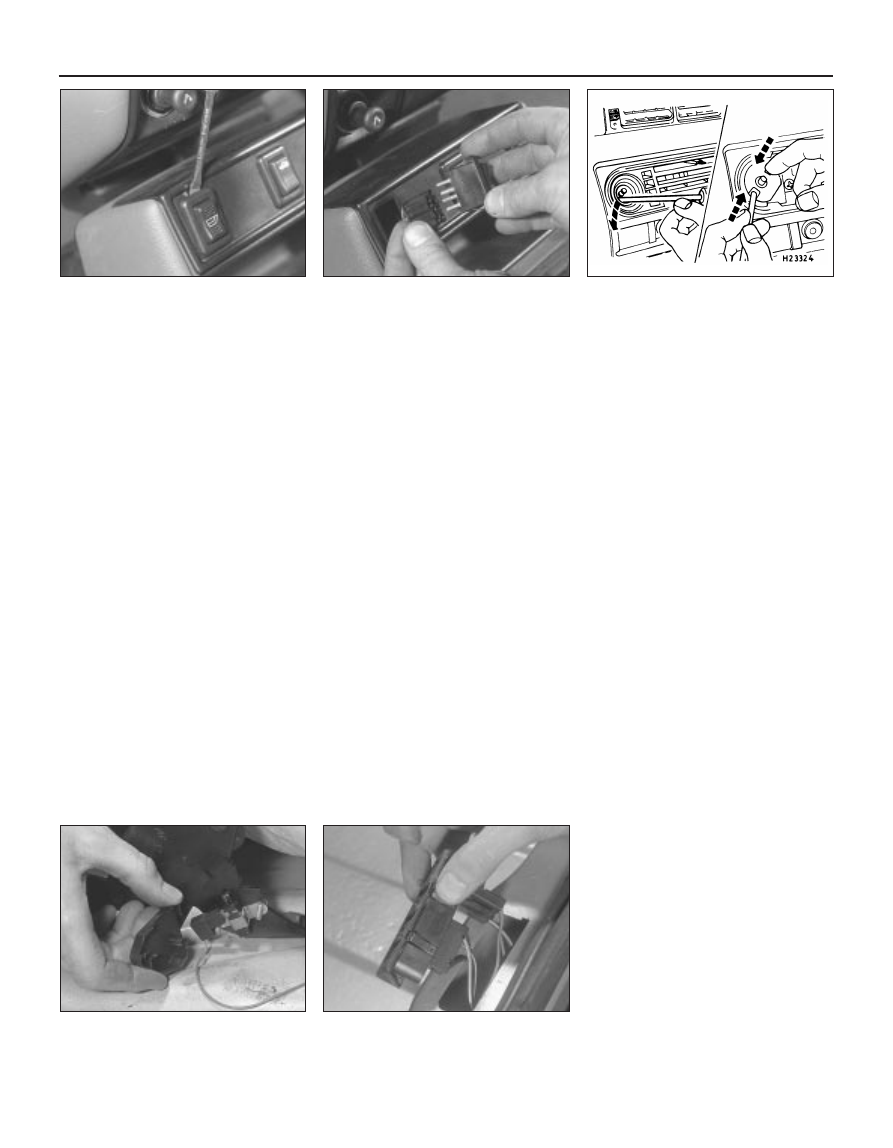
20 To remove a switch, carefully prise it from
its location using a thin flat-bladed
screwdriver, then disconnect the multi-plug
(see illustrations).
21 To refit, connect the multi-plug then push
home to secure.

Heater fan motor control switch

22 Disconnect the battery negative (earth)
lead (refer to Chapter 5A, Section 1).
23 Pull the heater fan motor control knob off,
then move the air distribution and
temperature controls fully to the right. Unclip
and remove the heater slide facia towards the
left-hand side of the vehicle, removing the
slide control knobs only as necessary, and
disconnecting its bulbholder (bayonet type) as
it is withdrawn (see illustration).
24 Squeeze the two release tabs together on
the heater fan motor control switch, and
remove it, disconnecting its multi-plug as it is
withdrawn.
25 Refit by reversing the removal procedure.

Brake stop-light switch

26 The brake stop-light switch is attached to
the brake pedal mounting bracket.
27 Detach the wiring multi-plug from the
switch, then twist the switch through a quarter
of a turn (90º) anticlockwise and withdraw it
from the bracket.

28 Insert the switch into its retainer, press it
lightly against the brake pedal until all free
play is just taken up, then turn the switch
clockwise to secure. Reconnect the switch
wiring connector and the battery.

Handbrake warning light 
switch

29 Push the carpet mounding down as
necessary to gain access to the switch,
located on the handbrake lever.
30 Remove the cover, then disconnect the
warning light switch wiring multi-plug (see
illustration)
. Undo the two screws securing
the switch to the handbrake lever assembly
and remove the switch.
31 Refit by reversing the removal procedure.

Low brake fluid level warning
light switch

32 This is incorporated into the brake fluid
reservoir cap, and senses fluid level in the
reservoir. It cannot be renewed separately
from the cap.
33 To remove, disconnect the warning
indicator loom multi-plug and unscrew the
reservoir cap.
34 Refit by reversing the removal procedure.

Courtesy light switches

35 Disconnect the battery negative (earth)
lead (refer to Chapter 5A, Section 1).
36 With the door open, undo the retaining
screw and withdraw the switch from the door
pillar. Pull out the wiring slightly, and tie a

piece of string to it, so that it can be retrieved
if it drops down into the door pillar.
37 Disconnect the wiring from the switch.
38 Refitting is a reversal of removal.

Reversing light switch

39 Refer to Chapter 7A, Section 6.

Starter inhibitor switch
(automatic transmission)

40 Disconnect the battery negative (earth)
lead (refer to Chapter 5A, Section 1).
41 The starter inhibitor switch is located on
the transmission housing, and prevents the
engine from being started with the selector
lever in any position except “P” or “N”.
Access to the switch is gained after raising
and supporting the vehicle at the front end on
axle stands (see “Jacking and vehicle
support”
).
42 Detach the switch multi-plug, then
unscrew and remove the switch from the
transmission, together with its O-ring. As the
switch is removed, catch any fluid spillage in a
suitable container, and plug the switch
aperture in the transmission to prevent any
further loss.
43 Refitting is a reversal of the removal
procedure. Use a new O-ring, and tighten the
switch securely. Ensure that the wiring
connection is securely made. On completion,
check and if necessary top-up the automatic
transmission fluid (see Chapter 1) then check
that the engine only starts when the selector
is in the “P” or “N” position.

Luggage area contact plate

44 Disconnect the battery negative (earth)
lead (refer to Chapter 5A, Section 1).
45 Open the tailgate and release the contact
plate side retaining clips using a thin-bladed
screwdriver. Push the contact plate from its
location in the body.
46 Disconnect the wiring multi-plug and
remove the plate (see illustration).
47 Refit in the reverse order of removal.

Luggage area contact switch

48 Disconnect the battery negative (earth)
lead (refer to Chapter 5A, Section 1).
49 Open the tailgate and remove its inner
trim panel (see Chapter 11).

12•6 Body electrical systems 

4.46  Withdrawing the luggage area

contact plate for access to disconnect the

multi-plug

4.30  Removing the cover from the

handbrake warning light switch

4.23  Heater fan motor control switch

removal

4.20b  . . . then disconnect its multiplug

and remove the switch

4.20a  Prise the centre console switch up

from its location . . .

1595Ford Fiesta Remake

50 Undo the two screws securing the contact
switch and withdraw it from its tailgate
location.
51 Unclip and disconnect the switch multi-
plug, and disconnect the earth wiring.
Remove the switch.
52 Refit in the reverse order of removal.
Make sure that the pins and their contacts are
clean. On completion, check the operation of
the rear wipers, courtesy light, heated rear
window and the tailgate release/central
locking system.

Electric window switches 
(1992 models onward)

53 On later models the electric window
switches are located in the upper surfaces of
the door stowage pockets. Removal and
refitting is the same as for the earlier centre
console mounted switches described
previously in this Section.

5

Bulbs (exterior lights) -
renewal

1

Note:  Ensure that all exterior lights are
switched off before disconnecting the wiring
connectors to any exterior light bulbs. Note
that if a bulb fails, and has just been in use, it
will still be extremely hot, particularly in the
case of a headlight bulb.

Headlight

From within the engine compartment,
disconnect the multi-plug from the back of the
headlight.
Remove the rubber bulb protective cap,
then unlock the bulb retaining spring clip or
retaining ring (according to type) and
withdraw the bulb (see illustrations).

Caution: Take care not to touch the bulb
glass with your fingers - if accidentally
touched, clean the bulb with methylated
spirit.

Refitting is a reversal of the removal
procedure.

Front sidelight

The bulbholder is located on the side of the
headlight unit, and is removed by twisting
anti-clockwise and withdrawing from within
the engine compartment.
Withdraw the push-fit bulb from its holder.
Refitting is a reversal of the removal
procedure.

Front direction indicator

Remove the direction indicator light unit by
releasing the retaining spring from its body
location, then pulling the light assembly
forwards. Disconnect its multi-plug as it is
withdrawn.
Turn the bulbholder anti-clockwise and
remove it (see illustration). The bulb is a
bayonet type fitting in its holder.
Refitting is a reversal of the removal
procedure.

Front direction indicator side
repeater

10 Remove the appropriate front wheel arch
liner as described in Chapter 11.
11 Remove the appropriate sill scuff plate as
described in Chapter 11, and release the clip
securing the insulation to the panel forward of
the lower A-pillar.
12 Disconnect the supply lead connector and

the earth lead, then release their grommet
from its panel location.
13 From outside the vehicle, twist the light
assembly to release it, then withdraw it and its
leads (see illustration).
14 Refitting is a reversal of the removal
procedure, ensuring that the grommet is
seated correctly in its panel location.

Auxiliary lights

S models

15 Undo the screw at the base of the light,
then withdraw the lens and reflector assembly
from the light housing.
16 Disconnect the wiring then release the
bulb retainer and remove the bulb.
17 Refitting is a reversal of the removal
procedure.

XR2i models

18 Remove the auxiliary light assembly from
its bumper location, as described in Section 7.
19 Release the bulb retainer, then remove the
bulb (see illustration).
20 Refitting is a reversal of the removal
procedure.

Rear light cluster (all models
except Courier)

21 Access to the rear light cluster bulbholder
is gained from the luggage compartment.
Disconnect the multi-plug from the
bulbholder, then press the retaining lugs on

Body electrical systems  12•7

5.2b  . . . then unlock the headlight bulb

retaining spring and withdraw the bulb

5.2a  Remove the protective cap . . .

5.19  Releasing the auxiliary light bulb

retainer (XR2i models)

5.13  Removing the direction indicator side

repeater bulbholder assembly

5.8  Remove the front direction indicator

light bulbholder by turning it anti-

clockwise

A Light unit

C Multi-plug

B Bulbholder

D Retaining spring

12

1595Ford Fiesta Remake

the bulbholder together and remove it (see
illustrations)
.
22 All bulbs are of bayonet type fitting.
23 Refitting is a reversal of the removal
procedure.

Rear light cluster (Courier
models)

24 Working inside the load compartment,
unscrew the two black plastic nuts securing
the light cluster assembly. Withdraw the
assembly to the outside of the vehicle,
disconnecting the wiring from the bulbholder
(see illustrations).
25 All bulbs are of bayonet type fitting.
26 Refitting is a reversal of the removal
procedure.

Number plate lights

27 Insert a thin flat-bladed screwdriver
between the light assembly and the bumper,
and carefully prise the light out. Use a rag, or
a piece of card, between the screwdriver and
the bumper, to prevent damage to the
bumper.
28 Detach the connections on the underside
of the light assembly.
29 Release the tab securing the light cover to
the bulbholder, and remove the cover (see
illustration)
.
30 The bulb is a bayonet type fitting in its
holder.
31 Refitting is a reversal of the removal
procedure.

6

Bulbs (interior lights) -
renewal

2

Instrument panel illumination
and warning lights

Refer to Section 10.

Automatic transmission selector
illumination

Using a thin flat-bladed screwdriver, prise
up the selector cover and remove it.
Pull the bulb assembly to release it from the
selector lever, then remove its cover. The bulb
is a bayonet fit in its holder (see illustrations).
Refitting is a reversal of the removal
procedure.

Hazard warning switch

The hazard warning light switch, an integral
part of the steering column multi-function
switch assembly, has a bulb cover which pulls
off. The bulb is removed by pulling it from its
location.
Refitting is a reversal of the removal
procedure.

Clock illumination

Carefully prise the clock out of its facia
location, as described in Section 13.
Twist the bulbholder and withdraw it from
the rear of the clock (see illustration). Note

12•8 Body electrical systems 

6.8  Withdrawing the clock illumination

bulb and its integral holder from the rear of

the clock

6.3b  . . . followed by the (bayonet fitting)

bulb

6.3a  Remove the selector illumination bulb

cover . . .

5.29  Release the number plate light

securing tab (arrowed) and separate the

bulbholder and light cover

5.24b  . . . then withdraw the assembly to

the outside of the vehicle

5.24a  On Courier models, unscrew the two

black plastic nuts securing the rear light

cluster assembly . . .

5.21b  . . . then having pressed its retaining

lugs, withdraw the bulbholder for access

to the bulbs

5.21a  Disconnect the ear light cluster

multi-plug from the bulbholder . . .

1595Ford Fiesta Remake

that the bulb and bulbholder cannot be
separated - they are replaced as an assembly.
Refitting is a reversal of the removal
procedure.

Cigarette lighter illumination

10 Remove the cigarette lighter, as described
in Section 12.
11 Pull the bulbholder from its location in the
illuminated surround, then pull the bulb out of
the bulbholder.
12 Refitting is a reversal of the removal
procedure.

Heater facia illumination

13 Pull the heater fan motor control knob off,
then move the air distribution and
temperature controls fully to the right. Unclip
and remove the heater slide facia towards the
left-hand side of the vehicle, removing the
slide control knobs only as necessary, and
disconnecting its bulbholder (bayonet type) as
it is withdrawn (see illustration).
14 The bulb is removed by pulling it from its
bulbholder.
15 Refitting is a reversal of the removal
procedure.

Interior (courtesy) light

16 Insert a thin flat-bladed screwdriver into
the slot in the light assembly, and carefully
lever it out of its aperture. The bulb is a
bayonet fit (see illustrations).
17 Refit the bulb by reversing the method of

removal, then insert the switch end of the light
to the aperture, pivot the light upwards and
push home to secure.

Luggage compartment
(courtesy) light

18 Carefully prise the luggage compartment
(courtesy) light assembly out of its location,
using a thin flat-bladed screwdriver. Twist the
bulbholder anti-clockwise to remove.
19 The bulb is removed by pulling it from its
bulbholder.
20 Refitting is a reversal of the removal
procedure.

7

Exterior light units 
removal and refitting

2

Disconnect the battery negative (earth) lead
(refer to Chapter 5A, Section 1), before
removing any of the light units.

Headlight

Disconnect the multi-plug from the back of
the headlights (see illustration).
Twist the sidelight bulb holder to release,
then withdraw it.
Remove the headlight securing bolt and
depress the headlight retaining spring, to
allow the headlight assembly to be hinged

forwards and out of its location (see
illustration)
.
Refitting is a reversal of the removal
procedure, ensuring that the lower headlight
mounting guide is inserted correctly, and that
the retaining spring engages fully (see
illustration)
.
On completion, check the headlight beam
alignment as described in Section 8.

Front direction indicator

To remove, release the indicator light
retaining spring from its body location, then
pull the light assembly forwards and
disconnect its multi-plug as it is withdrawn
(see illustrations).

Body electrical systems  12•9

6.16b  Interior (courtesy) light pivoted for

access to the bulb

7.2  Disconnecting the multi-plug from the

back of the headlight

6.16a  Releasing the interior (courtesy)

light from its location

6.13  Heater fan illumination arrangement

7.7a  Release the front direction indicator

light retaining spring from its body 

location . . .

7.5  Refitting the headlight. Mounting

guides (A) to fit to panel (B)

7.4  Headlight retaining bolt (A), and

retaining spring arrangement (B)

12

1595Ford Fiesta Remake


Content   ..  55  56  57  58   ..