Fiat Qubo (2021 year). Manual in english - page 3


  Index      Manuals     Fiat Qubo (2021 year). Manual in english


Search            copyright infringement  


Content      ..     1      2      3      4      ..


Fiat Qubo (2021 year). Manual in english - page 3


43

is not perfectly closed, do not try to

press the bonnet lid down but open it

and repeat the procedure.

WARNING A plate summarising the

described bonnet opening/closing

operations is affixed under the bonnet

(see fig. 59).

25)

59

F0T0215

24)

Before opening the bonnet, make

sure that windscreen wiper arm is not

raised, but is rather positioned against the

windscreen.

25)

For safety reasons, the bonnet must

always be properly closed while driving.

Therefore, make sure that the bonnet

is properly closed and that the lock is

engaged. If you discover that the bonnet

is not perfectly closed while driving, stop

immediately and close the bonnet in the

correct manner.

PARTITIONS

(for versions/markets, where provided)

CARGO VERSIONS

Fixed partition fig. 60

Separates the passenger area from the

load compartment.

60

F0T0179

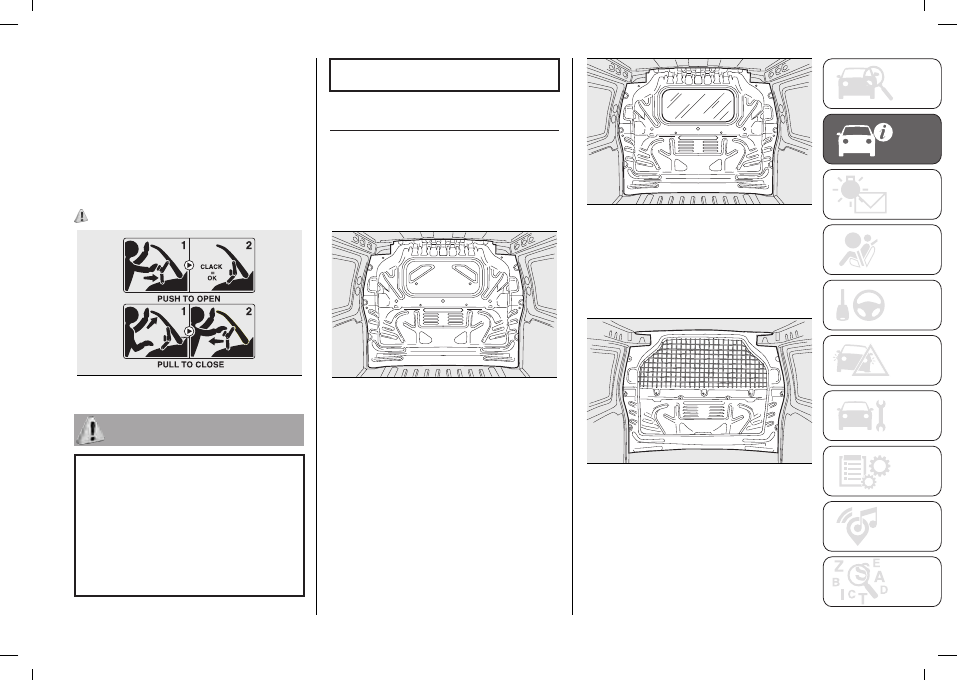
Glazed fixed partition fig. 61

This is provided with window in the

middle so you can observe load

stability.

61

F0T0167

Fixed mesh fig. 62

Separates the passenger area from the

load compartment. This is provided

with metallic mesh so you can observe

load stability.

62

F0T0059

-------------------------------------------------------------------------------------------------------------------------------------------------------------

 KNOWING YOUR VEHICLE

44

Pivoting split partition fig. 63

63

F0T0196

If you need to carry awkward shaped

items, you can open the partition as

follows:

lay the foldaway passenger seat flat

(see previous pages);

from inside the load compartment,

unhook the pin (A) fig. 64on the back of

the partition and insert it in seat on the

backrest of the folded seat (B).

64

F0T0210

To put the partition back in its normal

position, follow the same procedure in

reverse.

DRIVER PROTECTION

LADDER

(for versions/markets, where provided)
On some versions, a fixed ladder fig. 65

is provided to protect the driver from

unstable loads and allow greater

loading capacity from the passenger

side.

65

F0T0177

FIORINO COMBI AND

QUBO N1 4-SEATER

VERSIONS

(for versions/markets, where provided)

Fixed partition fig. 66

This is located behind the backrest of

the rear seats.

66

F0T0195

-------------------------------------------------------------------------------------------------------------------------------------------------------------

45

ANCHORING YOUR LOAD

Hooks (various number, according to

version) are fixed to the floor for easy

securing load.
Cargo versions fig. 67;

67

F0T0057

Combi versions fig. 68.

68

F0T0058

LOADING ADVICE

Some simple suggestions can improve

driving safety, comfort and vehicle

duration: - distribute the load evenly

over the platform: if it must be

concentrated it in a single area, choose

an area mid-way between both axles;

- lastly, remember that the dynamic

behaviour of the vehicle is affected by

the transported weight: in particular,

the stopping distances are longer,

especially at high speed.

26) 27) 28) 29)

26)

Bumpy roads and abrupt braking

may cause unexpected load shifting with

consequently hazardous situations for the

driver and passengers: before setting off,

secure the load tightly using the partition

and appropriate hooks, steel cables, ropes

or chains strong enough to hold the items

to be secured.

27)

Even when the car is stopped on a

steep hill or side slope, opening the rear or

side doors could cause unsecured goods

to fall out.

28)

If you wish to carry a reserve of petrol

in a can, observe the legal restrictions and

only use a can that is type-approved and

properly secured to the load anchoring

eyebolts. In the event of a collision the fire

risk is increased all the same.

29)

Each of these must be strictly

observed and MUST NEVER BE

EXCEEDED in any case. In particular,

ensure that you never exceed the

maximum permitted weights on the front

and rear axles when arranging the load

on the vehicle (particularly if the vehicle is

equipped with a specific trim level).

BOOT

OPENING THE TAILGATE

FROM THE OUTSIDE

(Qubo version)

69

F0T0250

70

F0T0381

The tailgate (when unlocked) can only

be opened from the outside of the car

using the electric opening handle (A)

fig. 69 located under the handle.
The tailgate can be opened at any time

if the doors are unlocked.
To open it, enable the handle, opening

one of the front doors or unlocking the

-------------------------------------------------------------------------------------------------------------------------------------------------------------

 KNOWING YOUR VEHICLE

46

doors with the remote control or using

the key without remote control.
The tailgate unlocks also by pressing

the button

on the remote control.

To close the tailgate use handle (B)

fig. 70.

30)

EMERGENCY OPENING

FROM THE INSIDE

(Qubo version)

71

F0T0285

In the event of an emergency, you can

open the tailgate from inside as follows:

Open the sliding side door and fully

fold the rear seats;

from inside the boot, press lever (A)

fig. 71 and open the tailgate.

31) 32)

EMERGENCY OPENING

FROM THE INSIDE

(Fiorino version)

In the event of an emergency, you can

open the tailgate from inside as follows:

open the sliding side door and lower

the backrest of the rear seat to gain

access to the boot (Combi versions);
or

72

F0T0060

open the sliding side door (Cargo

versions);

use device (A) fig. 72 located on the

inside of the right-hand swing door;

open the left-hand swing door by

pulling the handle (see "Doors" in this

section).

31) 32)

DOUBLE REAR WING

DOORS

(for versions/markets, where provided)
The double rear swing doors fig. 73 are

fitted with a spring-loaded system that

stops them when they have opened to

an angle of approximately 90 degrees.

73

F0T0139

To open them wider to an angle of 180

degrees, push the locking device (A)

fig. 74 (one on each side) as shown in

the diagram and simultaneously open

the doors.

33) 34)

74

F0T0375

-------------------------------------------------------------------------------------------------------------------------------------------------------------

47

Opening/closing the first swing

door from the outside

75

F0T0140

To open the door, turn the metallic

insert of the key in the lock or press

button

on the remote control

and then pull handle (A) fig. 75 in the

direction of the arrow.
To close the door, turn the key in the
lock or press button

on the remote

control.

34)

Opening the second swing door

76

F0T0142

After having opened the first door, pull

handle (A) fig. 76 in the direction shown

by the arrow.

WARNING Pull handle (A) fig. 76 in the

direction of the arrow only.

REMOVING THE PARCEL

SHELF

(Fiorino Combi and Qubo versions)

The parcel shelf fig. 77consists of

two parts. To remove it completely,

proceed as follows:

open the rear swing doors; lift the

front part (A) fig. 77 releasing the pin (A)

fig. 78 from the housing (F) fig. 78;

77

F0T0062

lift the rear part (B) fig. 77 releasing

the pins (B) and (C) fig. 78 from the

housing (D) and (E) fig. 78;

If the seat is completely folded down,

remove the parcel shelf as described

and store it horizontally between the

back of the front seats and the folded

rear seat.

78

F0T0456

To refit the parcel shelf, follow the same

procedure in reverse.

35)

EXTENDING THE BOOT

79

F0T0921

Proceed as follows:

open the rear doors and remove the

parcel shelf (as described previously);

completely lower the rear seat head

restraints;

-------------------------------------------------------------------------------------------------------------------------------------------------------------

 KNOWING YOUR VEHICLE

48

move the seat belt to the side,

making sure that it is fully extended and

not twisted;

lift backrest retainer lever (A) fig. 79

and fold the backrest forwards to

obtain a flat loading area. When you lift

the lever, you will see a red band.

Versions with single rear seat

80

F0T0416

To further expand the boot, pull tab (A)

fig. 80 located behind the rear backrest

and tip seat and backrest forward.
Qubo versions: To fix the seat, take

the red cords (A) shown in fig. 81 and

fix the ends of the cords in position (A)

and (B) as in fig. 82.

A

81

F0T0445

A

B

82

F0T0446

-------------------------------------------------------------------------------------------------------------------------------------------------------------

49

Versions with split rear seat

83

F0T0289

To further expand the boot, pull the

tabs (A) and (B) fig. 83 located behind

the backrest of the rear seats and tip

seats and backrest forwards.

A

84

F0T0447

To fix the seat, take the red cords (A)

shown in fig. 84 and fix the ends of the

cords in position (A) and (B) as in fig. 85

for each of the two portions of the seat.

A

B

85

F0T0448

Rear seat removal (Qubo versions)

The rear seat can be removed to carry

large loads and expand the boot even

further.

WARNING To remove the rear seat,

first disconnect the SBR sensor

connection on both the right and left

sides, as shown in fig. 86. Turn the ring

(A) anticlockwise to disconnect the

connector.

86

F0T0987

Operate the two brackets (A) fig. 87

under the side of the seat (one on each

side) after having tipped the rear seat

as previously described.

87

F0T0455

Rear seat removal (Fiorino Combi

versions)

The rear seat can be removed to carry

large loads and expand the boot even

further.

-------------------------------------------------------------------------------------------------------------------------------------------------------------

 KNOWING YOUR VEHICLE

50

WARNING To remove the rear seat,

first disconnect the SBR sensor

connection on both the right and left

sides, as shown in fig. 86. Turn the ring

(A) anticlockwise to disconnect the

connector.

Operate the two brackets (A) fig. 88

under the side of the seat (one on each

side) after having tipped the rear seat

as previously described.

88

F0T0199

Repositioning the rear seat

89

F0T0302

WARNING When refitting the rear seat

after removal (for versions/markets

where provided), take care to

reconnect the SBR sensor correctly. If

not, the SBR system will not warn of

any unfastened seat belts on the rear

seats.

Proceed as follows:

check that the seat belt webbing is

correctly inserted in the corresponding

bracket;

take the cushion back to horizontal

position and check that it is secured

correctly;

tip back the backrest and check that

it is secured correctly.
A pictogram fig. 89 is located under

the split seat cushion showing how to

secure the seat back onto the brackets

screwed to the floor.

ANCHORING YOUR LOAD

Hooks (various number, according to

version) are fixed to the floor for easy

securing load.
Fiorino Cargo version fig. 90;
Fiorino Combi version fig. 91;
Qubo version fig. 92.

90

F0T0057

91

F0T0058

92

F0T0418

-------------------------------------------------------------------------------------------------------------------------------------------------------------

51

CARGO BOX

(Natural Power versions)
The cargo Box is located in the luggage

compartment and it includes different

sized compartments to store all kinds

of small items. To gain access to the

Cargo Box follow the illustrations in

fig. 93.

93

F0T0354

Folding the rear seats

To fold down the rear seats, in order to

find the (A) fig. 94, you need to open

the cargo box as illustrated in fig. 95.

We recommend you keep the cover

raised in the same position also when

repositioning the seat.

94

F0T0353

95

F0T0352

30)

Do not try to close the tailgate by

pressing on the side shock absorbers (C)

fig. 70. Also be careful not to knock the

side shock absorbers when you load the

boot, to avoid damaging them.

31)

If you are travelling in areas with few

filling stations and you want to transport

fuel in a spare tank, comply with the law by

using only an approved, suitably secured

tank. In the event of a collision the fire risk

is increased all the same.

32)

Never exceed the maximum allowed

load in the luggage compartment, see

chapter "Technical specifications". Also

make sure that the objects you place in the

luggage compartment have been properly

secured, to avoid them from being thrown

forward consequent to sudden braking

and injuring your passengers.

33)

The spring-loaded system is designed

for optimum usage. Accidental knocks

or a strong gust of wind may release the

springs, forcing the doors to close.

34)

When closing, shut the right hand door

(2) fig. 73 fully before you close the left

hand door (1) fig. 73. Never shut the two

doors at the same time.

35)

You must not use the folded rear

seat to carry luggage. The load could

be thrown forward into the backrest of

the front seats, seriously injuring the

occupants.

-------------------------------------------------------------------------------------------------------------------------------------------------------------

 KNOWING YOUR VEHICLE

52

INTERIOR FITTINGS

DRIVER SIDE ARMREST

(for versions/markets, where provided)

96

F0T0056

On some versions, the driver side front

seat has an armrest.
Raise or lower the armrest as shown by

the arrows fig. 96.

STORAGE

COMPARTMENT

97

F0T0187

This is located in front of the passenger

seat fig. 97.

GLOVE COMPARTMENT

(for versions/markets, where provided)

98

F0T0069

To open it, operate handle (A) fig. 98.

36)

FRONT POWER SOCKET

(12V)

99

F0T0454

This is located on the central unit

fig. 99 and only works with the key at

MAR.
Lift cap (B) fig. 99 to use.

REAR POWER SOCKET

(12V)

100

F0T0406

This is located in the boot fig. 100 and

only works with the key at MAR.

-------------------------------------------------------------------------------------------------------------------------------------------------------------

53

CIGARETTE LIGHTER

(for versions/markets, where provided)
The cigarette lighter is positioned on

the central console. Press the button

(A) fig. 99 to switch on the cigar lighter

with key in the MAR position.
After a few seconds the button goes

back to its initial position and the cigar

lighter is ready for use.

WARNING Always check that the

cigarette lighter is switched off.

37)

USB PORT

(for versions/markets, where provided)
The USB port (A) fig. 101 is located

in the central console in place of the

cigar lighter and can be used only as a

charging source for external devices.

101

F0T0930

ASHTRAY

(for versions/markets, where provided)
The ashtray is a removable spring-

loaded plastic box that can be fitted

into the cup/can holders on the central

console fig. 102.

38)

102

F0T0117

SUN VISORS

103

F0T0188

The driver and passenger sun visors

fig. 103 can be moved back and forth

and to the side.

There is a housing for storing tickets

behind the sun visor on the driver's

side.
A vanity mirror may be fitted to the

passenger's sun visor on some

versions.

DOCUMENT HOLDER

CLIP

(for versions/markets, where provided)

104

F0T0408

A document clip is located in the

middle of the dashboard over the radio

compartment. On some versions, this

component may be used as a book

rest fig. 104.
For using it this way:

lift the book rest from the back as

shown by the arrow (detail (A)).

In vertical position, the book rest is in

reading position (detail (B)).

39)

To fold the book rest back:

-------------------------------------------------------------------------------------------------------------------------------------------------------------

 KNOWING YOUR VEHICLE

54

move in the reverse direction,

following with your open hand until you

feel the front and rear fasteners snap

(detail (C)).

HINGED REAR SIDE

WINDOWS

(for versions/markets, where provided)

105

F0T0134

106

F0T0135

To open, proceed as follows fig. 105

and fig. 106:

Move lever (A) fig. 106 outwards until

the window is fully open.

push the lever back until it locks into

place.
To close them, carry out the process in

reverse until the lever clicks back into

its original place.

36)

Never travel with the glove

compartment open: it could injure the

passenger in the event of an accident.

37)

The cigar lighter becomes very hot.

Handle it carefully and make sure children

do not touch it: risk of fire and/or burning.

38)

Do not use the ashtray as a waste

paper basket: it may catch fire in contact

with cigarette stubs.

39)

Do not use the book rest in a vertical

position with the vehicle in motion.

ROOF RACK/SKI

RACK

FASTENERS

107

F0T0154

The hook provisions are located in

points (A), (B), (C) fig. 107.

LONGITUDINAL ROOF

BARS

(for versions/markets, where provided)

108

F0T0176

On some versions, the vehicle has two

longitudinal bars fig. 108 which, with

-------------------------------------------------------------------------------------------------------------------------------------------------------------

55

the addition of special accessories, can

be used to carry various objects (e.g.

skis, surfboards, etc.).

40) 41)

5) 6)

40)

Fully comply with the regulations in

force concerning maximum clearance.

41)

After travelling for a few kilometres,

check to ensure that the fixing screws for

the attachments are well tightened.

5)

Distribute the load evenly and pay

attention to side winds when driving.

6)

Never exceed the maximum permitted

loads; see chapter "Technical Data".

VERSION WITH

METHANE SYSTEM

(Natural Power)

(for versions/markets, where provided)

42) 43) 44)

INTRODUCTION

The "Natural Power" version features

two fuel systems, one for petrol and

one for natural gas (methane).
The two systems are independent of

each other and the CNG system is of

the Phased Sequential Multipoint type.
The starting system is the petrol

system in common to all versions.

What is natural gas?

Natural gas is a mixture of gas used as

a primary energy source.
Its main component is methane and

for this reason it is usually known as

"methane" in Italy but it contains small

amounts of other hydrocarbons and

inert gases.
It is extracted in a gaseous state

and transported to where it is used

through gas pipelines; world reserves

are plentiful and widely distributed.

Methane is a fuel with a low impact on

the environment, since it significantly

reduces the contribution of exhaust

gases to the greenhouse effect and

pollution.

The Methane Multipoint

Injection System

It is an original product of Fiat research

in the field of alternative fuels, that

comes from close co-operation with

major suppliers in the methane sector.
By adapting the sophisticated

electronic control technology of petrol

engines to meet the specifications

of methane, it has been possible to

achieve important results in terms of

driveability, exhaust emissions and

consumption.
With the methane Multipoint injection

system, the engine features the same

driveability as a petrol fuelled system.
It should be borne in mind that,

under all driving conditions, methane

operation offers engine power

and torque specifications 10%

lower than with petrol operation.

Petrol operation is therefore

recommended if a lot of power is

required (e.g. driving uphill with a

laden car, steep hill starts).

Selecting the type of

fuel supply

The vehicle is configured to run

normally on methane.
When the methane is running out and

the pressure in the cylinder is close

to the correct operating limit, the

-------------------------------------------------------------------------------------------------------------------------------------------------------------

 KNOWING YOUR VEHICLE

56

system automatically switches to petrol

operation.
The engine always starts up on petrol,

with automatic switching to methane

when the best conditions are achieved

(engine water temperature, minimum

engine rpm limit) for switching to

methane.
Therefore, there must always be some

petrol in the tank (at least 1/4 full), in

order not to compromise the operation

of the fuel pump.

For this reason there must always

be petrol in the tank.

The petrol/methane switch fig. 109,

amongst the controls in the dashboard,

makes it possible to select petrol

operation. The system does not switch

automatically to methane operation if

the petrol runs out.

109

F0T0343

Passive safety

The vehicle has the same passive

safety specifications as other versions.

In particular, the cylinder location and

attachments are designed to pass the

impact tests in accordance with Fiat

safety standards. The flow of methane

from the cylinders is governed by a

solenoid valve that is open only during

methane operation.
The solenoid valve unit includes

protections against excess flows (if

the high pressure system breaks, the

flow of methane is restricted to values

that are not dangerous), overheating

(melting pad that allows the methane to

drain off if the temperature exceeds

110

°

C) and a pressure calibrated

device that intervenes if the pressure

goes above 300 bar ensuring the

methane escapes in a controlled

manner and as quickly as possible.
The solenoid valve is connected to

the Fire Protection System (fuel cut-off

system).

Active safety

The vehicle has the same active safety

specifications as other versions.

WARNING If gas is smelled, switch

from methane operation to petrol

operation and immediately go to a Fiat

Dealership to have the vehicle checked

and possible system faults excluded.

42)

The vehicle is equipped with a high-

pressure methane system designed to

operate at 200 rated bar. It is dangerous

to stretch the system with higher

pressures. To prevent damage to the

methane system parts when towing or

lifting the vehicle, follow the instructions

shown in the "Towing the vehicle" section.

If there is a problem with the methane

system, only contact a Fiat Dealership. Do

not modify configuration or components

of the methane system; they have been

designed exclusively for this vehicle. The

use of other components or materials

could cause malfunctions and prejudice

safety.

43)

When oven painting, the cylinders

must be removed from the vehicle and

refitted by a Fiat Dealership. Although the

methane system has numerous safety

features, it is advisable to close the

manual tap on the cylinders whenever the

vehicle is not in use for a long period,

transported on other vehicles or moved in

an emergency as a result of a breakdown

or accident.

44)

If gas is smelt, switch from methane

operation to petrol operation and

immediately go to a Fiat Dealerships to

have the vehicle checked and possible

system faults supply excluded.

-------------------------------------------------------------------------------------------------------------------------------------------------------------

57

SYSTEM FUNCTIONAL DIAGRAM

110

F0T0344

1. Methane cylinders 2. Methane filler 3. Methane pipes 4. Pressure regulator/reduction unit 5. Methane injector holder manifold

6. Petrol tank

-------------------------------------------------------------------------------------------------------------------------------------------------------------

 KNOWING YOUR VEHICLE

58

CYLINDERS

The vehicle has two cylinders (total

capacity about 77 litres) located under

the floor and protected by two special

guards.

The cylinders fig. 111 and fig. 112

are the tank that contains methane in

compressed gaseous state (200 rated

bar at 15

°

C).

The methane, stored in the canisters

at high pressure, flows through a

dedicated pipe to reach the pressure

regulator/reduction unit which supplies

the 4 methane injectors at low pressure

(about 6 bar).

111

F0T0345

112

F0T0356

Cylinder certification

The methane cylinders are certified in

accordance with ECE Regulation no.

110.

The cylinders must be inspected, in

accordance with ECE Regulation

Procedure no. 110, every 4 years

from the vehicle registration date

or in accordance with specific

regulations in individual countries.

The other plates provided by the

Dealership with the vehicle documents

show the date when the first cylinder

inspection/test is due.

Methane refuelling stations are not

authorised to refill the cylinders

when the inspection date has

expired.
IMPORTANT If the vehicle has

been registered in a country other

than Italy, the certification and

identification data and the control

/ inspection procedures for the

methane cylinders comply with the

legislation in that country. In any

case, it should be remembered that

the life of the cylinders is 20 years

from the production date as set out

in ECE Regulation no. 110.

SOLENOID VALVES /

SAFETY DEVICES

The solenoid valves fig. 113 and

fig. 113 are screwed directly onto the

methane cylinders: their main function

is to interrupt the flow of methane to

the supply circuit.

113

F0T0347

114

F0T0348

-------------------------------------------------------------------------------------------------------------------------------------------------------------


Content      ..     1      2      3      4      ..