Dodge Nitro. Manual - part 414


  Index      Dodge     Dodge Nitro - service repair manual 2007 year


Search            


Content   ..  412  413  414  415   ..


Dodge Nitro. Manual - part 414


MOLDING - FRONT WHEEL OPENING FLARE

REMOVAL 

MOLDING - FRONT WHEEL OPENING FLARE 

Fig. 249: Removing/Installing Rivets Connecting Fender Flare To Wheel House Liner 
Courtesy of CHRYSLER LLC 

1. Remove four rivets connecting the fender flare to the wheel house liner. 

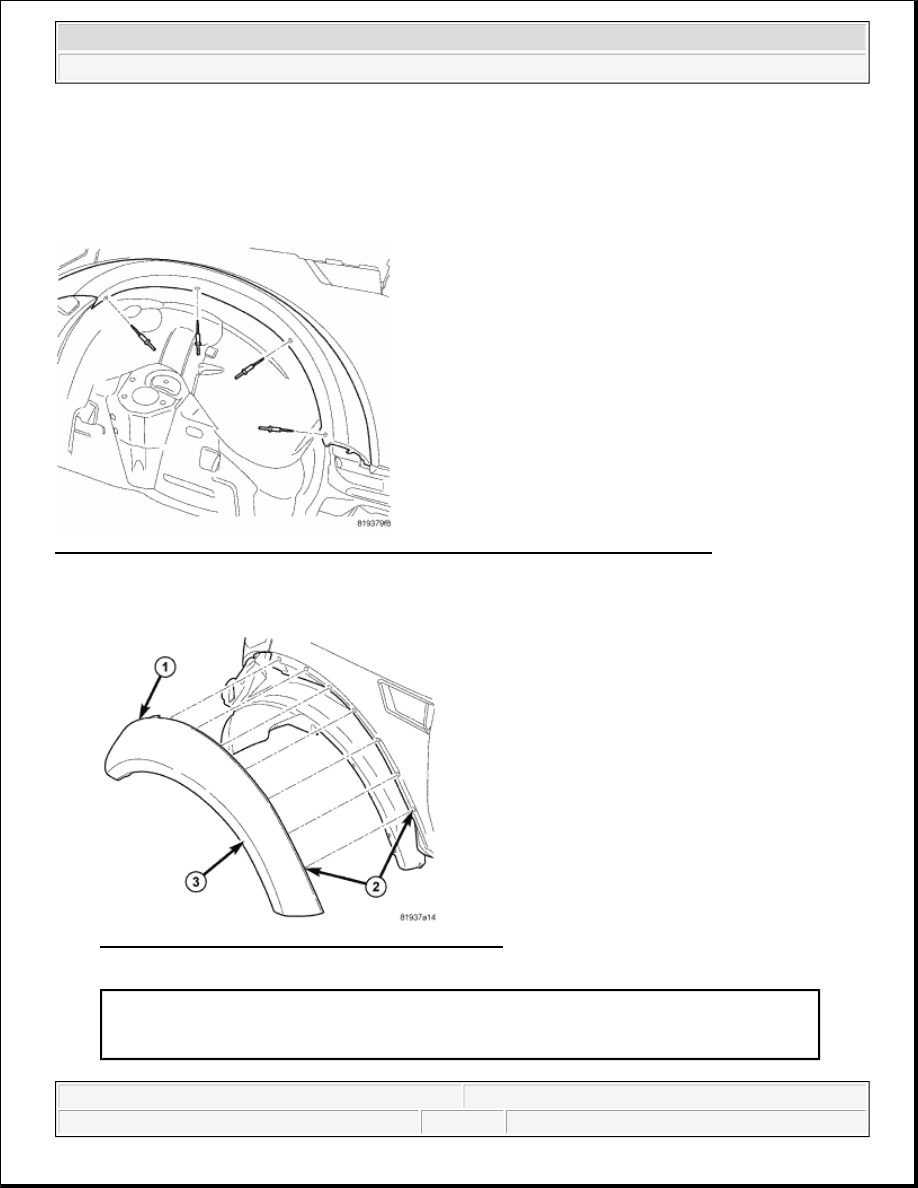
Fig. 250: Removing/Installing Fender Flare Molding 
Courtesy of CHRYSLER LLC 

1 - Front Flare Clip
2 - Rear Flare Clip
3 - Front Flare Molding


2007 Dodge Nitro R/T 

2007 ACCESSORIES AND EQUIPMENT Body - Nitro


2. Using a trim stick C-4755 or equivalent, separate the front flare clips from the front of the molding (1), 

and rear flare clips from the rear of the molding (2).  

3. Remove the fender flare molding (3) from the fender.  

INSTALLATION 

MOLDING - FRONT WHEEL OPENING FLARE 

Fig. 251: Removing/Installing Fender Flare Molding 
Courtesy of CHRYSLER LLC 

1. Position and install the front of the molding (1) and the rear of the molding (2) to the fender.  

2. Align the front fender molding (3) to the fender assembly and apply enough hand pressure in order to 

make sure the clips are fully seated. 

1 - Front Flare Clip
2 - Rear Flare Clip
3 - Front Flare Molding


2007 Dodge Nitro R/T 

2007 ACCESSORIES AND EQUIPMENT Body - Nitro


Fig. 252: Removing/Installing Rivets Connecting Fender Flare To Wheel House Liner 
Courtesy of CHRYSLER LLC 

3. Install four rivets connecting the front fender flare molding to the wheel house liner.  

MOLDING - REAR WHEEL OPENING FLARE 

REMOVAL 

MOLDING - REAR WHEEL OPENING FLARE 

Fig. 253: Rear Wheel Flare Molding - Front 
Courtesy of CHRYSLER LLC 

1 - Door
2 - Rivets
3 - Front Flare Molding


2007 Dodge Nitro R/T 

2007 ACCESSORIES AND EQUIPMENT Body - Nitro


1. Raise and support the vehicle.  

2. Open the rear door and remove the rivets (2) from the inside surface of the door (1).  

3. Using a trim stick C-4755 or equivalent, separate the clips attaching the molding (3) to the door (1) and 

remove the molding. 

Fig. 254: Rear Wheel Flare Molding - Rear 
Courtesy of CHRYSLER LLC 

4. Remove the tire and wheel in order to gain access to the rear wheel flare molding.  

5. Remove the rivets (4) attaching the rear flare molding (3) to the body (1) and rear fascia (2).  

6. Using a trim stick C-4755 or equivalent, separate the clips attaching the molding (3) to the body (1) and 

the rear fascia (2) and remove the molding.  

INSTALLATION 

MOLDING - REAR WHEEL OPENING FLARE 

1 - Body
2 - Rear Fascia
3 - Rear Flare Molding
4 - Rivets


2007 Dodge Nitro R/T 

2007 ACCESSORIES AND EQUIPMENT Body - Nitro


Content   ..  412  413  414  415   ..