Dodge Dakota (ND). Manual - part 877


  Index      Dodge     Dodge Dakota (ND) 2005 - service repair manual 2005 year


Search            


Content   ..  875  876  877  878   ..


Dodge Dakota (ND). Manual - part 877


1. Perform fuel pressure release procedure. Refer to

Fuel Pressure Release Procedure.

2. Disconnect negative battery cable from battery.

3. Clean fitting of any foreign material before disas-

sembly.

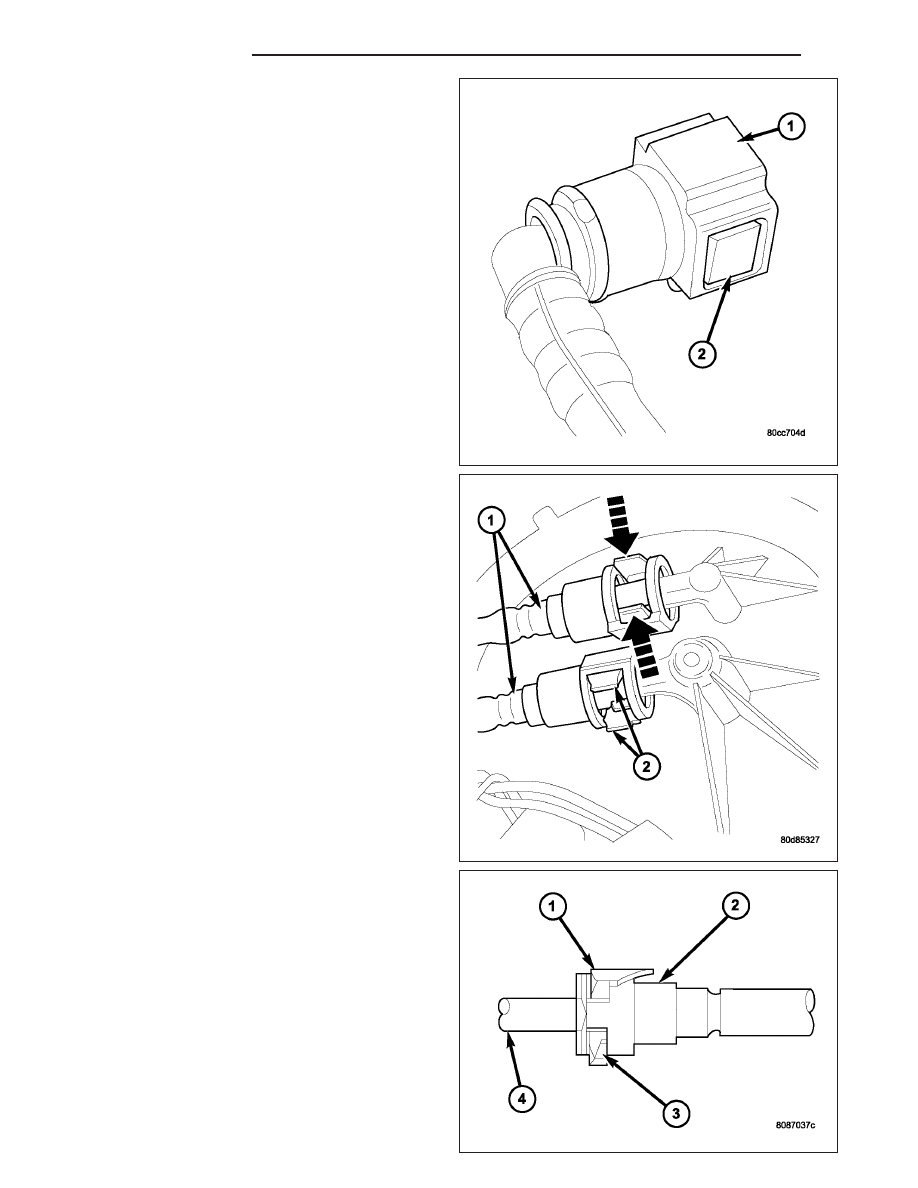
4. 2–Button Type Fitting: This type of fitting (1) is

equipped with a push-button located on each side
of quick-connect fitting (2). Press on both buttons
simultaneously for removal. Special tools are not
required for disconnection.

5. Pinch-Type Fitting: This fitting (1) is equipped with

two finger tabs (2). Pinch both tabs together while
removing fitting. Special tools are not required for
disconnection.

6. Single-Tab Type Fitting: This type of fitting (3) is

equipped with a single pull tab (1). The tab is
removable. After tab is removed, quick-connect fit-
ting can be separated from fuel system component.
Special tools are not required for disconnection.

14 - 6

FUEL DELIVERY

ND

7. Press release tab on side of fitting to release pull

tab (1). If release tab is not pressed prior to
releasing pull tab, pull tab will be damaged.

8. While pressing release tab on side of fitting, use

screwdriver (2) to pry up pull tab.

9. Raise pull tab until it separates from quick-connect

fitting.

10. Two-Tab Type Fitting: This type of fitting (2) is

equipped with tabs located on both sides of fitting
(1). The tabs are supplied for disconnecting quick-
connect fitting from component being serviced.

a. To disconnect quick-connect fitting, squeeze

plastic retainer tabs (1) against sides of quick-
connect fitting with your fingers. Tool use is not
required for removal and may damage plastic
retainer.

b. Pull fitting from fuel system component being

serviced.

c. The plastic retainer will remain on component

being serviced after fitting is disconnected. The
o-rings and spacer will remain in quick-connect
fitting connector body.

11. Plastic Retainer Ring Type Fitting: This type of

fitting can be identified by the use of a full-round
plastic retainer ring (4) usually black in color.

a. To release fuel system component from quick-

connect fitting, firmly push fitting towards com-
ponent being serviced while firmly pushing
plastic retainer ring into fitting (6). With plastic
ring depressed, pull fitting from component.
The plastic retainer ring must be pressed
squarely into fitting body. If this retainer is
cocked during removal, it may be difficult
to disconnect fitting. Use an open-end
wrench on shoulder of plastic retainer ring
to aid in disconnection.

b. After disconnection, plastic retainer ring will

remain with quick-connect fitting connector
body.

c. Inspect fitting connector body, plastic retainer

ring and fuel system component for damage. Replace as necessary.

ND

FUEL DELIVERY

14 - 7

12. Latch Clips — Type 1: Depending on vehicle

model and engine, 2 different types of safety latch
clips are used. Type-1 (4) is tethered to fuel line
and type-2 is not. A special tool will be necessary
to disconnect fuel line after latch clip is removed.
The latch clip may be used on certain fuel line/
fuel rail connection, or to join fuel lines together.

13. Pry up on latch clip with a screwdriver (3).

14. Slide latch clip toward fuel rail while lifting with

screwdriver.

15. Insert special fuel line removal tool (Snap-On

number FIH 9055-1 or equivalent) into fuel line
(1). Use tool to release locking fingers in end of
line.

16. With special tool still inserted, pull fuel line from

fuel rail.

17. After disconnection, locking fingers will remain

within quick-connect fitting at end of fuel line.

18. Disconnect quick-connect fitting from fuel system

component being serviced.

19. Latch Clips — Type 2: Depending on vehicle

model and engine, 2 different types of safety latch
clips are used. Type-1 is tethered to fuel line and
type-2 is not. A special tool will be necessary to
disconnect fuel line after latch clip is removed.
The latch clip may be used on certain fuel line/
fuel rail connection, or to join fuel lines together.

20. Type 2: Separate and unlatch 2 small arms (1) on

end of clip and swing away from fuel line.

21. Slide latch clip toward fuel rail while lifting with

screwdriver.

14 - 8

FUEL DELIVERY

ND

22. Insert special fuel line removal tool (Snap-On

number FIH 9055-1 or equivalent) into fuel line
(1). Use tool to release locking fingers in end of
line.

23. With special tool still inserted, pull fuel line from

fuel rail.

24. After disconnection, locking fingers will remain

within quick-connect fitting at end of fuel line.

25. Disconnect quick-connect fitting from fuel system

component being serviced.

CONNECTING

1. Inspect quick-connect fitting body and fuel system component for damage. Replace as necessary.

2. Prior to connecting quick-connect fitting to component being serviced, check condition of fitting and component.

Clean parts with a lint-free cloth. Lubricate with clean engine oil.

3. Insert quick-connect fitting into fuel tube or fuel system component until built-on stop on fuel tube or component

rests against back of fitting.

4. Continue pushing until a click is felt.

5. Single-tab type fitting: Push new tab down until it locks into place in quick-connect fitting.

6. Verify a locked condition by firmly pulling on fuel tube and fitting (15-30 lbs.).

7. Latch Clip Equipped: Install latch clip (snaps into position). If latch clip will not fit, this indicates fuel line is

not properly installed to fuel rail (or other fuel line). Recheck fuel line connection.

8. Connect negative cable to battery.

9. Start engine and check for leaks.

PUMP-FUEL

DESCRIPTION

Refer to Fuel Pump Module for information.

ND

FUEL DELIVERY

14 - 9


Content   ..  875  876  877  878   ..