DAF LF45, LF55 Series. Manual - part 596
 

  Index      DAF     DAF LF45, LF55 Series - service repair manual


Search            


Content   ..  594  595  596  597   ..


DAF LF45, LF55 Series. Manual - part 596


8

LF45/55 series

Removal and installation

SINGLE REAR AXLE 10.20

4-1

4. REMOVAL AND INSTALLATION

4.1 REMOVAL AND INSTALLATION, STUB AXLES

Removing stub axles
1.

Jack up the rear axle and support it on
stands.

2.

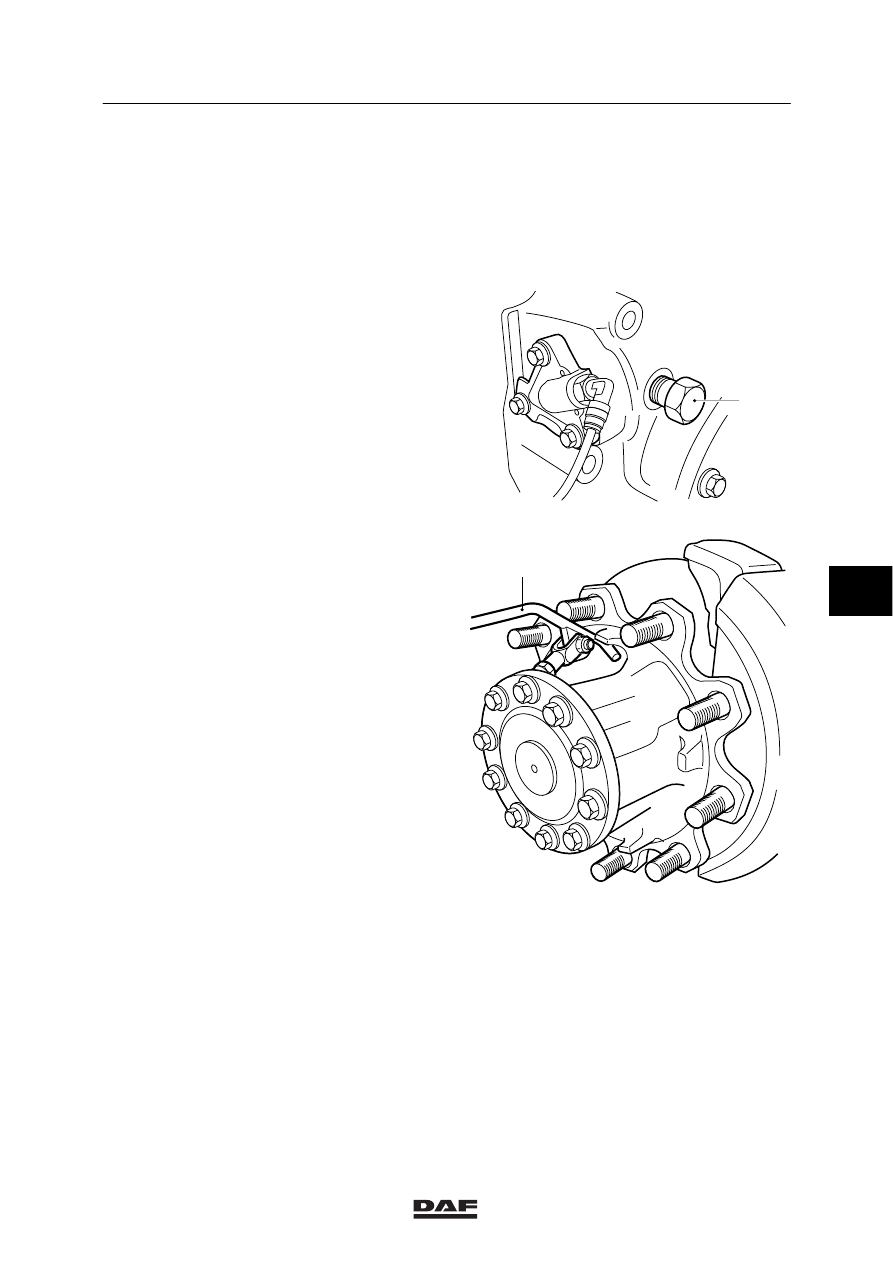
Engage the differential lock. Check that the
axle is blocked. Replace the switch by the
special tool (DAF No. 1329447), see (A).
This is to prevent the selector sleeve from
falling into the differential when removing
the stub axle.

A8 00 396

A

3.

Remove the stub axle attachment bolts.

4.

Remove the stub axle using special tool
(DAF No. 0694980), if required, see (B), or
with a copper punch.
When the stub axle comes loose, a small
amount of oil may leak out. Collect this oil.

Installing stub axles
1.

Clean the mating surfaces of the stub axle
flange and wheel hub.

2.

Apply the specified sealant to the mating
surface of the stub axle flange. See main
group “Technical data”.

3.

Fit the stub axle. Tighten the stub axle
attachment bolts to the specified tightening
torque. See main group “Technical data”.

4.

Engage the differential lock and remove the
special tool from the differential lock. Install
the switch.

B

A8 00 382

6

ᓻ 200313

8

SINGLE REAR AXLE 10.20

Removal and installation

LF45/55 series

4-2

4.2 REMOVAL AND INSTALLATION, WHEEL HUB

Removing wheel hub
1.

Jack up the rear axle and support it on
stands.

2.

Remove the wheels.

3.

Remove the brake caliper.

4.

Remove the stub axle.

5.

Remove the hub nut (1) using special tool
(A) (DAF No. 0535266) and a torque
amplifier (B).

6.

Remove the thrust washer (2).

3

2

1

A8 00 376

B

A

A8 00 355

6

ᓻ 200313

8

LF45/55 series

Removal and installation

SINGLE REAR AXLE 10.20

4-3

7.

Install the guide sleeve (A), special tool
(DAF No. 1329490), on the axle journal.

8.

Attach the wheel hub securely to a movable
lifting device.

9.

Slide the wheel hub from the axle journal
using the lifting device.
Take care that the wheel hub does not rest
on the guide sleeve (A) as the latter is not
strong enough to take the weight of the
wheel hub.

Installing wheel hub
1.

Check the wheel-speed sensor ring and the
oil seals in the wheel hub for damage.

2.

Check the axle journal screw thread
carefully for damage.

You must never fit a wheel hub on
an axle journal with damaged screw
thread.

A

A8 00 389

3.

Apply a thin and even layer of the specified
anti-corrosion agent to the axle journal. See
main group “Technical data”.

Note:
Do not apply too much anti-corrosion agent
to the axle journal. When installing the
wheel hub, the excess anti-corrosion agent
will collect at the backside of the wheel hub.
When the vehicle is used in daily operation,
this anti-corrosion agent can leak out so
that it looks as if the oil seal leaks.

A8 00 390

4.

Install the guide sleeve (A), special tool
(DAF No. 1329490), on the axle journal.

5.

Attach the wheel hub securely to a movable
lifting device.

6.

Position the wheel hub exactly in front of
the axle journal using the movable lifting
device. Slide the wheel hub onto the axle
journal.
Take care that the wheel hub does not rest
on the guide sleeve (A) as the latter is not
strong enough to take the weight of the
wheel hub.

A8 00 397

A

6

ᓻ 200313

8

SINGLE REAR AXLE 10.20

Removal and installation

LF45/55 series

4-4

7.

Fit the thrust washer (2).

8.

Replace the hub nut (1). Apply a few drops
of oil to the abutting surface of the hub nut.
Fit the hub nut.

3

2

1

A8 00 376

9.

Tighten the hub nut in the specified manner.
See main group “Technical data”. Use
special tool (A) (DAF No. 0535266) and a
torque amplifier (B) to do so.

B

A

A8 00 355

10. Press the wheel-speed sensor (1) against

the sensor ring (2).
When the vehicle is being driven, the air
gap between the sensor and the sensor ring
is adjusted automatically.
If the sensor is stuck, remove, clean and
refit it.

Never tap the sensor with a
hammer. This may damage both the
sensor and the sensor ring.

A8 00 379

1

2

6

ᓻ 200313


Content   ..  594  595  596  597   ..