DAF LF45, LF55 Series. Manual - part 140


  Index      DAF     DAF LF45, LF55 Series - service repair manual


Search            


Content   ..  138  139  140  141   ..


DAF LF45, LF55 Series. Manual - part 140


1

LF45/55 series

Removal and installation

SEATS

4-13

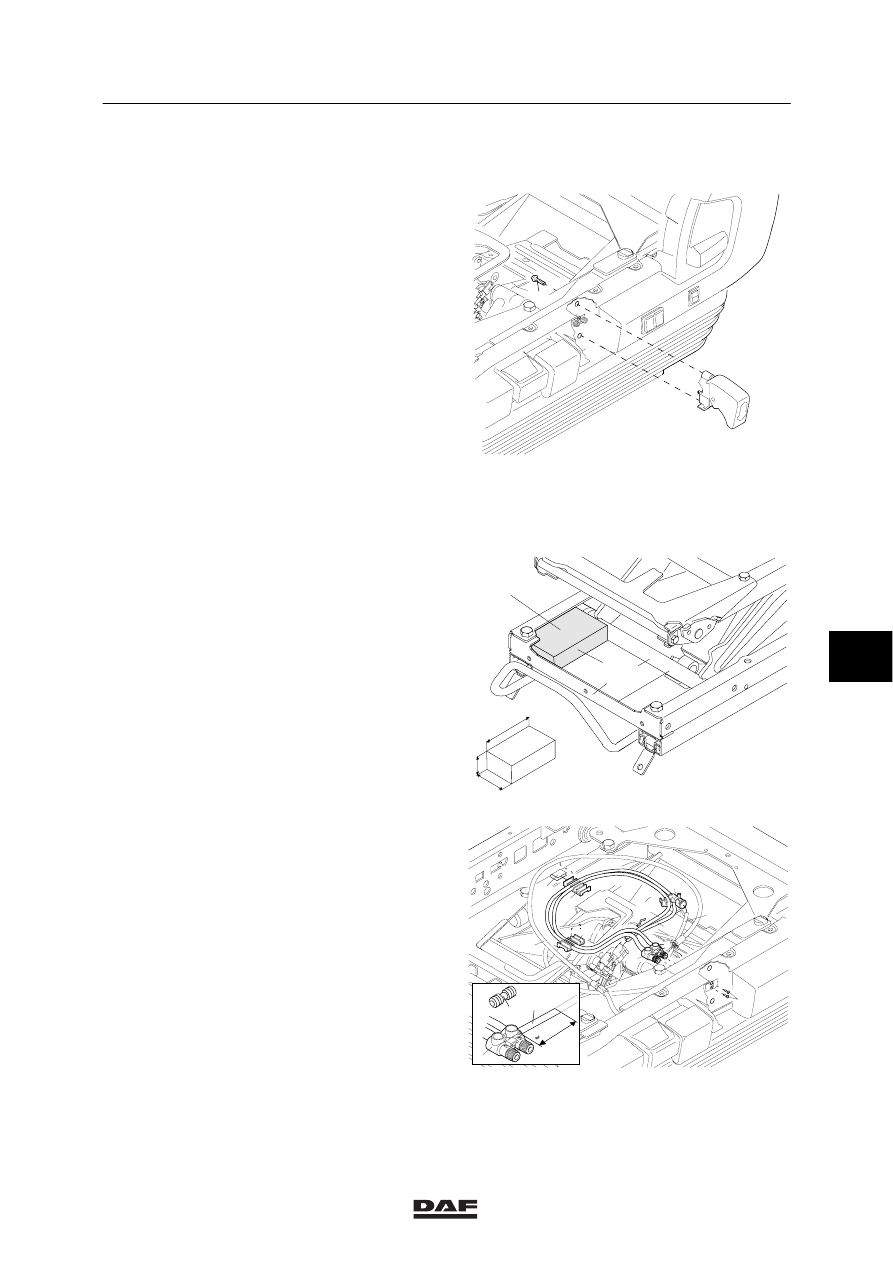
4.16 REMOVAL AND INSTALLATION, RAPID-LOWERING HANDLE

Removing rapid-lowering handle
1.

Remove the seat squab.

2.

Remove the attachment bolts (1) of the
rapid-lowering handle.

3.

Remove the rapid-lowering handle from the
seat frame.

Installing rapid-lowering handle
1.

Fit the rapid-lowering handle to the seat
frame using the attachment screws.

2.

Fit the seat squab.

1

K1 01 390

4.17 REMOVAL AND INSTALLATION, MANIFOLD

Removing manifold
1.

Remove the seat squab.

2.

Lock the seat in its highest position using a
spacer block. The spacer block serves to
prevent the frame from lowering when work
is carried out on the air pipes. Since you
can easily make it yourself, it cannot be
ordered from DAF. The block is sized
65x40x25 mm (LxWxH).

3.

Remove rapid-lowering handle.

A

40

25

65

2

3

1

A

K1 01 402

4.

Remove the attachment bolts (1) of the
manifold (2).

5.

Disconnect the manifold (2) from the seat
frame.

6.

When replacing the manifold, cut loose the
transparent air supply pipe, approximately 3
cm from the manifold (3).

7.

Remove the pipe guide (7) from the
attachment clamp (10). Remove the control
cable (5) from the pipe guide.

8.

Disconnect the pipe guide (6).

30 mm

1

2

2

3

4

5

6

7

10

8

12

13

11

K1 01 391

7

ǹ 0210

1

SEATS

Removal and installation

LF45/55 series

4-14

9.

Disconnect the air pipes (11) (red) and (12)
(yellow) from the quick-release coupling to
the height control valve.

10. Disconnect the air pipe (11) of the air

bellows from the quick-release coupling (8).

11. Remove the complete manifold (2) with

pipes from the seat frame.

Installing manifold
1.

Repair the air supply pipe to the new
manifold (2) using the repair kit (4) supplied.

2.

Fit the manifold (2) on the seat frame.

3.

Fit the control cable (5) in the pipe guide
(7). Fit the pipe guide (7) in the attachment
clamp (10).

4.

Fit the pipe guide (6).

5.

Lay the pipes back into the original position
(before removal) in the pipe clips (6 and 7).

6.

Connect the air pipe (11) of the air bellows
to the quick-release coupling (8).

7.

Connect the air pipes (11) (red) and (12)
(yellow) to the height control valve.

8.

Fit the rapid-lowering handle.

9.

Remove the seat lock.

10. Check the pipes and system for air

tightness and proper operation.

11. Fit the seat squab.

7

ǹ 0210

1

LF45/55 series

Removal and installation

SEATS

4-15

4.18 REMOVAL AND INSTALLATION, HEIGHT CONTROL VALVE

Removing height control valve
1.

Remove the seat back.

2.

Remove the air pipes (1) on the coupling
piece of the height control valve. Note the
position of the pipes.

3.

Remove the attachment bolt (5) on the
bracket (6). Remove the bracket.

4.

Loosen nut (2) of the connection piece (3).
Remove the control cable from the bracket.

5.

Unhook the cable eye (4) from the lever.

6.

Remove the reset spring (8) of the height
control valve.

7.

Snap the height control valve off the cross
bar in the seat frame.

Installing height control valve
1.

Snap the height control valve onto the cross
bar of the seat frame.

2.

Fit the reset spring (8).

3.

Install the bracket (6).

4.

Hook the control cable (4) into the bracket.
Fit the connection piece (3) with nut (2).

5.

Fit the air pipes (1) in the quick-release
coupling. Remember the sequence.

6.

Check the pipes and system for air
tightness and proper operation.

7.

Fit the seat squab.

1

2

3

4

8

5

6

K1 01 392

7

ǹ 0210

1

SEATS

Removal and installation

LF45/55 series

4-16

4.19 REMOVAL AND INSTALLATION, VERTICAL DAMPING ADJUSTER

Removing vertical damping adjuster
1.

Remove the seat squab.

2.

Remove the attachment bolts (2) of the
vertical damping lever (1).

3.

Disconnect the vertical damping lever (1)
from the seat frame.

4.

Press the attachment pin (3) of the control
cable (4) from the vertical damping
lever (1).

5.

Disconnect the control cable (4) from the
vertical damping lever (1).

6.

Disconnect the circlip (5) of the control
cable on the fixing bracket near the shock
absorber (6).

7.

Unhook the control cable from the control
lever of the shock absorber (6).

Installing vertical damping adjuster
1.

Hook the control cable into the control lever
of the shock absorber (6).

2.

Fasten the control cable in the fixing
bracket near the shock absorber (6).

3.

Secure the control cable on the fixing
bracket using circlip (5).

4.

Fit the control cable in the opening in the
seat frame.

5.

Fit the control cable (4) in the operating
lever (1) using the attachment pin (3).

6.

Fit the vertical damping lever (1) on the
seat frame using the attachment bolts (2).

7.

Loosen the lock nut of the control cable
adjuster (7). Using the nut, adjust the cable
until the movement of the control lever (8)
on the shock absorber (6) covers the entire
range (A).

8.

Fit the seat squab.

9.

Check the system for proper operation.

2

1

3

4

5

6

7

A

8

K1 01 393

7

ǹ 0210


Content   ..  138  139  140  141   ..