DAF 95XF. Manual - part 772


  Index      DAF     DAF 95XF Series - service repair manual


Search            


Content   ..  770  771  772  773   ..


DAF 95XF. Manual - part 772


9

STABILISERS AND TORQUE RODS

General

1-4

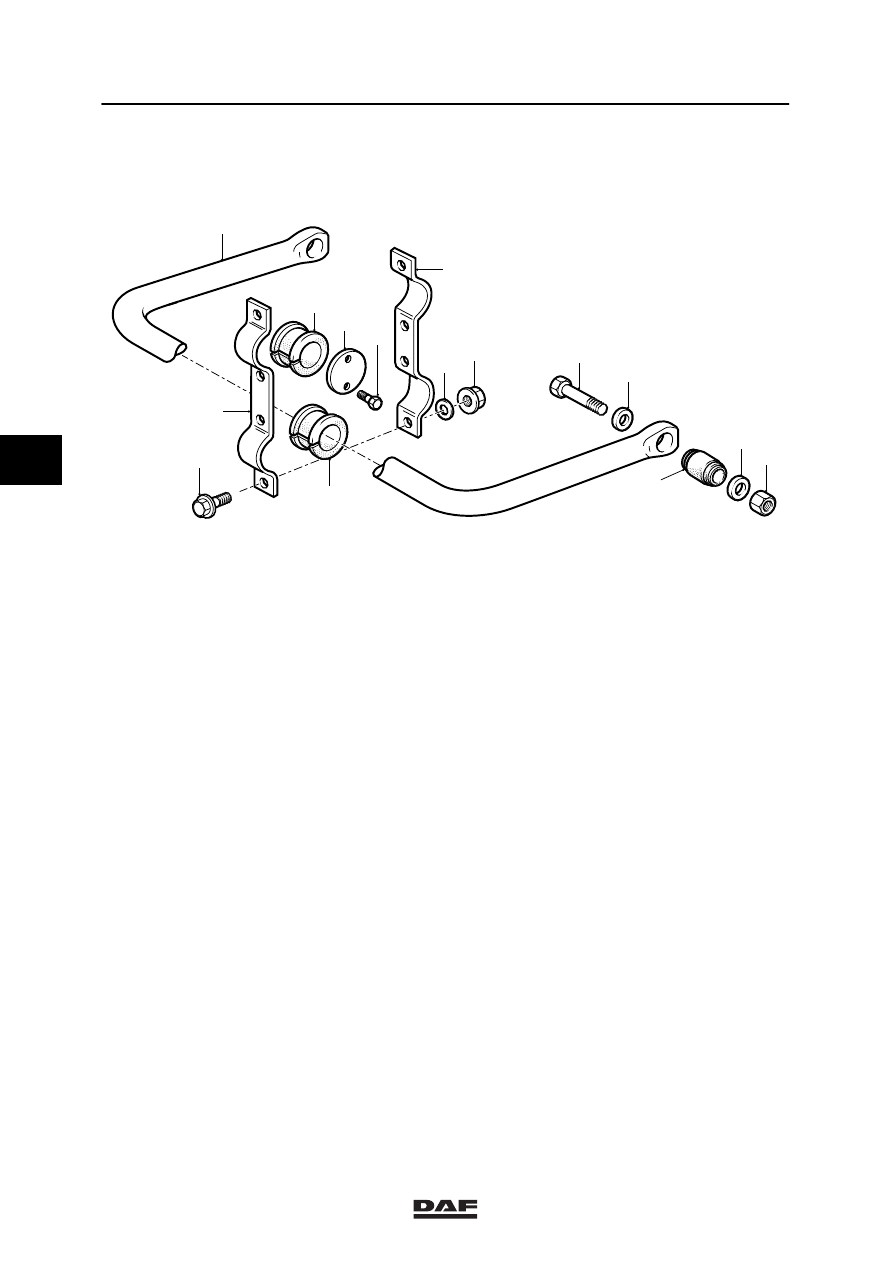
1.4 OVERVIEW DRAWING, SECOND-STEERED AXLE STABILISER

10

1

8

3

7

2

9

4

5

6

11

12

14

15

C9 00 157

13

1.

Stabiliser

2.

Bracket

3.

Bolt

4.

Bearing bush

5.

Locking plate

6.

Bolt

7.

Bearing bush

8.

Bracket

9.

Ring

10. Nut
11.

Bolt

12. Ring
13. Silentbloc
14. Ring
15. Nut

4

ǹ 9701

9

Removal and installation

STABILISERS AND TORQUE RODS

2-1

2. REMOVAL AND INSTALLATION

2.1 REMOVAL AND INSTALLATION, FRONT-AXLE STABILISER

C9 00 167

2

6

1

8

7

9

3

5

4

11

12

13

10

14

Removal of the front-axle stabiliser
1.

Remove the brackets (13).

2.

Remove the bolts (7).

3.

Remove the stabiliser (6) from under the
vehicle.

4.

Remove the silentblocs (12) from the
stabiliser (6).

5.

Remove the bolts (1) and the shackles (2).

Installation of the front-axle stabiliser
1.

Check the condition of the silentblocs (3, 8
and 12).

2.

Fit the shackles (2).

3.

Turn the silentbloc (12) so that the edges
come to rest in the support (11) and the
bracket (13).

4.

Install the brackets (13).

5.

Install the stabiliser (6) in the shackles (2).

6.

Fit the bolts (7) with the heads facing
towards the chassis.

4

ǹ 9701

9

STABILISERS AND TORQUE RODS

Removal and installation

2-2

2.2 REMOVAL AND INSTALLATION, LEAF-SPRUNG REAR-AXLE STABILISER

C9 00 158

11

1

3

4

6

7

9

8

13

14

16

12

17

10

2

5

15

Removal of the leaf-sprung rear-axle
stabiliser
1.

Remove the brackets (5 and 11)

2.

Remove the bolts (12).

3.

Remove the stabiliser (10) from under the
vehicle.

4.

Remove the bearing bushes (9) from the
stabiliser (10).

5.

Remove the lock ring (7) with the retainer
ring (6) and remove the bearing bush (4)
from the axle (3).

Installation of the leaf-sprung rear-axle
stabiliser
1.

Check the condition of the silentbloc (15)
and the bearing bushes (4 and 9).

2.

Fit bearing bush (4), using a new lock
ring (7).

3.

Fit the bearing bushes (9) to the
stabiliser (10).

4.

Turn the bearing bushes (4 and 9) such that
the opening is located at the side.

5.

Fit the brackets (5 and 11)

6.

Fit the bolts (12) with the heads facing
towards the chassis.

4

ǹ 9701

9

Removal and installation

STABILISERS AND TORQUE RODS

2-3

2.3 REMOVAL AND INSTALLATION, AIR-SPRUNG REAR-AXLE STABILISER

C9 00 156

13

2

3

1

4 5

6

7

8

9

10

11

16

14

15

17

12

Removal of the air-sprung rear-axle
stabiliser
1.

Remove the bearing-bush covers (15).

2.

Remove the bolts (8).

3.

Remove the stabiliser (13) from under the
vehicle.

4.

Remove the bearing bushes (14) from the
stabiliser (13).

5.

Remove the bolts (2) and remove the
shackle (7) from the support (1).

Removal of the air-sprung rear-axle
stabiliser
1.

Check the condition of the bearing
bush (14) and the silentblocs (6 and 12).

2.

Fit the shackle (7).

3.

Turn the bearing bushes (14) such that the
opening is located at the side.

4.

Fit the bearing-bush covers (15).

5.

Fit the bolts (8) with the heads facing
towards the chassis.

4

ǹ 9701


Content   ..  770  771  772  773   ..