DAF 95XF. Manual - part 551


  Index      DAF     DAF 95XF Series - service repair manual


Search            


Content   ..  549  550  551  552   ..


DAF 95XF. Manual - part 551


EXPLANATORY NOTES ON THE MAINTENANCE ACTIVITIES

Removal and installation

4-20

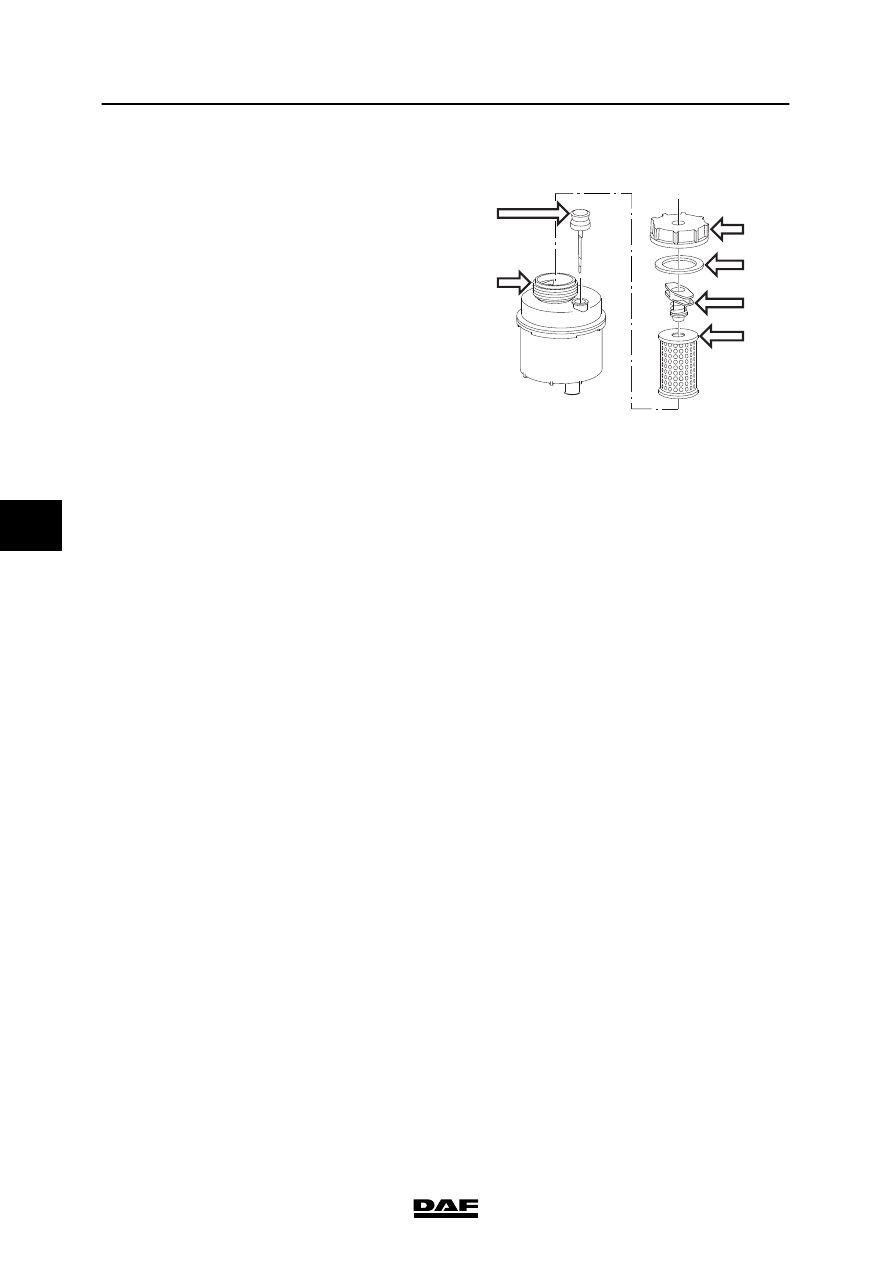
4.13 REMOVAL AND INSTALLATION, STEERING GEAR FILTER ELEMENT

1.

Clean the reservoir cover, so that absolutely
no dirt can get into the reservoir.

2.

Remove the cover (3), turn filter holder (5) a
quarter turn and remove the filter holder
containing the filter element (6) carefully
from the reservoir, so that no dirt from the
filter element can get into the reservoir.

3.

Remove the filter element from the filter
holder.

4.

Fit a new filter element on the holder and
install the filter holder containing the filter in
the reservoir. Make sure that the filter holder
engages in its locking element.

5.

Check the seal (4) on the cover (3) and fit
the cover.

6.

Check the fluid level using the dipstick (2),
see chapter “Inspection and adjustment”.

M7002

6

3
4

5

1

2

5

 200424

Removal and installation

EXPLANATORY NOTES ON THE MAINTENANCE ACTIVITIES

4-21

4.14 REMOVAL AND INSTALLATION, AIR DRYER FILTER ELEMENT

Removing the air dryer filter element
1.

Remove the compressor line (1); as a
result, the inside of the air dryer will become
pressureless.

2.

Remove the filter element by turning it
counter-clockwise using a strap wrench.

3.

Clean the air dryer internally.

4.

Check the air dryer threaded connection (2)
for damage and then lubricate it sparingly
with grease.

1

R600251

Installing the air dryer filter element

1.

Lubricate the sealing ring of the new filter
element sparingly with grease.

2.

Install the filter element by manually
tightening it until the sealing ring abuts.
Subsequently turn the air dryer filter
element one full turn by hand.

3.

Fit the compressor line (1).

4.

Pressurise the system and subsequently
check the air dryer for possible air leakage.

R600252

2

5

 200424

EXPLANATORY NOTES ON THE MAINTENANCE ACTIVITIES

Removal and installation

4-22

4.15 REMOVAL AND INSTALLATION, GEARBOX OIL FILTER

To prevent skin injury, avoid
unnecessary contact with the
drained oil.

Gearbox 16S-181/221 with integrated retarder

Removing the gearbox oil filter
1.

Remove the attachment bolt (1) of the oil
filter.

M3052

1

2.

Pull the filter cover with the filter from the
filter housing.

M3053

3.

Remove the filter (3) from the filter cover
(2). Do not clean the filter. The filter must
always be replaced.

Note:
If the magnetic disc is still attached to the
back of the filter, separate it from the filter
element and fit it to the new filter element.

M3054

2

3

5

 200424

Removal and installation

EXPLANATORY NOTES ON THE MAINTENANCE ACTIVITIES

4-23

Installing the gearbox oil filter
1.

Check the O-ring of the filter cover (2) for
any damage. Replace the O-ring if
necessary. Grease the O-ring.

2.

Grease the O-ring of the new filter (3) and
place the filter on the filter cover.
Then insert the filter and the filter cover into
the filter housing.

3.

Use a plastic mallet to tap the filter cover
into the filter housing.

4.

Tighten the attachment bolt (1) to the
specified tightening torque, see “Technical
data”.

M3052

1

5

 200424


Content   ..  549  550  551  552   ..