Chrysler Pacifica Hybrid (2022 year). Manual in english - page 11
170
STARTING AND OPERATING
NOTE:
If the vehicle speed remains below 8 mph
(13 km/h), the Rear View Camera image will be
displayed continuously until deactivated via the
touchscreen button X, the transmission is
shifted into PARK, or the ignition is placed in the
OFF position.
The touchscreen button X to disable display of
the camera image is made available ONLY when
the vehicle is not in REVERSE.
When enabled, active guidelines are overlaid on
the image to illustrate the width of the vehicle,
including the side view mirrors and its projected
back up path based on the steering wheel position.
Different colored zones indicate the distance to
the rear of the vehicle.
The following table shows the approximate
distances for each zone:
Modes Of Operation
Manual activation of the Surround View system is
selected by pressing the Surround View Camera
soft key located in the Controls screen within the
Uconnect system.
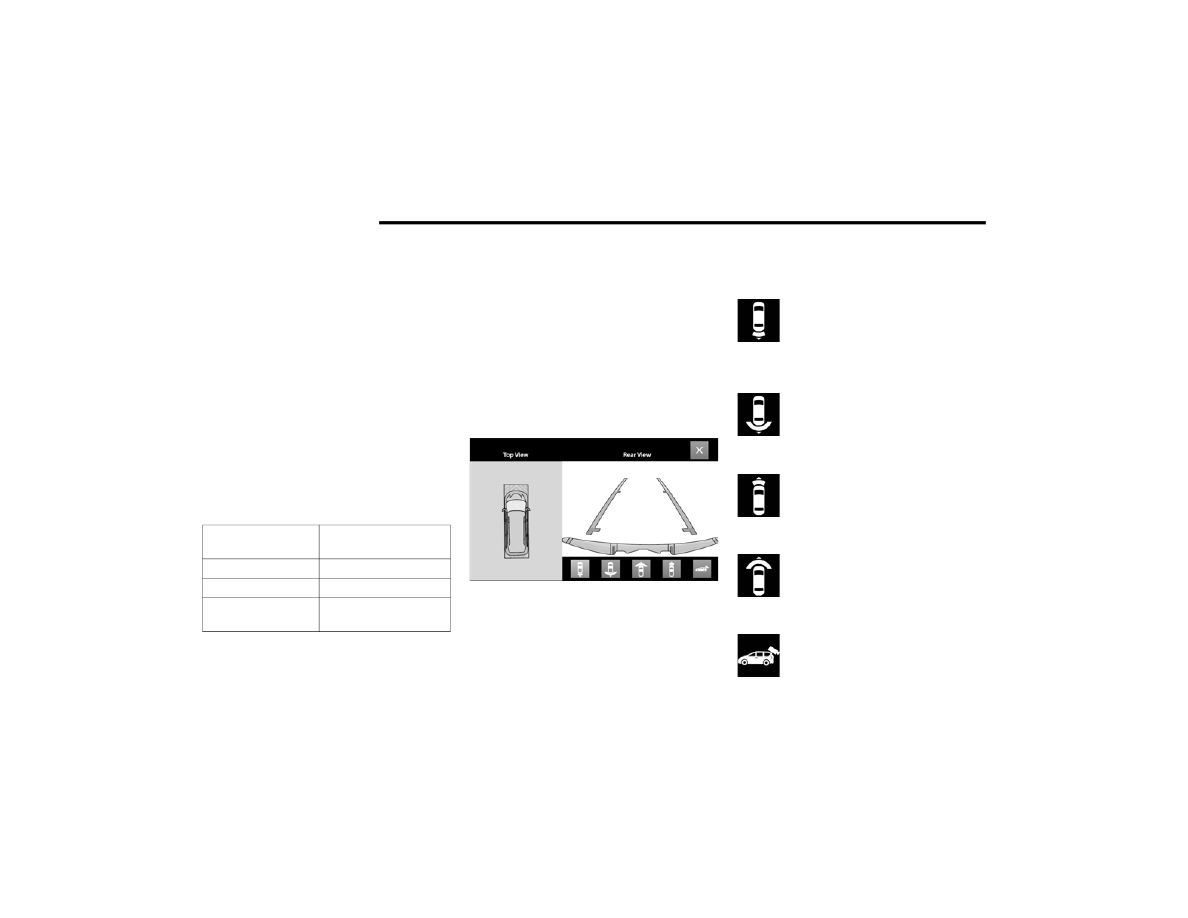
Top View
The Top View will show in the Uconnect system with
Rear View and Front View in a split screen display.
There is integrated ParkSense arcs in the image at
the front and rear of the vehicle. The arcs will
change color from yellow to red corresponding the
distance zones to the oncoming object.
Surround View Camera View
NOTE:
Front tires will be in image when the tires are
turned.
Due to wide angle cameras in the mirrors, the
image will appear distorted.
Top View will show which sliding doors are open.
Open front doors will remove outside image.
Rear View Plus Top View
This is the default view of the system in
REVERSE and is always paired with the
Top View of the vehicle with optional
active guidelines for the projected path
when enabled.
Rear Cross Path View
Pressing the Rear Cross Path soft key will
give the driver a wider angle view of the
Rear View. The Top View will be disabled
when this is selected.
Front View Plus Top View
The Front View will show you what is
immediately in front of the vehicle and is
always paired with the Top View of the
vehicle.
Front Cross Path View
Pressing the Front Cross Path soft key
will give the driver a wider angle view of
the Front View. The Top View will be
disabled when this is selected.
Back Up Camera View
Pressing the Back Up Camera soft key
will provide a full screen rear view with
Zoom View.
Zone
Distance To The Rear
Of The Vehicle
Red
0 - 1 ft (0 - 30 cm)
Yellow
1 ft - 6.5 ft (30 cm - 2 m)
Green
6.5 ft or greater
(2 m or greater)