RAM 2500 (2019 year). Manual - part 20


  Index      RAM     RAM 2500 (2019 year) - manual in english


Search            copyright infringement  


Content      ..     18      19      20      21     ..


RAM 2500 (2019 year). Manual - part 20


STARTING AND OPERATING

317

shift completion to occur. The preferred method is with the

vehicle rolling 2 to 3 mph (3 to 5 km/h). Avoid attempting

to engage or disengage 4L with the vehicle moving faster

than 2 to 3 mph (3 to 5 km/h).

• Do not attempt to shift into or out of 4L while the transmis-

sion is in gear.

Transfer Case Position Indicator Light

The “Transfer Case Position Indicator Light” in the instru-

ment cluster is used to alert the driver that the front axle is

fully engaged and all four wheels are driving.

AIR SUSPENSION SYSTEM (2500/3500 MODELS) — IF 
EQUIPPED

Description

This  air  suspension  system  is  a  rear  leveling  ride  height

system. The main purpose of this system is to maintain the

truck’s rear ride height level. There are two selectable heights

that can be chosen based on your operating conditions.
The system requires that the ignition be in ON/RUN posi-

tion or  the engine  running with  zero vehicle speed for all

user requested changes and load leveling.

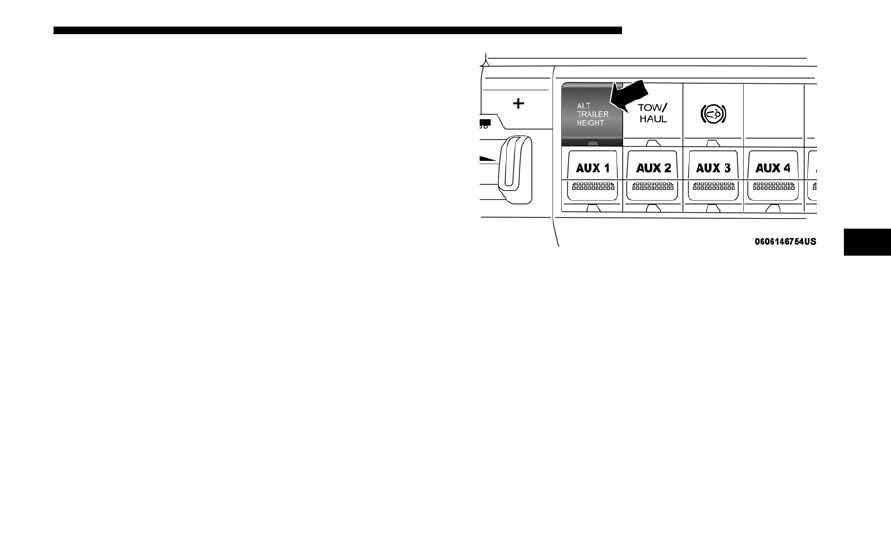
Rear Leveling Ride Height Switch

Normal Ride Height (NRH) – This is the standard position

of the suspension and is meant for normal driving. It will

automatically  adjust  to  maintain  the  rear  ride  height  as

conditions change.
Alternate  Trailer  Height  (ATH)  –  Lowers  the  vehicle

approximately 1 in (25 mm) for a level truck, to be used as

required while trailer towing. It will automatically adjust to

maintain the rear ride height as conditions change.

5

-------------------------------------------------------------------------------------------------------------------------------------------------------------

318 STARTING AND OPERATING

Trailer Decoupling/Unloading - The air suspension system

will load level (lower/exhaust only) once after 12 minutes

after the vehicle is turned off. This allows for easy removal of

a trailer and/or  load from the  back of the  truck by main-

taining  the  ride  height.  After  12 minutes  you  will need  to

turn the ignition to the run position for the air suspension to

re-level due to addition/removal of load in the vehicle. If the

air suspension system is disabled using the settings menu

(Tire Jack Mode, Transport Mode, Alignment Mode, or Bed

Lowering Mode) the system will remain disabled when the

vehicle is turned off. Reactivating the air suspension can be

accomplished via the settings menu or driving the vehicle

above  5 mph  (8 km/h)  for  Tire  Jack  Mode  or  Alignment

Mode and 16 mph (26 km/h) for Transport Mode and Bed

Lowering Mode.
NOTE:
• Most  3500 models  will  not  lower  to  Alternate  Trailer

Height (ATH) when unloaded.

• Refer to “Trailer Towing” in “Starting And Operating” for

further information.

Ignition OFF Behavior
For a predetermined amount of time after the ignition is off the

air suspension may adjust to maintain a proper appearance.

Air Suspension Modes

The air suspension system has multiple modes to protect the

system in unique situations:
Tire/Jack Mode
To  assist  with  changing  a  tire,  the  air  suspension  system  has  a

feature  which allows the automatic  leveling  to be disabled. This

mode  is  intended  to  be  enabled  with  engine  running.  Refer  to

“Instrument Cluster Display” in “Getting To Know Your Instru-

ment Panel” or “Uconnect Settings” in “Multimedia” if equipped

with a touch screen radio for further information.
NOTE:

This mode is intended to be enabled with engine running.

WARNING!

The air suspension system uses a high pressure volume

of air to operate the system. To avoid personal injury or

damage  to  the  system,  see  your  authorized  dealer  for

service.

-------------------------------------------------------------------------------------------------------------------------------------------------------------

STARTING AND OPERATING

319

Transport Mode
For towing your vehicle with four wheels off the road, the air

suspension system has a feature which will put the vehicle

below Normal Ride Height (NRH) and disable the automatic

load leveling system. This mode is intended to be enabled

with engine running. Refer to “Instrument Cluster Display”

in “Getting To Know Your Instrument Panel” or “Uconnect

Settings”  in  “Understanding  Your  Instrument  Panel”  if

equipped with a touch screen radio for further information.
NOTE:

This mode is intended to be enabled with engine running.
Wheel Alignment Mode
Before  performing  a  wheel  alignment  this  mode  must  be

enabled. Refer to “Instrument Cluster Display” in “Getting

To Know Your Instrument Panel” or “Uconnect Settings” in

“Multimedia”  if  equipped  with  a  touch  screen  radio  for

further information.
NOTE:

This mode is intended to be enabled with engine running.

Bed Lowering Mode
For towing your vehicle with four wheels off the road, the air

suspension system has a feature which will put the vehicle

below Normal Ride Height (NRH) and disable the automatic

load leveling system. This mode is intended to be enabled

with engine running. Refer to “Instrument Cluster Display”

in “Getting To Know Your Instrument Panel” or “Uconnect

Settings”  in  “Understanding  Your  Instrument  Panel”  if

equipped with a touch screen radio for further information.
Protection Strategy
In order to “protect” the air suspension system, the vehicle

will  disable  load  leveling  as  required  (suspension  over-

loaded, battery charge low, etc.). Load leveling will automat-

ically resume as soon as system operation requirements are

met. See your authorized dealer if system does not resume.

5

-------------------------------------------------------------------------------------------------------------------------------------------------------------

320 STARTING AND OPERATING

Instrument Cluster Display Messages

When  the  appropriate  conditions  exist,  a  message  will

appear  in  the instrument  cluster display. Refer  to “Instru-

ment  Cluster  Display”  in  “Getting  To  Know  Your  Instru-

ment Panel” for further information.
An audible chime will be heard whenever a system error has

been detected.
See your authorized dealer for system service if normal oper-

ation does not resume.

Operation

Pushing  the  Alternate  Trailer  Height  (ATH)  button  once

while at Normal Ride Height (NRH), will lower the vehicle

to  Alternate  Trailer  Height  (ATH)  and  will  illuminate  the

LED.
NOTE:

The  LED  will  continuously  blink  until  vehicle  Alternate

Trailer Height (ATH) has been achieved and the LED will

turn on.
Pushing the Alternate Trailer Height (ATH) again will raise

the vehicle to Normal Ride Height (NRH).

NOTE:

The LED will continuously blink until Normal Ride Height

(NRH) has been achieved and the LED will turn off.
• Transport Mode – No indicator lamps will be illuminated.

Transport Mode is disabled by driving the vehicle, or dese-

lecting the mode via the interface.

• Tire/Jack Mode – No indicator lamps will be illuminated.

Tire/Jack Mode is disabled by driving the vehicle, or by

deselecting the mode via the interface.

• Wheel Alignment Mode – No indicator lamps will be illu-

minated. Wheel Alignment Mode is disabled by driving

the vehicle, or by deselecting the mode via the interface.

• Bed Lowering Mode – No indicator lamps will be illumi-

nated.  Bed  Lowering  Mode  is  disabled  by  driving  the

vehicle, or deselecting the mode via the interface.

AXLE LOCKER SYSTEM — POWER WAGON 
MODELS ONLY (IF EQUIPPED)

This  vehicle  is  equipped  with  electronically  locking  front

and  rear  differentials.  These  differentials,  when  engaged,

mechanically lock together the axle shafts forcing the wheels

to spin at an equal rate. This allows the vehicle to maintain

its  momentum  and  prevents  it  from  becoming  stuck.  The

locking front and rear differentials should only be engaged

-------------------------------------------------------------------------------------------------------------------------------------------------------------

STARTING AND OPERATING

321

(Continued)

during  low-speed,  extreme  off-road  situations  where  one

wheel is likely to not be in contact with the ground. It is not

recommended  to  drive  the  vehicle  with  the  differentials

locked on pavement due to the reduced ability to turn and

speed limitations.

Axle Lock Selector

The locking axles are controlled by the axle locker switch.
The switch has three positions:
• AXLE UNLOCK – the front and rear axles are unlocked
• REAR LOCK – the rear axle is locked
• FRONT/REAR LOCK – the front and rear axles are locked
Under normal driving conditions, the switch should be left

in the AXLE UNLOCK position.
NOTE:

Even when the axles are in the AXLE UNLOCK position, the

limited slip differential in the rear axle still provides torque

biasing capability for moderate low traction environments.
During the command to lock the axle, the indicator light will

flash until the axle is locked. After the lock command has

been successfully executed, the light will remain on solid.

CAUTION!

• Do  not  lock  the  front  or  rear  axle  on  hard  surfaced

roads. The  ability  to steer the  vehicle  is  reduced and

damage to the drivetrain may occur when the axles are

locked on hard surfaced roads.

• Do not try to lock the rear axle if the vehicle is stuck and

the  tires  are  spinning.  You  can  damage  drivetrain

components. Lock the rear axle before attempting situ-

ations  or  navigating  terrain,  which  could  possibly

cause the vehicle to become stuck.

CAUTION! (Continued)

5

-------------------------------------------------------------------------------------------------------------------------------------------------------------

322 STARTING AND OPERATING

To lock the rear axle, place the vehicle in 4LO. Refer to “Four

Wheel  Drive  Operation”  in  “Starting  And  Operating”  for

further  information.  Push  the  REAR  LOCK  button  while

traveling less than 3 mph (5 km/h). The RR indicator light

will remain on when the rear axle is locked.
NOTE:

Left  to  right  wheel  speed  difference  may  be  necessary  to

allow the axle to fully lock. If the indicator light is flashing

after  placing  the  switch  in  the  REAR  LOCK  or  FRONT/

REAR LOCK position, drive the vehicle in a turn or on loose

gravel to expedite the locking action.

To lock the front axle; push the FRONT/REAR LOCK button

while traveling less than 3 mph (5 km/h). The indicator light

will be solid when the front axle is locked.
NOTE:

The rear axle must be locked before the front axle will lock.

To unlock the front axle; push the REAR LOCK button. The

FRONT/REAR LOCK indicator light will go out when the

axle is unlocked.
NOTE:

The axle lockers could be torque locked due to side to side

loads on the axle. Driving slowly while turning the steering

wheel from a left hand turn to a right hand turn or driving in

REVERSE for a short distance may be required to release the

torque lock and unlock the axles.
To unlock the rear axle; push the AXLE UNLOCK button.

The REAR LOCK indicator light will go out when the rear

axle is unlocked.

STABILIZER/SWAY BAR SYSTEM — POWER WAGON 
ONLY  

Your  vehicle  is  equipped with  an electronic  disconnecting

stabilizer/sway  bar.  This  system  allows  greater  front

suspension travel in off-road situations.
Due to the use of taller springs, this vehicle has an increased

ride  height  of  approximately  1.9 in  (48.3 mm)  in  the  front

and  1.5 in  (38.1 mm)  in  the  rear.  A  major  advantage  to

increasing  ride  height  is  the  positive  effect  it  has  on

approach/departure and break over angles.

WARNING!

Do not use the locked axle position for normal driving. A

locked front axle  is intended for off-road  driving only.

Locking  the  front  axle  during  on-road  driving  will

reduce the steering ability. This could cause a collision

and you may be seriously injured.

-------------------------------------------------------------------------------------------------------------------------------------------------------------

STARTING AND OPERATING

323

This system is controlled by the electronic control sway bar

switch located below the instrument panel.

Sway Bar Disconnect Button

Push the SWAY BAR switch to activate the system. Push the

switch again to deactivate the system. The “Sway Bar Indi-

cator Light” (located in the instrument cluster) will illumi-

nate when the bar is disconnected. The “Sway Bar Indicator

Light” will flash during activation transition, or when activa-

tion conditions are not met. The stabilizer/sway bar should

remain in on-road mode during normal driving conditions.

To disconnect the stabilizer/sway bar, shift to either 4HI or

4LO and push the SWAY BAR button to obtain the Off-Road

position. Refer to “Four Wheel Drive Operation” in “Starting

And  Operating”  for  further  information.  The  “Sway  Bar

Indicator Light” will flash until the stabilizer/sway bar has

been fully disconnected.
NOTE:

The stabilizer/sway bar may be torque locked due to left and

right suspension height differences. This condition is due to

driving surface differences or vehicle loading. In order for

the Stabilizer/Sway Bar to disconnect/reconnect, the right

WARNING!

Do  not  disconnect the stabilizer  bar  and drive on  hard

surfaced roads or at speeds above 18 mph (29 km/h), you

may  lose  control  of  the  vehicle,  which  could  result  in

serious injury or death. The front stabilizer bar enhances

vehicle stability and assists in maintaining control of the

vehicle.  The  system  monitors  vehicle  speed  and  will

attempt  to  reconnect  the  stabilizer  bar  at  speeds  over

18 mph (29 km/h). This is indicated by a flashing off road

light  and  solid  on  road  light.  Once  vehicle  speed  is

reduced  below  14 mph  (22 km/h),  the  system  will

attempt to return to the Off-Road mode. 

5

-------------------------------------------------------------------------------------------------------------------------------------------------------------

324 STARTING AND OPERATING

and left halves of the bar must be aligned. This alignment

may require that the vehicle be driven onto level ground or

rocked from side to side.
To return to the On-Road mode; push the SWAY BAR button

again.

SAFE OFF-ROAD DRIVING — POWER WAGON ONLY 

Off-Road Driving Tips And Vehicle Characteristics  

Your vehicle has excellent on and off-road capabilities. These

off-road capabilities will allow you to explore those wilder-

ness trails where few travel, providing a source of exciting

and  satisfying  recreation.  Before  you  venture  out,  you

should contact your local governmental agency to determine

the  designated  off-road  vehicle  (ORV)  trails  or  recreation

areas. You should always tread lightly and only use estab-

lished roads, trails or ORV recreational areas.
The National Forest Service, Bureau of Land Management,

or  local  Department  of  Natural  Resources  are  a  wealth  of

information and usually have maps with marked trails.
Skid Plates And Underbody Protection

Steel skid plates protect the major driveline components of

the truck including the fuel tank, transfer case and steering

damper.  In  addition,  this  vehicle  is  equipped  with  boxed

cross members and fore/aft rails. This additional protection

allows the vehicle to be utilized in severe off-road situations

that would be considered impassable by a normal truck.
Ramp Travel Index (RTI) 

The ramp travel index is the distance, in inches, that you can

drive  your  vehicle  with  one  wheel  on  a  20-degree  ramp

without lifting any other wheel off the ground. This distance

up  the ramp  divided by  the  wheelbase of the  vehicle  and

multiplied by 1,000 is the RTI. This vehicle has an RTI of 510,

which means you can articulate one front wheel 26 inches (66

cm) in the air while the other three wheels remain in contact

with the ground.

WARNING!

If  the  stabilizer/sway  bar  will  not  return  to  On-Road

mode,  vehicle  stability  is  reduced.  Do  not  attempt  to

drive the vehicle over  18 mph (29 km/h). Driving faster

than 18 mph (29 km/h) may cause loss of control of the

vehicle,  which  could  result  in  serious  injury  or  death.

Contact your local service center for assistance. 

-------------------------------------------------------------------------------------------------------------------------------------------------------------

STARTING AND OPERATING

325

Water Fording Characteristics

Water fording characteristic is the vehicle's ability to cross a

body of still water, where the powertrain and drivetrain are

safe  from  water  ingestion.  This  vehicle  has  high  water

fording  characteristics  with  the  ability  to  cross  a  pool  of

water,  without  stopping,  24 inches  (60  cm)  deep  at  a

maximum speed of 10 mph (16 km/h) and a pool of water

30 inches (76 cm) deep at a maximum speed of 5 mph (8 km/

h), both with an entrance ramp angle of 1.3 degrees.

Simultaneous Brake And Throttle Operation

Many off-road driving conditions require the simultaneous

use  of  the  brake  and  throttle  (two  footed  driving).  When

climbing  rocks,  logs,  or  other  stepped  objects,  using  light

brake pressure with light throttle will keep the vehicle from

jerking or lurching. This technique is also used when you

need to stop and restart a vehicle on a steep incline.

The Basics Of Off-Road Driving

You will encounter many types of terrain driving off-road.

You  should  be  familiar  with  the  terrain  and  area  before

proceeding.  There  are  many  types  of  surface  conditions:

hard packed dirt, gravel, rocks, grass, sand, mud, snow and

ice.  Every  surface  has  a  different  effect  on  your  vehicle's

steering, handling and traction. Controlling your vehicle is

one of the keys to successful off-road driving, so always keep

a  firm  grip  on  the  steering  wheel  and  maintain  a  good

driving  posture.  Avoid  sudden  accelerations,  turns  or

braking. In most cases there are no road signs, posted speed

limits or signal lights. Therefore you will need to use your

own good judgment on what is safe and what isn't. When on

a trail you should always be looking ahead for surface obsta-

cles and changes in terrain. The key is to plan your future

driving  route  while  remembering  what  you  are  currently

driving over.

CAUTION!

The  door  sill  height  is  25 inches  (63.5  cm).  Water  may

intrude into the interior of the vehicle at greater depths.

WARNING!

Always wear your seat  belt and firmly  tie down  cargo.

Unsecured  cargo  can  become  projectiles  in  an  off-road

situation.

5

-------------------------------------------------------------------------------------------------------------------------------------------------------------

326 STARTING AND OPERATING

When To Use Low Range

When driving off-road, shift into 4LO (Low Range) for addi-

tional traction or to improve handling and control on slip-

pery or difficult terrain. Due to the lower gearing, low range

will  allow  the engine to  operate  in  a higher  power  range.

This  will allow you  to idle over  obstacles and  down  hills,

with improved control and less effort. Also, use 4LO (Low

Range)  in  rain,  ice,  snow,  mud,  sand,  to  get  heavy  loads

rolling,  improve  traction,  or  whenever  4HI  (High  Range)

traction will not do the job.

Driving In Snow, Mud And Sand

There is a drastic reduction in traction when driving in snow,

mud or sand. The vehicle will be less responsive to steering,

acceleration and braking inputs. Therefore you should accel-

erate  slowly,  leave  greater  stopping  distances  and  avoid

abrupt vehicle maneuvers. You want to keep a slow constant

steady pace. The key is to maintain the vehicle's momentum.

• Snow – In heavy snow or for additional control and trac-

tion at slower speeds, shift the transmission to a low gear

and shift the transfer case to 4LO (Low Range) if necessary.

Do  not  shift  to  a lower  gear than  necessary  to  maintain

headway.  Over-revving  the  engine  can  spin  the  wheels

and traction will be lost. If you start to slow to a stop, try

turning your steering wheel no more than a ¼ turn quickly

back and forth, while still applying throttle. This will allow

the  tires  to  get  a  fresh  "bite"  and  help  maintain  your

momentum.

• Mud – Deep mud creates a great deal of suction around

the tires and is very difficult to get through. You should

use 4LO (Low Range) with a gear low enough to maintain

your momentum without shifting. If you start to slow to a

stop,  try turning  your steering wheel  no  more than a ¼

turn quickly back and forth for additional traction. Mud

holes  pose  an  increased  threat  of  vehicle  damage  and

getting  stuck.  They  are  normally  full  of  debris  from

previous vehicles getting stuck. As a good practice before

CAUTION!

Never  park  your  vehicle  over  dry  grass  or  other

combustible  materials.  The  heat  from  your  vehicle

exhaust system could cause a fire.

CAUTION!

On  icy  or  slippery  roads,  do  not  downshift  at  high

engine RPMs or vehicle speeds because engine braking

may cause skidding and loss of control.

-------------------------------------------------------------------------------------------------------------------------------------------------------------

STARTING AND OPERATING

327

entering any mud hole, get out and determine how deep it

is, if there are any hidden obstacles and if the vehicle can

be safely recovered if stuck.

• Sand – Soft sand is very difficult to travel through with full

tire  pressure.  When  crossing  soft  sandy  spots  in  a  trail

maintain your vehicle's momentum and do not stop. The

key to driving in soft sand using the appropriate tire pres-

sure, accelerating slowly, avoiding abrupt maneuvers and

maintaining the vehicle's momentum. If you are going to

be driving on large soft sandy areas or dunes, reduce your

tire pressure to a minimum of 15 psi (103 kPa) to allow for

a greater tire surface area. Reduced tire pressure will dras-

tically improve your traction and handling, while driving

on the soft sand, but you must return the tires to normal air

pressure  before  driving  on  pavement  or  other  hard

surfaces. Be sure you have a way to air the tires back up

prior to reducing the pressure.

Crossing Obstacles (Rocks And Other High Points)

While  driving  off  road,  you  will  encounter  many  types  of

terrain. These varying types of terrain bring different types of

obstacles. Before proceeding  review  the path ahead to  deter-

mine the correct approach and your ability to safely recover the

vehicle if something goes wrong. Keeping a firm grip on the

steering wheel, bring the vehicle to a complete stop and then

inch the vehicle forward until it makes contact with the object.

Apply the throttle lightly while holding a light brake pressure

and ease the vehicle up and over the object.

Using A Spotter

There are many times where it is hard to see the obstacle or

determine the correct path. Determining the correct path can

be extremely difficult when you are confronting many obsta-

cles. In these cases have someone guide you over, through, or

around the obstacle. Have the person stand a safe distance in

front of you where they can see the obstacle, watch your tires

and undercarriage, and guide you through.

CAUTION!

Reduced  tire  pressures  may  cause  tire  unseating  and

total  loss  of  air  pressure.  To  reduce  the  risk  of  tire

unseating, while at a reduced tire pressure, reduce your

speed and avoid sharp turns or abrupt maneuvers.

WARNING!

Crossing  obstacles  can  cause  abrupt  steering  system

loading which could cause you to loose control of your

vehicle.

5

-------------------------------------------------------------------------------------------------------------------------------------------------------------

328 STARTING AND OPERATING

Crossing Large Rocks

When approaching large rocks, choose a path which ensures

you drive over the largest with your tires. This will lift your

undercarriage  over  the  obstacle.  The  tread  of  the  tire  is

tougher and thicker than the  side wall  and  is  designed to

take the abuse. Always look ahead and make every effort to

cross the large rocks with your tires.

Crossing A Ravine, Gully, Ditch, Washout Or Rut

When crossing a ravine, gully, ditch, washout or a large rut,

the angled approach is the key to maintaining your vehicle's

mobility. Approach these obstacles at a 45-degree angle and

let  each  tire  go  through  the  obstacle  independently.  You

need to use caution when crossing large obstacles with steep

sides. Do not attempt to cross any large obstacle with steep

sides at an angle great enough to put the vehicle at risk of a

rollover. If you get caught in a rut, dig a small trench to the

right or left at a 45-degree angle ahead of the front tires. Use

the removed dirt to fill the rut ahead of the turnout you just

created. You should now be able to drive out following the

trench you just created at a 45-degree angle.

Crossing Logs

To cross a log, approach it at a slight angle (approximately 10

to 15 degrees). This allows one front tire to be on top of the

log while the other just starts to climb the log. While climbing

the log, modulate your brake and accelerator to avoid spin-

ning the log out from under your tires. Then ease the vehicle

off the log using your brakes.

CAUTION!

• Never attempt to straddle a rock that is large enough to

strike your axles or undercarriage.

• Never  attempt  to  drive  over  a  rock  which  is  large

enough to contact the door sills.

WARNING!

There is an increased risk of rollover when crossing an

obstacle, at any angle, with steep sides.

CAUTION!

Do not attempt to cross a log with a greater diameter than

the running ground clearance or the vehicle will become

high centered.

-------------------------------------------------------------------------------------------------------------------------------------------------------------

STARTING AND OPERATING

329

Getting High Centered

If you get hung up or high centered on an object, get out of

the vehicle and try to determine what the vehicle is hung up

on, where it is contacting the underbody and what is the best

direction to recover the vehicle. Depending on what you are

in  contact with,  jack  the  vehicle  up  and place a few rocks

under the tires so the weight is off of the high point when

you let the vehicle down. You can also try rocking the vehicle

or winching the vehicle off the object.

Hill Climbing

Hill  climbing  requires  good  judgment  and  a  good  under-

standing of your abilities and your vehicle's limitations. Hills

can cause serious problems. Some are just too steep to climb

and should not be attempted. You should always feel confi-

dent with the vehicle and your abilities. You should always

climb hills straight up and down. Never attempt to climb a

hill on an angle.

• Before Climbing A Steep Hill – As you approach a hill

consider its grade or steepness. Determine if it is too steep.

Look to see what the traction is on the hill side trail. Is the

trail straight up and down? What is on top and the other

side? Are there ruts, rocks, branches or other obstacles on

the path? Can you safely recover the vehicle if something

goes wrong? If everything looks good and you feel confi-

dent, then change transmission into a lower gear, shift the

transfer  case  into  4LO (Low) and  proceed  with  caution.

You should use first gear and 4LO (Low Range) for very

steep hills.

• Driving Up Hill – Once you have determined your ability

to proceed and have shifted into the appropriate gear, line

your vehicle up for the straightest possible run. Accelerate

with an easy constant throttle and apply more power as

you  start  up  the  hill.  Do  not  race  forward  into  a  steep

grade, the abrupt change of grade could cause you to lose

control.  If  the  front  end  begins  to  bounce,  ease  off  the

throttle slightly to bring all four tires back on the ground.

As you approach the crest of the hill ease off the throttle

and slowly proceed over the top. If the wheels start to slip

as you approach the crest of a hill, ease off the accelerator

and maintain headway by turning the steering wheel no

more  than  a  ¼  turn  quickly  back  and  forth.  This  will

provide  a  fresh  "bite"  into  the  surface  and  will  usually

CAUTION!

Winching  or  rocking  the  vehicle  off  hard  objects

increases the risk of underbody damage.

5

-------------------------------------------------------------------------------------------------------------------------------------------------------------

330 STARTING AND OPERATING

provide enough traction to complete the climb. If you do

not make it to the top, place the vehicle in REVERSE and

back  straight  down  the  grade  using  engine  resistance

along with the vehicle brakes.

• Driving Down Hill – Before driving down a steep hill you

need to determine if it is too steep for a safe descent. What

is the surface traction? Is the grade too steep to maintain a

slow  controlled  descent?  Are  there  obstacles?  Is  it  a

straight descent? Is there plenty of distance at the base of

the hill to regain control if the vehicle descends too fast? If

you feel confident  in  your ability  to  proceed  then make

sure you are in 4LO (Low Range) with the transmission in

first gear (manually select first gear on automatic transmis-

sions) and proceed with caution. Allow engine braking to

control the descent and apply your brakes if necessary, but

do not allow the tires to lock.

• Driving  Across  An  Incline  –  If  at  all  possible  avoid

driving  across  an  incline.  If  it  is  necessary,  know  your

vehicle's  abilities.  Driving  across  an  incline  places  more

weight on the down hill wheels, which increases the possi-

bilities  of  a  down  hill  slide  or  rollover.  Make  sure  the

surface  has  good  traction  with  firm  and  stable  soils.  If

possible transverse the incline at an angle heading slightly

up or down.

• If You Stall Or Begin To Lose Headway – If you stall or

begin to lose headway while climbing a steep hill, allow

your vehicle to come to a stop and immediately apply the

brake.  Restart  the  engine  and  shift  into  REVERSE.  Back

slowly down the hill allowing the compression braking of

the engine and transmission to help regulate your speed. If

WARNING!

Never attempt to climb a hill at an angle or turn around

on a steep grade. Driving across an incline increases the

risk of a roll over, which may result in severe injury or

death.

WARNING!

Do not descend a steep grade in NEUTRAL. Use vehicle

brakes in conjunction with engine braking. Descending

a grade too  fast  could cause you to lose control and be

seriously injured or killed.

WARNING!

Driving across an incline increases the risk of a rollover,

which may result in severe injury.

-------------------------------------------------------------------------------------------------------------------------------------------------------------

STARTING AND OPERATING

331

the  brakes  are  required  to  control  vehicle  speed,  apply

them lightly and avoid locking or skidding the tires.

Driving Through Water

Extreme  care  should  be  taken  crossing  any  type  of  water.

Water crossings should be avoided if possible and only be

attempted  when  necessary,  in  a  safe  responsible  manner.

You should only drive through areas which are designated

and approved. You should tread lightly and avoid damage

to the environment. You should know your vehicle's abilities

and  be  able  to  recover  it  if  something  goes  wrong.  You

should never stop or shut a vehicle off when crossing deep

water unless you ingested water into the engine air intake. If

the engine stalls do not attempt to restart it. Determine if it

has ingested water first. The key to any crossing is low and

slow.  You  want  to  use  first  gear  in  4L  (Low  Range)  and

proceed  very slowly  with  a constant  slow speed (3-5 mph

[5–8 km/h] maximum) and light throttle. Keep the vehicle

moving; do not try to accelerate through the crossing. After

crossing any water higher than the bottom of the axle differ-

entials, you should inspect all of the vehicle fluids for signs

of water ingestion.

• Before You Cross Any Type Of Water – As you approach

any type of water you need to determine if you can cross it

safely  and  responsibly.  If  necessary,  get  out  and  walk

through the water or probe it with a stick. You need to be

sure  of  its  depth,  approach  angle,  current  and  bottom

condition. Be careful of murky or muddy waters, check for

hidden obstacles. Make sure you will not be intruding on

any wildlife and you can recover the vehicle if necessary.

The key to a safe crossing is the water depth, current and

bottom conditions. On soft bottoms the vehicle will sink in,

WARNING!

If the engine stalls or you lose headway or cannot make

it to the top of a steep hill or grade, never attempt to turn

around. To do so  may  result in  tipping and rolling the

vehicle, which may result in severe injury. Always back

carefully straight down a hill in REVERSE. Never back

down a hill in NEUTRAL using only the vehicle brakes.

Never  drive  diagonally  across  a  hill,  always  drive

straight up or down.

CAUTION!

Water  ingestion  into  the  axles,  transmission,  transfer

case, engine or vehicle interior can occur if you drive too

fast  or  through  too  deep  of  water.  Water  can  cause

permanent damage to engine, driveline or other vehicle

components and your brakes will be less effective once

wet and/or muddy.

5

-------------------------------------------------------------------------------------------------------------------------------------------------------------

332 STARTING AND OPERATING

effectively  increasing  the  water  level  on  the  vehicle.  Be

sure to consider this when determining the depth and the

ability to safely cross.

• Crossing Puddles, Pools, Flooded Areas Or Other Standing

Water – Puddles, pools, flooded or other standing water areas

normally contain murky or muddy waters. These water types

normally  contain  hidden  obstacles  and  make  it  difficult  to

determine  an  accurate  water  depth,  approach  angle,  and

bottom condition. Murky or muddy water holes are where

you want to hook up tow straps prior to entering. This makes

for a faster, cleaner and easier vehicle recovery. If you are able

to determine you can safely cross, than proceed using the low

and slow method.

• Crossing  Ditches,  Streams,  Shallow  Rivers  Or  Other

Flowing Water – Flowing water can be extremely dangerous.

Never attempt to cross a fast running stream or river even in

shallow  water.  Fast  moving  water  can  easily  push  your

vehicle downstream sweeping it out of control. Even in very

shallow water, a high current can still wash the dirt out from

around your tires putting you and your vehicle in jeopardy.

There is still a high risk of personal injury and vehicle damage

with  slower  water  currents  in  depths  greater  than  the

vehicle's  running  ground  clearance.  You  should  never

attempt  to  cross  flowing  water  which  is  deeper  than  the

vehicle's running ground clearance. Even the slowest current

can push the heaviest vehicle downstream out of control if the

water is deep enough to push on the large surface area of the

vehicle's body. Before you proceed determine the speed of the

current, the water's depth, approach angle, bottom condition

and if there are any obstacles, then cross at an angle heading

slightly upstream using the low and slow technique.

Airing Down For Off-Road Driving

Running lower tire pressure off-road can improve your ride

comfort and vehicle traction. Reducing the tire air pressure

allows the tire to bulge slightly, improving its surface area

for better flotation and ability to mold or form to the ground

contour.  Different  terrain,  tires,  and  vehicles  require

different tire pressure. Hard surfaces like rock and heavier

vehicles require higher pressures than softer surfaces such as

CAUTION!

Muddy  waters  can  reduce  the  cooling  system

effectiveness by depositing debris onto the radiator.

WARNING!

Never drive through fast moving deep water. It can push

your  vehicle  downstream,  sweeping  it  out  of  control.

This could put you and your passengers at risk of injury

or drowning.

-------------------------------------------------------------------------------------------------------------------------------------------------------------


Content      ..     18      19      20      21     ..