Chrysler Concorde (2004 year). Manual - part 6


  Index      Chrysler     Chrysler Concorde (2004 year) - manual in english


Search            copyright infringement  


Content      ..     4      5      6      7     ..


Chrysler Concorde (2004 year). Manual - part 6


• WASHER FLUID LOW (with graphic)
• MEMORY SEAT DISABLED VEHICLE (not in Park)

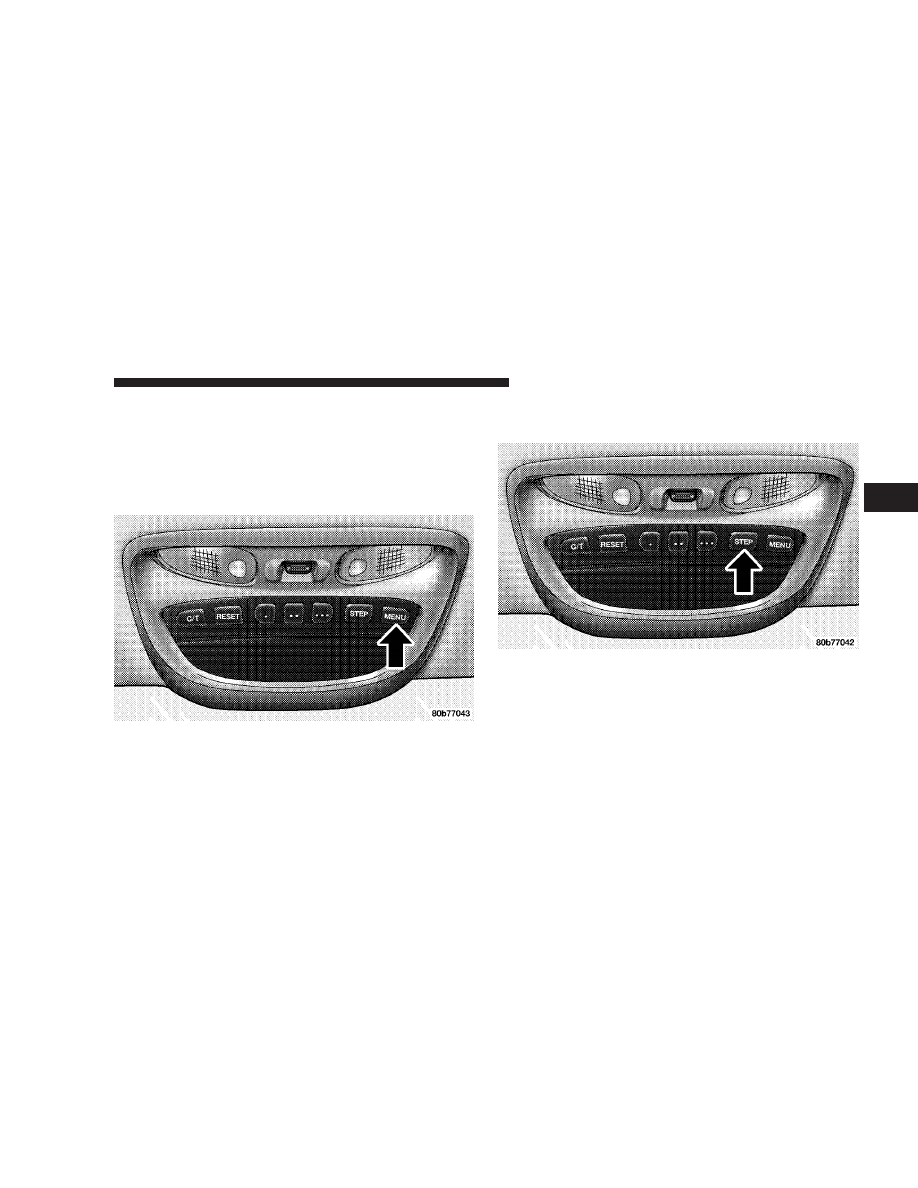
Customer Programmable Features

Press the MENU button until one of the display choices
following appears:

Language
When in this display you may select one of five lan-
guages for all display nomenclature, including the trip
computer functions. Press the STEP button while in this
display selects English, Francaise, Deutsch, Italiano, or

Espanol. As you continue the displayed information will
be shown in the selected language.

US or Metric
Pressing the STEP button when in this display selects US
or Metric. The overhead console and instrument panel
displays will be in the selected units.

UNDERSTANDING THE FEATURES OF YOUR VEHICLE

89

3

-------------------------------------------------------------------------------------------------------------------------------------------------------------

Auto Door Locks
When this feature is selected, all doors lock automatically
when the speed of the vehicle reaches 15 mph (25 km/h).
Pressing the STEP button when in this display will select
“Yes” or “No.”

Auto Unlock On Exit (Available Only When the
AUTO DOOR LOCKS Feature is Turned On )
When this feature is selected all the vehicle’s doors will
unlock when the driver’s door is opened if the vehicle is
stopped and the transmission is in P (Park) or N (Neu-
tral) position. Pressing the STEP button when in this
display will select “Yes” or “No.”

Remote Unlock Driver’s Door 1st
When this feature is selected only the driver’s door will
unlock on the first press of the remote keyless entry
unlock button and require a second press to unlock the
remaining locked door. When REMOTE UNLOCK ALL
DOORS

is selected all of the doors will unlock at the first

press of the remote keyless entry unlock button. Pressing
the STEP button when in this display will select DRIV-
ER’S DOOR 1ST or ALL DOORS.

Remote Linked To Memory (Available with
Memory Seat Only)
When this feature is selected the memory seat, mirror,
and radio settings will return to the memory set position
when the remote keyless entry “Unlock” button is
pressed. If this feature is not selected then the memory
seat, mirror, and radio settings can only return to the
memory set position using the door mounted switch.
Pressing the STEP button when in this display will select
“Yes” or “No.”

Sound Horn with Lock
When this feature is selected a short horn sound will
occur when the remote keyless entry “Lock” button is
pressed. This feature may be selected with or without the
flash lights on lock/unlock feature. Pressing the STEP
button when in this display will select “Yes” or “No.”

Flash Lights with Lock/Unlock
When this feature is selected, the front and rear turn
signals will flash when the doors are locked or unlocked
using the remote keyless entry transmitter. This feature
may be selected with or without the sound horn on lock

90

UNDERSTANDING THE FEATURES OF YOUR VEHICLE

-------------------------------------------------------------------------------------------------------------------------------------------------------------

feature selected. Pressing the STEP button when in this
display will select “Yes” or “No.”

Headlamp Delay
When this feature is selected the driver can choose, when
exiting the vehicle, to have the headlamps remain on for
30, 60, or 90 seconds, or not remain on. Pressing the STEP
button when in this display will select 30, 60, 90, or OFF.

Headlamp On With Wipers (Available with Auto
Headlights Only)
When this feature is selected and the headlight switch
has at least once been moved to the AUTO position, the
headlights will turn on when the wipers are turned on.
The headlights will also turn off when the wipers are
turned off if they were turned on in this way. Pressing the
STEP button when in this display will select “Yes” or
“No.”

NOTE:

Turning the headlights on during the daytime

causes the instrument panel lights to dim. To increase the
brightness, refer to “Lights” in this section.

Service Interval
When this feature is selected a service interval between
2,000 (3 200 km) and 6,000 miles (9 600 km) in 500 mile
(800 km) increments may be selected. Pressing the STEP
button when in this display will select distances between
2,000 (3 200 km) and 6,000 miles (9 600 km) in 500 mile
(800 km) increments.

Reset Service Distance (Displays Only if Service
Interval was Changed)
When this feature is selected the current accumulated
service distance can be reset to the newly selected service
interval. Pressing the STEP button when in this display
will select “Yes” or “No.”

Easy Exit Seat
When this feature is selected the driver’s seat moves
rearward two inches (55 mm) or to the farthest rearward
position if this distance is less than two inches (55 mm)
when the key is removed from the ignition switch so that
the driver can more easily exit the vehicle. The seat will
return to the memorized seat location (if REMOTE LINK
TO MEMORY is set to YES) when the remote keyless
entry transmitter is used to unlock the door. Pressing the

UNDERSTANDING THE FEATURES OF YOUR VEHICLE

91

3

-------------------------------------------------------------------------------------------------------------------------------------------------------------

STEP button when in this display will select “Yes” or
“No.”

Tilt Mirrors Down
When this feature is selected, and the vehicle is placed in
reverse, the driver’s exterior mirror will tilt downward to
improve visibility of rear wheel area. Once reverse is
disengaged, the driver’s exterior mirror will return to it’s
original position. Pressing the STEP button when inthis
display will select “YES” or “NO”.

Train Remote

NOTE:

As a safety feature, successful training of at least

one transmitter will erase all previously trained transmit-
ters.

When this feature is selected the driver can choose to
train up to four remote keyless entry transmitters. Press-
ing the STEP button when in this display will select

“YES” or “NO”. When “YES” is selected and the MENU
button is pressed; the EVIC will display “PRESS RE-
MOTE LOCK & UNLOCK THEN PRESS UNLOCK”,
followed by a chime to indicate the training sequence can
commence. You have approximately 30 seconds to train
up to four transmitters; after each transmitter is trained a
chime will sound indicating that the training was suc-
cessful. If remote link to memory is “YES,” the first
transmitter trained will be associated with memory set-
ting 1 and the second transmitter trained will be associ-
ated with memory setting 2. Additional transmitters will
not be associated with a memory setting. When you have
finished training the transmitters, press the MENU but-
ton again and the EVIC will display “TRAIN DONE, x
TRAINED”. (Where x = 1,2,3, or 4) If no transmitters are
trained within approximately 30 seconds the EVIC will
display “TRAIN TIMEOUT”.

92

UNDERSTANDING THE FEATURES OF YOUR VEHICLE

-------------------------------------------------------------------------------------------------------------------------------------------------------------

Compass/Temperature/Trip Computer

This display provides the outside temperature, one of the
eight compass headings to indicate the direction the
vehicle is facing, and vehicle trip information. The com-
pass and temperature display is the normal display.
When the C/T button is pressed or the customer pro-
grammable features have been “stepped through” the
compass/temperature display returns.

Trip Computer

This feature, located in the overhead console, displays the
following information when the display is in the
“Compass/Temperature” mode and the STEP button is
pressed:

UNDERSTANDING THE FEATURES OF YOUR VEHICLE

93

3

-------------------------------------------------------------------------------------------------------------------------------------------------------------

Step Button
Press the STEP button to cycle through all of the
Compass/Mini-Trip Computer displays.

Average Fuel Economy
Shows the average fuel economy since the last reset.

Distance To Empty
Shows the estimated distance that can be travelled with
the fuel remaining in the tank. This is calibrated using the
miles per gallon for the last few minutes.

Trip Odometer
Shows the distance travelled since the last reset.

Elapsed Time
Shows the accumulated ignition ON time since the last
reset.

Miles to Service
Shows the distance remaining to require service.

NOTE:

This display can be reset to the set service

interval by pressing and holding the RESET button for 3
seconds.

Blank Screen
Shows a blank screen. Pressing the STEP button returns
to the compass and temperature display.

Automatic Compass Calibration
This compass is self-calibrating which eliminates the
need to manually set the compass. When the vehicle is
new, the compass may appear erratic and the CAL
symbol will be displayed.

94

UNDERSTANDING THE FEATURES OF YOUR VEHICLE

-------------------------------------------------------------------------------------------------------------------------------------------------------------

After completing three 360° turns in an area free from
large metal or metallic objects, the CAL symbol will turn
off and the compass will function normally.

Manual Compass Calibration
If the compass appears erratic and the CAL symbol does
not appear, you must manually put the compass into the
“Calibration” mode.

NOTE:

To ensure proper compass calibration, make

sure the compass variance is properly set before manu-
ally calibrating the compass (see variance map).

To Put Into a Calibration Mode
Turn on the ignition and set the display to “Compass/
Temperature.” Press and hold the RESET button to
change the display between VAR (compass variance) and
CAL (compass calibration) modes. When the CAL sym-
bol is displayed complete three 360 degree turns in an
area free from large metal objects or power lines. The
CAL symbol will turn off and the compass will function
normally.

Compass Variance

is the difference between magnetic

north and geographic north. In some areas of the country,
the difference between magnetic and geographic north is
great enough to cause the compass to give false readings.
If this occurs, the compass variance must be set according
to the Compass Variance Map.

UNDERSTANDING THE FEATURES OF YOUR VEHICLE

95

3

-------------------------------------------------------------------------------------------------------------------------------------------------------------

To set the variance: Turn the ignition ON and set the
display to “Compass/Temperature.” Press the RESET
button approximately five seconds. The last variance
zone number will be displayed. Press the STEP button to
select the new variance zone and press the RESET button
to resume normal operation.

OVERHEAD TRAVEL INFORMATION CENTER —
IF EQUIPPED

This feature allows you to choose between a compass /
temperature display and one of five trip conditions being
monitored.

Pressing the STEP button will select the available trip
information. Pressing the US / M button will toggle
between US and Metric displays. Pressing the C/T (Com-
pass / Temperature) button will return the display to the
normal compass / temperature display.

96

UNDERSTANDING THE FEATURES OF YOUR VEHICLE

-------------------------------------------------------------------------------------------------------------------------------------------------------------

US/M Button

Use this button to change the display from U.S. to metric
measurement units.

RESET Button

Use this button to reset the following displays to zero:
Average Fuel Economy
Trip Odometer
Elapsed time.

Global Reset

If the RESET button is pressed twice within 3 seconds
while in any of the 3 resetable displays, the Global Reset
button will reset all 3 displays.

Step Button

Use this button to choose or cycle through the five trip
conditions.

Average Fuel Economy (AVG ECO)

This display shows the average fuel economy since the
last reset.

Distance To Empty (DTE)

This display shows the estimated distance that can be
traveled with the fuel remaining in the tank. The distance
is calculated by multiplying the amount of fuel remain-
ing by the projected fuel economy. The distance predicted
will change every few seconds to a higher or lower
number as these factors change.

This display cannot be reset.

UNDERSTANDING THE FEATURES OF YOUR VEHICLE

97

3

-------------------------------------------------------------------------------------------------------------------------------------------------------------

Trip Odometer (ODO)

This display shows the distance traveled since the last
reset.

Elapsed Time (ET)

This display shows the accumulated ignition ON time
since the last reset.

C/T Button

Use this button to select a readout of the outside tem-
perature and one of eight compass headings that indicate
the direction in which the vehicle is facing.

Compass/Temperature Display

This display provides the outside temperature and one of
eight compass readings to indicate the direction the
vehicle is facing.

Automatic Compass Calibration

The self calibrating feature of the compass eliminates the
need to calibrate the compass for normal conditions.
During a short initial period, the compass may appear
erratic and the CAL symbol will appear on the display.
The CAL symbol may also appear after the vehicle is
subjected to a high level of magnetism. After completing

three 360 turns at about 5 mph (8 km/h) in an area free
from large metal or metallic objects, the CAL symbol will
turn off and the compass will function normally.

Manual Compass Calibration

If the compass appears erratic and the CAL light does not
appear, you must calibrate the compass. Find an open
area away from large metal objects. With the ignition ON
and the compass/temperature displayed, press and hold
the RESET button until the CAL symbol appears (about
10 seconds). Drive slowly (about 5 mph) (8 km/h) in 3
complete 360 circles. The CAL light will turn off and the
compass will be calibrated.

Variance is the difference between magnetic North and
geographic North. For proper compass function, the
correct variance zone must be set. Refer to the variance
map for the correct variance zone. To check the variance
zone, the ignition must be on and the compass/
temperature displayed. Press and hold the RESET button
for about 5 seconds until VAR appears in the display. The
number displayed is the variance zone used by the
compass. To change the zone, press the STEP button to

98

UNDERSTANDING THE FEATURES OF YOUR VEHICLE

-------------------------------------------------------------------------------------------------------------------------------------------------------------

scroll through numbers 1 through 15. Press the RESET
button after selecting the proper zone to return to the
normal compass/temperature display.

NOTE:

To ensure proper compass calibration, make

sure the compass variance is properly set before manu-
ally calibrating the compass (see variance map).

UNDERSTANDING THE FEATURES OF YOUR VEHICLE

99

3

-------------------------------------------------------------------------------------------------------------------------------------------------------------

Outside Temperature

Because engine temperature can increase the displayed
temperature, temperature readings are slowly updated
when vehicle speed is below 20 mph (30 km/h).

ELECTRCAL POWER OUTLET

Your vehicle is equipped with one power outlet which is
located in the forward portion of the center console if
your vehicle has bucket seats or in the lower center of the
instrument panel if your vehicle has bench or split bench
seats. Accessories powered through this outlet are pro-
tected by a 15 amp fuse. The outlet may be converted to
a cigar lighter by installing the dealer obtained smoker’s
package. The outlet is operated by the ignition switch,
when in the “run” or “acc” positions only. You may
convert the outlet from ignition to battery power by
performing the following:

• Remove the fuse cover from the left end of the

instrument panel (see the paragraph on fuses in sec-
tion 7 of this manual.)

• Remove fuse #6 (its on the upper right of the fuse

block) from its “IGN” position.

• Move the fuse slightly right and insert it in the fuse #6

“BAT” location in the fuse block.

• Reinstall the fuse cover.

100

UNDERSTANDING THE FEATURES OF YOUR VEHICLE

-------------------------------------------------------------------------------------------------------------------------------------------------------------

UNDERSTANDING YOUR INSTRUMENT PANEL

CONTENTS

䡵 Instruments And Controls . . . . . . . . . . . . . . . . 105
䡵 Instruments And Controls

(Concorde Limited Only) . . . . . . . . . . . . . . . . 106

䡵 Instrument Cluster . . . . . . . . . . . . . . . . . . . . . 107
䡵 Instrument Cluster (Concorde Limited Only) . . 108
䡵 Instrument Cluster Description . . . . . . . . . . . . 109
䡵 Setting The Analog Clock—If Equipped . . . . . 113
䡵 Electronic Digital Clock . . . . . . . . . . . . . . . . . 113

▫ Clock Setting Procedure . . . . . . . . . . . . . . . . . 114

䡵 Sales Code RAZ—AM/ FM Stereo Radio With

Cassette Tape Player And CD Player — If
Equipped 
. . . . . . . . . . . . . . . . . . . . . . . . . . . . 114

▫ Operating Instructions — Radio . . . . . . . . . . . 114

▫ Power Switch, Volume Control . . . . . . . . . . . . 114
▫ Seek Button (Radio Mode) . . . . . . . . . . . . . . . 115
▫ Tuning . . . . . . . . . . . . . . . . . . . . . . . . . . . . . 115
▫ PTY (Program Type) Button . . . . . . . . . . . . . . 115
▫ Balance . . . . . . . . . . . . . . . . . . . . . . . . . . . . 116
▫ Fade . . . . . . . . . . . . . . . . . . . . . . . . . . . . . . 116
▫ Tone Control . . . . . . . . . . . . . . . . . . . . . . . . 116
▫ AM/FM Selection . . . . . . . . . . . . . . . . . . . . . 117
▫ Scan Button . . . . . . . . . . . . . . . . . . . . . . . . . 117
▫ To Set The Radio Push-Button Memory . . . . . . 117
▫ To Change From Clock To Radio Mode . . . . . . 117
▫ Operating Instructions — Tape Player . . . . . . . 117

4

-------------------------------------------------------------------------------------------------------------------------------------------------------------

▫ Seek Button . . . . . . . . . . . . . . . . . . . . . . . . . 118
▫ Fast Forward (FF) . . . . . . . . . . . . . . . . . . . . . 118
▫ Rewind (RW) . . . . . . . . . . . . . . . . . . . . . . . . 118
▫ Tape Eject . . . . . . . . . . . . . . . . . . . . . . . . . . . 118
▫ Scan Button . . . . . . . . . . . . . . . . . . . . . . . . . 118
▫ Changing Tape Direction . . . . . . . . . . . . . . . . 118
▫ Metal Tape Selection . . . . . . . . . . . . . . . . . . . 118
▫ Pinch Roller Release . . . . . . . . . . . . . . . . . . . 118
▫ Noise Reduction . . . . . . . . . . . . . . . . . . . . . . 119
▫ Operating Instructions — CD Player . . . . . . . . 119
▫ Inserting The Compact Disc . . . . . . . . . . . . . . 119
▫ Seek Button . . . . . . . . . . . . . . . . . . . . . . . . . 119
▫ EJT CD (Eject) Button . . . . . . . . . . . . . . . . . . 120
▫ FF/Tune/RW Button . . . . . . . . . . . . . . . . . . . 120
▫ Program Button 4 (Random Play) . . . . . . . . . . 120
▫ Mode . . . . . . . . . . . . . . . . . . . . . . . . . . . . . . 120

▫ Tape CD Button . . . . . . . . . . . . . . . . . . . . . . 121
▫ Time Button . . . . . . . . . . . . . . . . . . . . . . . . . 121
▫ Scan Button . . . . . . . . . . . . . . . . . . . . . . . . . 121

䡵 Sales Code RBB—AM/FM Stereo Radio With

Cassette Tape Player And CD Changer
Capability 
. . . . . . . . . . . . . . . . . . . . . . . . . . . 121

▫ Operating Instructions . . . . . . . . . . . . . . . . . . 121
▫ Power Button . . . . . . . . . . . . . . . . . . . . . . . . 122
▫ Electronic Volume Control . . . . . . . . . . . . . . . 122
▫ Seek . . . . . . . . . . . . . . . . . . . . . . . . . . . . . . 122
▫ Tune . . . . . . . . . . . . . . . . . . . . . . . . . . . . . . 122
▫ To Set The Push-Button Memory . . . . . . . . . . 122
▫ Balance . . . . . . . . . . . . . . . . . . . . . . . . . . . . 123
▫ Fade . . . . . . . . . . . . . . . . . . . . . . . . . . . . . . 123
▫ Bass And Treble Tone Control . . . . . . . . . . . . 123
▫ AM/FM Selection . . . . . . . . . . . . . . . . . . . . . 123

102

UNDERSTANDING YOUR INSTRUMENT PANEL

-------------------------------------------------------------------------------------------------------------------------------------------------------------

▫ Mode Button . . . . . . . . . . . . . . . . . . . . . . . . 123
▫ Cassette Player Features . . . . . . . . . . . . . . . . 123
▫ CD Changer Control Capability — If

Equipped . . . . . . . . . . . . . . . . . . . . . . . . . . . 124

▫ Radio Display Messages . . . . . . . . . . . . . . . . 126

䡵 Sales Code RBK—AM/ FM Stereo Radio With

CD Player And CD Changer Controls . . . . . . . 126

▫ Radio Operation . . . . . . . . . . . . . . . . . . . . . . 126
▫ CD Player Operation . . . . . . . . . . . . . . . . . . . 128
▫ CD Changer Operation — If Equipped . . . . . . 130

䡵 6 Disc CD Changer — If Equipped . . . . . . . . . 131

▫ Loading The CD Changer . . . . . . . . . . . . . . . 131
▫ Playing Discs . . . . . . . . . . . . . . . . . . . . . . . . 131
▫ Seek Button . . . . . . . . . . . . . . . . . . . . . . . . . 132
▫ FF/Tune/RW . . . . . . . . . . . . . . . . . . . . . . . . 132
▫ Mode Button . . . . . . . . . . . . . . . . . . . . . . . . 132

▫ Program Button 1 . . . . . . . . . . . . . . . . . . . . . 132
▫ Program Button 4 (Random Play) . . . . . . . . . . 132
▫ Program Button 5 . . . . . . . . . . . . . . . . . . . . . 132
▫ Time Button . . . . . . . . . . . . . . . . . . . . . . . . . 132
▫ Changing Modes . . . . . . . . . . . . . . . . . . . . . . 132
▫ Removing Discs From The CD Changer . . . . . 133
▫ CD Changer Operation With The Changer

Off . . . . . . . . . . . . . . . . . . . . . . . . . . . . . . . 133

䡵 Remote Sound System Controls — If

Equipped . . . . . . . . . . . . . . . . . . . . . . . . . . . . 133

▫ Radio Operation . . . . . . . . . . . . . . . . . . . . . . 134
▫ Tape Player . . . . . . . . . . . . . . . . . . . . . . . . . 134
▫ CD Player — Single Disc In Radio . . . . . . . . . 134
▫ CD Player — 6 Disc CD Changer . . . . . . . . . . 134

䡵 Cassette Tape And Player Maintenance . . . . . . 135
䡵 Compact Disc Maintenance . . . . . . . . . . . . . . . 136

UNDERSTANDING YOUR INSTRUMENT PANEL

103

4

-------------------------------------------------------------------------------------------------------------------------------------------------------------

䡵 Radio Operation And Cellular Phones . . . . . . . 136
䡵 Climate Controls . . . . . . . . . . . . . . . . . . . . . . 137

▫ Manual Air Conditioning/Heater Operation . . 137

▫ Automatic Temperature Control (ATC) — If

Equipped . . . . . . . . . . . . . . . . . . . . . . . . . . . 140

104

UNDERSTANDING YOUR INSTRUMENT PANEL

-------------------------------------------------------------------------------------------------------------------------------------------------------------


Content      ..     4      5      6      7     ..