Chrysler PT Cruiser. Manual - part 904


  Index      Chrysler     Chrysler PT Cruiser - service repair manual 2005 year


Search            


Content   ..  902  903  904  905   ..


Chrysler PT Cruiser. Manual - part 904


DOORS - REAR

TABLE OF CONTENTS

page

page

REAR DOOR APPLIQUE

REMOVAL

. . . . . . . . . . . . . . . . . . . . . . . . . . . . . 74

INSTALLATION

. . . . . . . . . . . . . . . . . . . . . . . . . 75

REAR DOOR CHECK STRAP

REMOVAL

. . . . . . . . . . . . . . . . . . . . . . . . . . . . . 75

INSTALLATION

. . . . . . . . . . . . . . . . . . . . . . . . . 75

REAR DOOR

REMOVAL

. . . . . . . . . . . . . . . . . . . . . . . . . . . . . 76

INSTALLATION

. . . . . . . . . . . . . . . . . . . . . . . . . 76

REAR DOOR GLASS

REMOVAL

. . . . . . . . . . . . . . . . . . . . . . . . . . . . . 76

INSTALLATION

. . . . . . . . . . . . . . . . . . . . . . . . . 76

REAR DOOR OUTSIDE HANDLE

REMOVAL

. . . . . . . . . . . . . . . . . . . . . . . . . . . . . 77

INSTALLATION

. . . . . . . . . . . . . . . . . . . . . . . . . 77

REAR DOOR HINGE

REMOVAL

. . . . . . . . . . . . . . . . . . . . . . . . . . . . . 77

INSTALLATION

. . . . . . . . . . . . . . . . . . . . . . . . . 77

REAR DOOR LATCH

REMOVAL

. . . . . . . . . . . . . . . . . . . . . . . . . . . . . 78

INSTALLATION

. . . . . . . . . . . . . . . . . . . . . . . . . 78

ADJUSTMENTS

REAR DOOR LATCH ADJUSTMENT

. . . . . . . 78

REAR DOOR LATCH STRIKER

REMOVAL

. . . . . . . . . . . . . . . . . . . . . . . . . . . . . 78

INSTALLATION

. . . . . . . . . . . . . . . . . . . . . . . . . 79

REAR DOOR TRIM PANEL

REMOVAL

. . . . . . . . . . . . . . . . . . . . . . . . . . . . . 79

INSTALLATION

. . . . . . . . . . . . . . . . . . . . . . . . . 79

REAR DOOR WATER DAM

REMOVAL

. . . . . . . . . . . . . . . . . . . . . . . . . . . . . 79

INSTALLATION

. . . . . . . . . . . . . . . . . . . . . . . . . 79

REAR DOOR WINDOW REGULATOR

REMOVAL

. . . . . . . . . . . . . . . . . . . . . . . . . . . . . 80

INSTALLATION

. . . . . . . . . . . . . . . . . . . . . . . . . 80

REAR DOOR APPLIQUE

REMOVAL

(1) Open rear door.
(2) Lower door window to the lowest position (Fig.

1).

(3) Remove front and rear screws attaching out-

side belt weatherstrip and remove from door (Fig. 2).

(4) Remove glass run weatherstrip as necessary to

access the three screws in the B-pillar applique. The
glass run weatherstrip will need to be free of the
glass on forward edge, so that the front edge of the
glass can push outward to access the lower screw
(Fig. 3).

(5) Place a shop towel between the tract and glass

so that screw(s) do not fall in to the door opening.

(6) Remove screws attaching B-pillar applique.
(7) Remove B-pillar applique from door.
(8) To remove C-pillar applique pull glass run

weatherstrip down as necessary to access the three
screws in the C-pillar applique (Fig. 4).

(9) Remove screws attaching C-pillar applique.
(10) Remove C-pillar from door.

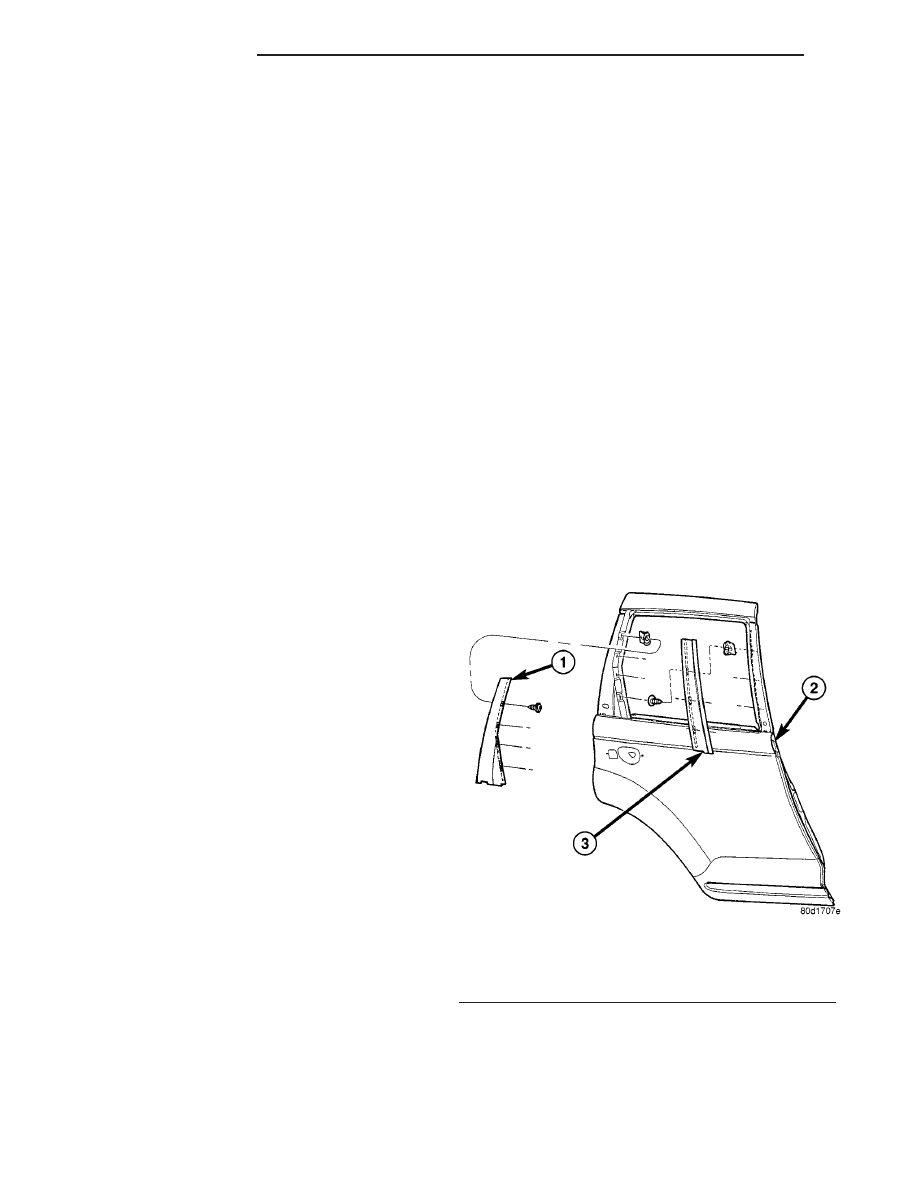
Fig. 1 REAR DOOR APPLIQUE

1 - REAR DOOR C=PILLAR APPLIQUE
2 - REAR DOOR
3 - REAR DOOR B-PILLAR

23 - 74

DOORS - REAR

PT

INSTALLATION

(1) Position C-pillar applique on door.
(2) Install attaching screws to C-pillar.
(3) Install C-pillar applique glass run weatherstrip

into position (Fig. 4).

(4) Position B-pillar applique on door.
(5) With shop towel between the tract and glass so

that screw(s) do not fall in to the door opening.

(6) Install attaching screws to B-pillar applique.
(7) Install glass run weatherstrip into position on

the door frame (Fig. 3).

(8) Place outside belt weatherstrip into position.
(9) Install front and rear screws attaching outside

belt weatherstrip (Fig. 2).

(10) Raise door window glass.
(11) Close door.

REAR DOOR CHECK STRAP

REMOVAL

(1) Raise glass to full up position.
(2) Remove door trim panel.
(3) Remove bolts attaching check strap to hinge

pillar (Fig. 5).

(4) Remove check strap seal from door end frame.
(5) Remove bolts attaching check strap to door end

frame.

(6) Remove check strap from vehicle.

INSTALLATION

CAUTION: Do not close door before adjusting the
door latch. Door may fail to open.

(1) Position door check strap on door.
(2) Install check strap attaching bolts to the door

end frame (Fig. 5).

Fig. 2 REAR DOOR OUTSIDE WEATHERSTRIP

1 - REAR DOOR FRAME
2 - REAR DOOR GLASS RUN WEATHERSTRIP

Fig. 3 REMOVE LOWER SCREW

1 - UPPER DOOR FRAME
2 - LOWER SCREW
3 - SHOP TOWEL
4 - DOOR WINDOW GLASS

Fig. 4 DOOR RUN WEATHERSTRIP

1 - UPPER DOOR FRAME
2 - DOOR RUN WEATHERSTRIP

PT

DOORS - REAR

23 - 75

REAR DOOR APPLIQUE (Continued)

(3) Install check strap seal. If seal is damaged or

worn replace seal.

(4) Install check strap attaching bolts to the hinge

pillar.

(5) Install water shield and door trim panel.

REAR DOOR

REMOVAL

(1) Open door and support on a suitable lifting

device.

(2) Disconnect the wire connector at the hinge pil-

lar.

(3) Remove bolts attaching door check strap to

B-pillar.

(4) Mark door hinges for reinstallation.
(5) Remove bolts attaching lower hinge to door

(Fig. 5).

(6) Remove bolts attaching upper hinge to door.

INSTALLATION

(1) Install bolts to the upper hinge to door (Fig. 5).
(2) Install bolts to the lower hinge to door.
(3) Connect the wire connector at the B-pillar.
(4) Remove lifting device.
(5) Install door check strap bolts.
(6) Adjust door as necessary.

REAR DOOR GLASS

REMOVAL

(1) Remove door trim panel and inner belt weath-

erstrip.

(2) Lower the window to 50 mm (2 ins.) from bot-

tom of travel.

(3) Loosen bolts attaching rear lower run channel

to inner door panel (Fig. 6).

(4) Remove rear run channels from door.
(5) Loosen screws attaching window regulator to

glass.

(6) Remove glass.
(7) Lift door glass upward out of the opening at

the top of door.

INSTALLATION

(1) Lower door glass through opening in top of

door and into position in the window regulator (Fig.
6).

(2) Raise window glass and regulator to full up

position.

(3) Tighten screws attaching window regulator to

glass.

(4) Install lower belt brackets.
(5) Install inner door belt door trim panel and

inner belt weatherstrip.

(6) Install outer belt weatherstrip.
(7) Operate window and check for interference.

Adjust glass as necessary.

Fig. 5 REAR DOOR CHECK STRAP

1 - REAR DOOR UPPER HINGE
2 - REAR DOOR
3 - REAR DOOR CHECK STRAP
4 - REAR DOOR LOWER HINGE

Fig. 6 REAR DOOR GLASS

1 - REAR DOOR WINDOW GLASS
2 - REAR DOOR
3 - REAR DOOR WINDOW POWER REGULATOR

23 - 76

DOORS - REAR

PT

REAR DOOR CHECK STRAP (Continued)

REAR DOOR OUTSIDE
HANDLE

REMOVAL

(1) Remove door trim panel.
(2) Raise door glass.
(3) Disengage clips attaching linkage rods to door

latch.

(4) Remove nuts attaching outside handle to door

(Fig. 7).

(5) Remove outside handle.

INSTALLATION

(1) Connect lock and latch rods to door handle.
(2) Position door outside handle in opening (Fig.

7).

(3) Tighten attaching nuts.
(4) Connect linkage rods to latch.
(5) Install door trim panel.

REAR DOOR HINGE

REMOVAL

NOTE: If both hinges on one door are to be
replaced, remove and install one hinge completely
prior to beginning the second hinge.

(1) With rear door closed apply tape to secure door

into body.

(2) Open front door.
(3) Mark position of hinge on both the door end

frame and lower B-pillar to ease installation.

(4) Remove B-pillar lower trim panel.
(5) Remove bolts attaching hinge to door end

frame (Fig. 5).

(6) Remove bolts attaching hinge to lower B-pillar.
(7) Remove door hinge from vehicle.

INSTALLATION

NOTE: If both hinges on one door are to be
replaced, remove and install one hinge completely
prior to beginning the second hinge.

NOTE: Do not grease door hinges.

Fig. 7 REAR DOOR OUTSIDE HANDLE

1 - REAR DOOR BELLCRANK TO LATCH LINK AND SLEEVE
2 - REAR DOOR INSIDE ROD TO LATCH LINK AND SLEEVE
3 - REAR DOOR LOCK LATCH
4 - REAR DOOR
5 - REAR DOOR OUTSIDE HANDLE

6 - REAR DOOR LATCH LINKAGE KNOB AND ROD
7 - REAR DOOR OUTSIDE HANDLE LINK TO LATCH
8 - REAR DOOR WIRE POWER LOCK CONNECTOR
9 - REAR DOOR POWER LOCK MOTOR AND BRACKET
10 - REAR DOOR POWER LOCK ACTUATOR TO LATCH LINK

PT

DOORS - REAR

23 - 77


Content   ..  902  903  904  905   ..